Monthly Archives: April 2013

Behavioral Android Malware Analysis with REMnux and Mobisec

[Editor’s Note: In the article below, Angel Alonso-Parrizas who is a SANS GSE certified, illustrates a series of very useful tools and techniques that security and malware analysts can apply to analyze mobile code malware. This way you can get familiar with malware specimens and analyze it on your own. Using free tools suite like Remnux or Mobisec you can put malware under a controlled environment and determine its purpose and functions. ~Luis]

REMnux-logo1
Last week Lenny Zelster released version 4 of  REMnux, a Linux distribution thought to perform malware analysis.
REMnux includes  a set of tools to  facilitate and speed up the analysis and although REMnux is not designed to perform Android malware analysis, it is possible to use some of the tools for this purpose.
On the other hand the guys from  Secure Ideas have deployed a Linux distribution named MobiSec which is designed to evaluate and analyze the security of mobile devices and the applications running on them. Also, it has many tools, emulators, etc.
The idea of this post it to show both distributions and combine the functionalities of them with a simple example for Android. The purpose isn’t to do an exhaustive malware analysis, but  explain how these distributions can be used to perform part of the behavior analysis.
It is possible to download REMnux in OVF/OVA which can be imported in VMWare or VirtualBox. On the other hand MobiSec requires to download the ISO and to install it manually . Once both OS have been installed, and on account that we are dealing with malware, it is key to setup the network isolated, without internet access, hence in ‘Host only’ mode. In order to facilitate the analysis, we have to setup the DNS and Gateway of MobiSec to REMnux’s IP.
Mobisec, beside other tools, it includes several version of Android emulator which facilitates a lot the work when you need to test something in Android in a quick way, because there is not need to setup anything. For this example we will use version 4.0.3
mobisec
Next step is to push the malware into the emulator which is running in MobiSec. In this example we will download the sample from http://contagiominidump.blogspot.com.es to the phisicall machine and afterwars it will be copied to MobiSec through SCP. The malware chosen is l
Android.Exprespam.  The last step is to install the file through  the ‘adb’ commands (adb install).
malwareinstallation

In the meantime, and before execute the malware in the emulator, let’s prepare REMnux. REMnux allows to run services (like a honeypot) to interact with the malware. For example, we can run a DNS server to resolve domain, IRC server, a SMTP server or a HTTP server

First step is to run ‘fakedns’ which will resolve any domain to REMnux IP and at the same time launch Wireshark to have visibility on what’s going on
In this case we can see that the malware is asking for the domain ftukguhilcom.globat.com and REMnux is replying with the IP of itself.
fakedns-remnux
We can observe in Wireshark that the malware is trying to make a HTTPS
connection, which is RST by REMnux as there is no service running on that port.
Wireshark-dnsquery
Next step is to emulate the HTTPS server in order to see the traffic. REMnux includes an HTTP server and stunnel, which permits to combine both tools to provide an HTTPs server. To do that it is necessary to launch the server with ‘httpd start’ and setup stunnel with an autosigned certificated.
wireshark-HTTPS-after-change
If we look to the HTTP logs we can see there is not any HTTP request. This is because it is necessary to accept the autosigned certificate when accessing through HTTPs. This might be because the malware checks the certificate, as an additional control, or the malware is using Android web browse which is not imported in the repository.
HTTP-logs-empty

If it were the second case, it would be possible to import the certificate in Android’s repository and avoid the SSL error. As the purpose of this post isn’t to perform a full malware analysis but   to show the tools in REMnux y MobiSec we are going to continue with the analysis of other malware which performs HTTP requests. For this second case we will use  Chuli.A

The steps are the same as previously: to install the malware and run it.

malware-chuliA

In this case the malware accesses directly and IP, instead of resolving a hostname first. Luckily, REMnux is able to reply to such requests automatically hence looking at Wireshark it is possible to see that the HTTP resource requested is ‘android.php’ which it doesn’t exists in the server.

wireshark-malware-3

In the meantime we can see in the HTTP logs all the requests to android.php. On account that the file doesn’t exist, we are going to create it in order to interact with the malware and see what happens when targeting the resource.

android.php

Now, once the resource exists, it is possible to see the replies from the server with code 200 OK.

android.php-OK

Probable in this POST request the malware has informed the C&C that a new device has been compromised and it sends some information about it. Likely the string  ‘phone1365842571243’ sent in the POST is a unique ID.

Given the fact that the reply is 200 now the malware is able to perform other request as it is possible to see in the logs of the HTTP server. To be precise, the requested resource is  ‘POST /data/phone1365842571243/process.php’. The same way than before, and in order to interact with the malware, we are going to creare such resource.phone1365
It seems it is working as there are several POST request which can be analyzed with Wireshark. This requests contains several information.
phone1365-posts
For example, in one of them the information sent looks like GPS coordinates encoded somehow.
phone1365-GPS
In other one it looks like the contacts are being sent (but in this case the contact list is empty so the information sent is short)
phone1365-contact
We could continue analyzing all the request and check which information is being sent through the different POST requests but this is not the objective of this post.
The important part is to keep in mind that it is possible to use MobiSec and REMnux to interact dynamically with malware creating fake DNS replies, HTTP services, web objects, etc, while advancing in the malware analysis. Also, MobiSec integrates several tools to perform malware reverse but this will be explain in other post.
Tagged , , ,

The Evil Bit

IPv4headerIt was 10 years ago that the Internet Engineering Task Force (IETF) released the Request For Comments (RFC) 3514 “The Security Flag in the IPv4 Header” authored by Steve Bellovin.

This RFC brought to the Internet community what  could have been the security silver bullet. What do you mean? Well, due to the fact that security devices like firewalls, intrusion detection systems, proxies and others have a hard time trying to determine if a packet has malicious intent or is rather normal. Steve Bellovin came up with the idea of creating the Evil bit, taking advantage of the unused high-order bit of the IP Flags field.

Very simple mechanism! Consider this: benign packets should have the Evil Bit set to 0 and those that have malicious intent will have the Evil Bit set to 1.

How does it work? When using offensive tools or crafting packets with malicious intent. The software or the attacker must set the Evil bit. For example fragments that are dangerous must have the Evil bit set. When executing a port scanning if the intent is malicious the Evil bit should be set. When sending an exploit via Metasploit the Evil bit should be set and the list goes on. On the other hand if the packets don’t have malicious intent the bit should not be set.

How should the security systems process such packets?

When processing packets, devices such as firewall should check the Evil Bit. If it is set they must drop all packets. If the Evil bit if off the packets must not be dropped.

Wonderful idea, but for those who don’t know the RFC was released on the April Fools’ Day. The Evil bit RFC was published on 1st April of 2003. Like many others, this has been another humorous RFC. Humorous Request for Comments have been around for quite some time and is a good read if you have time and want to laugh.
Apart of the Evil bit one that is really hilarious is the RFC 5841 which proposes a TCP option to denote packet mood. For example happy packets which are happy because they received their ACK return packet within less than 10ms. Or the Sad Packets which are sad because they faced retransmission rates greater than 20% of all packets sent in a session. If you want to read more the Wikipedia as its complete list here or the book “The Complete April Fools’ Day RFC“.

Humor apart and for the sake of curiosity you could try to determine if any system process or reply to such packets. I used Scapy which is a powerful packet crafting and manipulation tool. It is written in python and let’s see how could we generate a TCP Syn packet with the Evil Bit set.

Before creating the packet lets just refresh our knowledge about the IP Flags field. In the IP header there 3 bits used for flags and according to the RFC 791:

Bit 0: reserved, must be zero
Bit 1: (DF) 0 = May Fragment, 1 = Don’t Fragment.
Bit 2: (MF) 0 = Last Fragment, 1 = More Fragments.

The normal combinations used with Fragmentation flags are shown in the following table:

MF Bit Frag Offset Meaning
Not Set Zero Not Fragmented
Set Zero First Fragment
Set Non Zero Middle Fragment
Not Set Non Zero Last Fragment

In our case we want to generate a packet that has the highest order bit of the FlaView Postgs field set i.e. Evil Bit.

Which according to the RFC is reserved and must be set zero. However, we will use Scapy to craft a packet that has the Evil bit set with a fragment offset of zero and send it trough the wire and capture it using tcpdump.

#cat myevilpacket.py
#!/usr/bin/python
from scapy.all import *

ip=IP(src="192.168.1.121", dst="192.168.1.2", flags=4, frag=0)
tcpsyn=TCP(sport=1500, dport=80, flags="S", seq=4096)
send(ip/tcpsyn)

# python myevilpacket.py

I will leave the Scapy explanation for another post but would like to briefly mention the usage of flags=4. As you could see in the IPv4 header image the IP Flags field uses 3 bits.  These 3 bits are the highest bits in the 6th byte of the IP Header.  To set the Evil bit we need to set the value to 100 in binary or 4 in hex/integer.

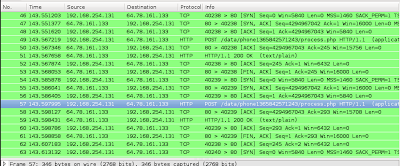
The following picture illustrates the packet that was captured using tcpdump when the myevilpacket.py script was invoked  You could see the Evil bit on.

Evilbit

Tagged , ,