 When an attacker conducts an intrusion using A, B or C technique, some of his actions leave artifact X, Y or Z behind. So, based on the scenario from the last article about PlugX, I collected a disk image and memory image from the domain controller. Over the past years I wrote several articles on how to perform acquisition, mounting and processing of such images and analyze them by creating super timelines, look at different artifacts like Event Logs, Prefetch, ShimCache, AMCache, etc., or analyze NTFS metadata or look for artifacts related to interactive sessions. Today, I’m not going to perform analysis but I’m going to list a quick overview about some of the Windows endpoint artifacts that might give us evidence about the actions that were executed in the previous scenario and help us produce a meaningful timeline. In addition, I list some tools that could be used to analyze those artifacts.
Scenario 1: The attacker placed the filename “kas.exe” on the folder “c:\PerfLogs\Admin”. Which artifacts could record evidence about this action?
- NTFS MFT
- Description: The Master File Table (MFT) is a special system file that resides on the root of every NTFS partition. The file is named $MFT and is not accessible via user mode API’s but can been seen when you have raw access to the disk e.g, forensic image. This special file is a hierarchical database and inside you have records that contains a series of attributes about a file, directory and indicates where it resides on the physical disk and if is active or inactive. The size of each MFT record is usually 1024-bytes. Each record contains a set of attributes. Some of the most important attributes in a MFT entry are the $STANDART_INFORMATION, $FILENAME and $DATA. The first two are rather important because among other things they contain the file time stamps. Each MFT entry for a given file or directory will contain 8 timestamps. 4 in the $STANDARD_INFORMATION and another 4 in the $FILENAME. These time stamps are known as MACE.
- Tools: Parse and analyze it with SleuthKit originally written by Brian Carrier, MFT2CSV from Joakim Schicht or PLASO/log2timeline originally created by Kristinn Gudjonsson
- NTFS INDX Attribute
- Description: The MFT records for directories contain a special attribute called $I30. This attribute contains information about file names and directories that are stored inside a directory. This special attribute is also known as $INDX and consists of three attributes, the $INDEX_ROOT, $INDEX_ALLOCATION and $BITMAP. So, What? Well, this attribute stores information in a B-tree data structure that keeps data sorted so the operating system can perform fast searches in order to determine if a file is present. In addition, this attribute grows to keep track of file names inside the directory. However, when you delete a file from a directory the B-tree re-balances itself but the tree node with metadata about the deleted file remains in a form of slack space until it gets reused. This means we can view the $I30 attribute contents and we might find evidence of files that once existed in a directory but are no longer there.
Tools: o Parse it and analyze it with INDXParse from William Ballenthin or MFT2CSV from Joakim Schicht.
- Description: The MFT records for directories contain a special attribute called $I30. This attribute contains information about file names and directories that are stored inside a directory. This special attribute is also known as $INDX and consists of three attributes, the $INDEX_ROOT, $INDEX_ALLOCATION and $BITMAP. So, What? Well, this attribute stores information in a B-tree data structure that keeps data sorted so the operating system can perform fast searches in order to determine if a file is present. In addition, this attribute grows to keep track of file names inside the directory. However, when you delete a file from a directory the B-tree re-balances itself but the tree node with metadata about the deleted file remains in a form of slack space until it gets reused. This means we can view the $I30 attribute contents and we might find evidence of files that once existed in a directory but are no longer there.
- NTFS $LogFile
- Description: NTFS has been developed over years with many features in mind, one being data recovery. One of the features used by NTFS to perform data recovery is the Journaling. The NTFS Journal is kept inside NTFS Metadata in a file called $LOGFILE. This file is stored in the MFT entry number 2 and every time there is a change in the NTFS Metadata, there is a transaction recorded in the $LOGFILE. These transactions are recorded to be possible to redo or undo file system operations. After the transaction has been logged then the file system can perform the change. When the change is done, another transaction is logged in the form of a commit. The $LOGFILE allows the file system to recover from metadata inconsistencies such as transactions that don’t have a commit. The size of the $LOGFILE can be consulted and changed using chkdsk /l and per default is 65536 KB. Why would $LOGFILE be important for our investigation? Because the $LOGFILE keeps record of all operations that occurred in the NTFS volume such as file creation, deletion, renaming, copy, etc. Therefore, we might find relevant evidence in there.
- Tools: Parse it and analyze it with LogFileParser from Joakim Schicht
- NTFS $UsnJrnl
- Description: The change journal contains a wealth of information that shouldn’t be overlooked. Another interesting aspect of the change journal is that allocates space and deallocates as it grows and records are not overwritten unlike the $LogFile. This means we can find old journal records in unallocated space on a NTFS volume. How to obtain those? Luckily, the tool USN Record Carver written by PoorBillionaire can carve journal records from binary data and thus recover these records
- Tools: Parse and analyze it with UsnJrnl2Csv from Joakim Schicht or from unallocated space with USN Record Carver from PoorBillionaire.
Scenario 2: Which account did the attacker used to log into the system when he placed “kas.exe” on the file system?
- Windows Event Logs
- Description: The Windows Event logs record activities about the operating system and its applications. What is logged depends on the audit features that are turned thus impacting the information that one can obtain. From a forensic perspective the Event Logs capture a wealth of information. The main three Windows Event Logs are Application, System, and Security and on Windows Vista and beyond they are saved on %System32%\winevt\Logs in a binary format. For example the Event id’s 4624, 4625 might give us answers.
- Tools: Parse it and Analyze it with PLASO/Log2timeline, LibEvtx-utils from Joakim Schicht , python-evtx from William Ballenthin or Event Log Explorer. You likely get better results if in your environment if you have consistent and enhanced audit policy settings defined that track both success and failures. In case the attacker deletes the Windows Event Logs, there is the possibility to recover Windows Event Log records from the pagefile.sys or from unallocated space, from Volume Shadow copies or even the system Memory. You could use EVTXtract from Willi Ballenthin to attempt to recover Event logs from raw data.
Scenario 3: Attacker executed the “kas.exe” binary. Which artifacts might record this evidence?
- Windows Prefetch / Superfetch
- Description: To improve customer experience, Microsoft introduced a memory management technology called Prefetch. This functionality was introduced into Windows XP and Win-dows 2003 Server. This mechanism analyses the applications that are most frequently used and preloads them in advance in order speed the operating system booting and application launching. On Windows Vista, Microsoft enhanced the algorithm and introduced SuperFetch which is an improved version of Prefetch. The Prefetch files are stored in %SYSTEMROOT%\Prefetch directory and have a .pf extension. The Superfetch files have a .db extension. Prefetch files keep track of programs that have been executed in the system even if the original file is no longer present. In addition Prefetch files can tell you when the program was executed, how many times and from which path.
- Tools: PLASO/log2timeline, Windows-Prefetch-Parser from Adam Witt, Prefetch Parser from Eric Zimmerman. For Superfetch you could use SuperFetch tools.
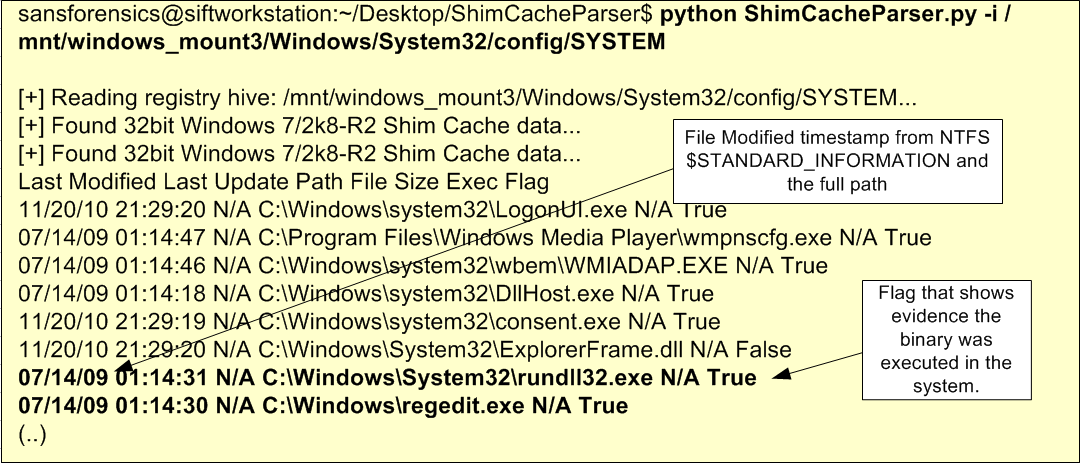
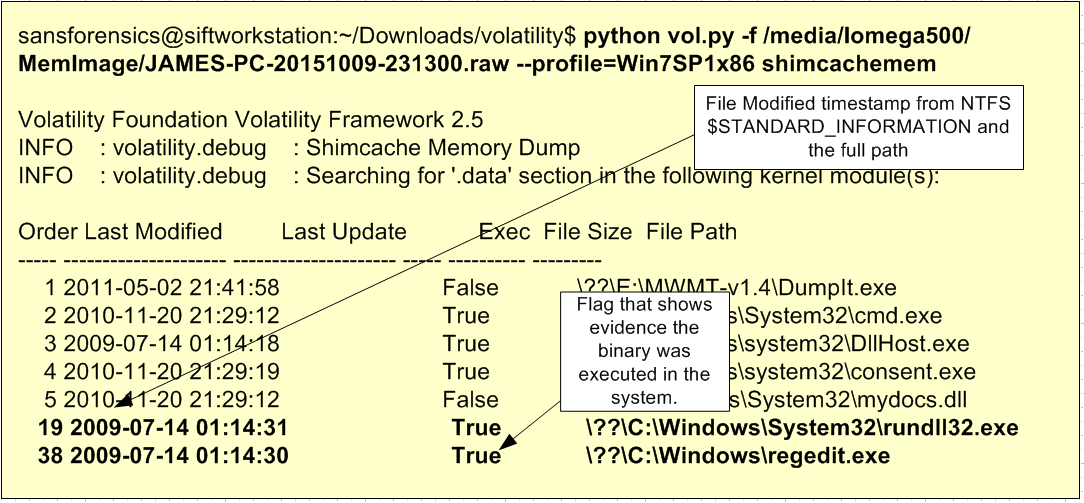
- ShimCache either from Registry or from Kernel Memory
- Description: Microsoft introduced the ShimCache in Windows 95 and it remains today a mechanism to ensure backward compatibility of older binaries into new versions of Microsoft op-erating systems. When new Microsoft operating systems are released some old and legacy application might break. To fix this Microsoft has the ShimCache which acts as a proxy layer between the old application and the new operating system. A good overview about what is the ShimCache is available on the Microsoft Blog on an article written by Tim Newton “Demystifying Shims – or – Using the App Compat Toolkit to make your old stuff work with your new stuff“. The interesting part is that from a forensics perspective the ShimCache is valuable because the cache tracks metadata for binary that was executed and stores it in the ShimCache.
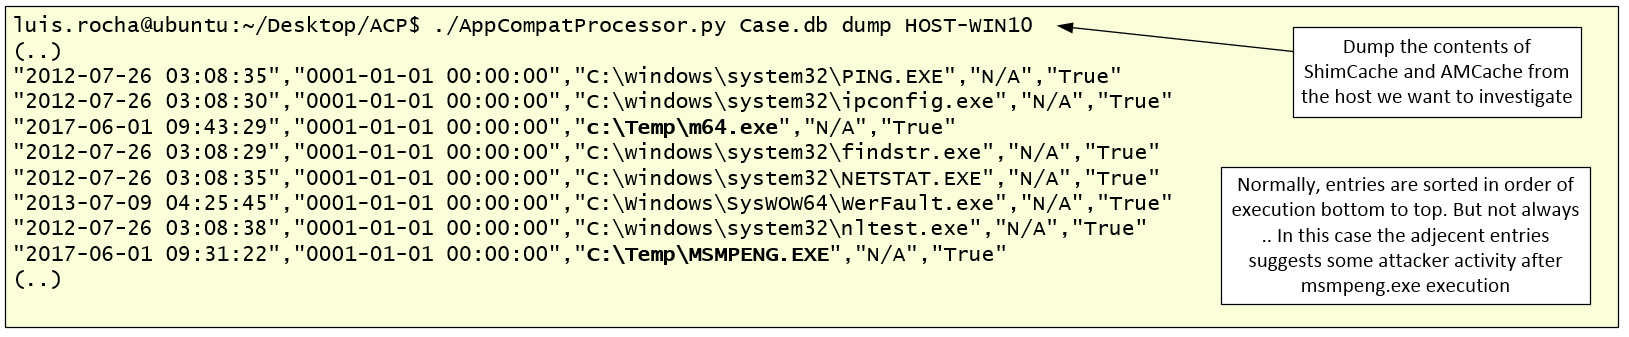
- Tools: From Kernel memory, you can parse it and analyze it with Volatility ShimCache and ShimCacheMem plugin. From the Registry you can use ShimCacheParser https://github.com/mandiant/ShimCacheParser. You can also use RegRipper from Harlan Carvey or AppCompatCacheParser from Eric Zimmerman. In addition, to analyze ShimCache artifacts at scale you can use AppCompatProcessor from Mattias Bevilacqua,
- AMCache
- Description: On Windows 8, Amcache.hve replaced the RecentFileCache.bcf file, a registry file used in Windows 7 as part of the Application Experience and Compatibility feature to ensure compatibility of existing software between different versions of Windows. Similar to its predecessor, Amcache.hve is a small registry hive that stores a wealth of information about recently run applications and programs, including full path, file timestamps, and file SHA1 hash value. Amcache.hve is commonly found at the following location: C:\Windows\AppCompat\Programs\Amcache.hve. The Amcache.hve file is standard within the Windows 8 operating system, but has been found to exist on Windows 7 systems as well.
- Tools: To read the amcache HIVE you could use RegRipper or Willi Ballenthin stand-alone script or Eric Zimmerman AmcacheParser. To analyze AMCache artifacts at scale you can use AppCompatProcessor from Mattias Bevilacqua,
- Windows Event Logs.
- The Windows Event logs – for example id 4688 – could track binary execution if you have the proper audit settings or you use Sysmon.
Scenario 4: The execution of “kas.exe” dropped three files on disk that used DLL Search Order Hijacking to achieve persistence and install the malicious payload. Which artifacts might help identifying this technique?
Identifying evidence of DLL Search Order hijacking is not easy if no other leads are available. Likely you need a combination of artifacts. The following artifacts / tools might help.
- NTFS MFT, INDX, $LogFile, $UsnJrnl.
- Prefetch / SuperFetch.
- ShimCache either from Registry or from Kernel Memory.
- AMCache.
- Windows Event Logs could track process execution and give you leads if you have the proper audit settings or you use Sysmon
- Volatility to perform memory analysis.
- RegRipper – One thing you could try, among many others that this powerful tool allows,is to identify different persistence mechanism that could have resulted as part of the DLL Search Order Hijacking technique.
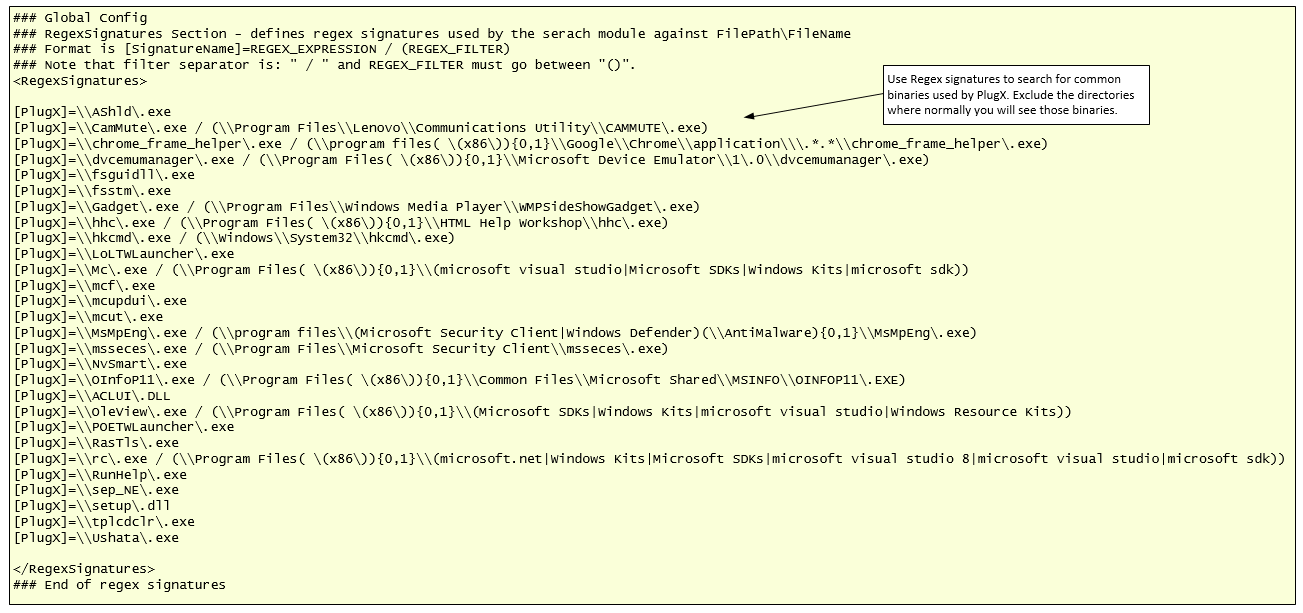
- AppCompatProcessor to analyze ShimCache and AMCache at scale combined with with PlugX signatures.
Scenario 5: The PlugX dropped files have the NTFS timestamps manipulated i.e., It copies the timestamps obtained from the operating system filename ntdll.dll to set the timestamps on the dropped files. What artifacts could be used to detect this?
The time modification will cause a discrepancy between the NTFS $STANDART_INFORMATION and $FILENAME timestamps. You could combine the NTFS artifacts with the execution artifacts to spot such anomalies. Other technique you could use is with AppCompat Processor which has the Time Stomp functionality that will search for appcompat entries outside of the Windows, System and SysWOW64 folders with last modification dates matching a list of known operating system files.
Scenario 6: Attacker used the PlugX controller to Invoke a command shell and execute Windows built-in commands. Are there any artifacts left behind that could help understand commands executed?
- ShimCache either from Registry or from Kernel Memory.
- Memory analysis with Volatility and look for Process creation, Console History, cmdscan or consoles plugin.
- The Windows Event logs could track process execution if you have the proper audit settings or you use Sysmon.
Scenario 7: Attacker established a persistence mechanism either using a Service or Registry Key.
- Producing a timeline of the Registry would help identify the last modification dates of the registry keys. You could use RegRipper from Harlan Carvey or RECmd from Eric Zimmerman. The Windows Event logs would also help in case the there was a service created on the operating system. For example Event ID 7009, 7030, 7035, 7036, 7040, 7023 or 7045 could help. In addition, to list the services and its properties you could perform memory analysis with Volatility or use RegRipper.
Scenario 8: The attacker accessed the Active Directory database using the “ntdsutil.exe” command. What could be used to detect this activity?
- As we saw previously, command execution could be identified using ShimCache either from Registry or from Kernel Memory. Because “ntdsutil.exe” would be executed on a Server system, Prefetch won’t help here because its not enabled on Server systems. One of the most usefull artifacts would be the Windows Event logs but you need to have the right settings so it could track binary execution and the interactions with the Active Directory. One thing that might help in case the memory image has been acquired not long after the attacker activity is to perform memory analysis and creating a timeline of the artifacts with Volatility might help identifying the process creation and its parent(s). In addition, you might get interesting leads just by running strings (little and big endian) on the pagefile.sys. Other than that, the execution of “ntdsutil.exe” the way it was executed on the scenario, leaves behind artifacts on the NTFS metadata.
That’s it for today. With this article I presented a quick listing on some artifacts and tools that can help you perform forensic analysis on a system and help you answer your investigative questions. Many other tools and artifacts would be available depending on the attacker activities, for example if the attacker logged into a system interactively, but the ones listed might give you a starting point and might help you understand what happened and when. One thing that would greatly complement the findings of a system forensic analysis the network data such as the ones that comes from Firewall, Router, IDS or Proxy logs or any other kind of networking logs you might have. Specially if attacker is using a C2 and is clearing evidence such as the threat group that used a file named “a.bat” to clean several artifacts as illustrated on the “Paranoid PlugX” article written by Tom Lancaster and Esmid Idrizovic from Unit 42.
Happy hunting and If you have dealt with a security incident where PlugX was used, please leave your comments about the tools or techniques you used to detect it.