Tag Archives: malware

Dynamic Malware Analysis with REMnux v5 – Part 1

REMnux-logo1 [Part 1 illustrates a series of very useful tools and techniques used for dynamic analysis. Security incident handlers and malware analysts can apply this knowledge to analyze a malware sample in a quick fashion using the multi-purpose REMnux v5. This way you can extract IOCs that might be used to identify the malware across your defense systems and aid your incident response actions. ~Luis]

Malware analysis is a interesting topic nowadays. It requires a fairly broad of knowledge and practical experience across different subjects. My background is in systems and infrastructure which means I am more confident with the dynamic analysis methodology than the static analysis one. Some of the readers have similar background. However, if you are willing to roll your sleeves and spend time in order to learn and be proficient with the different tools and techniques static analysis can done – hopefully will write about basic static analysis in a near future. Additionally is intellectually challenging.

One of the goals of performing malware analysis is to determine the malware actions and get insight into its behavior and inner workings by analyzing its code. By doing this we can find answers to pertinent questions such as:

  • What are the malware capabilities?
  • What is the worst it can do?
  • Which indicators of compromise (IOC) could be used identify this malware in motion (network), at rest (file system) or in use (memory)?  – These IOCs can then be used across our defense systems and in our incident response actions.

The process consists of executing the malware specimen in a safe, secure, isolated and controlled environment.The dynamic analysis methodology allows you to determine the malware behavior and how it interacts with the network, file system, registry and others. In this post I go trough a technique to determine its behaviour at the network level. In this way we can start answering the previous questions.

How?

A simple and effective manner to execute malware analysis in an safe, isolated and controlled fashion would be to use a second hand laptop with enough RAM and fast I/O like a SSD drive. Then on top of it a virtualization software. My personal preferences goes VMware Workstation due to the wide range of operating systems supported, and affordable price. Essentially two virtual machines. One machine running the resourceful and multi-purpose REMnux v5.

For those who don’t know, REMnux is a fantastic toolkit based on Ubuntu created by Lenny Zeltser that provides an enormous amount of tools preinstalled to perform static and dynamic malware analysis. The tools installed have the ability to analyze Windows and Linux malware variants. You can download it from either as a Live CD or a preconfigured virtual appliance for Vmware or VirtualBox from here.

The second machine will be running Windows XP or 7 32 Bits. That will get you started. Then configure the environment and install the required tools on the disposable – relying heavily on VMware snapshots – Windows machine.

In the first technique, I want REMnux to act as gateway, dns server and proxy – including SSL – . This will allow us to intercept all network communications originating from the infected machine. The following picture illustrates the methodology for dynamic analysis.

malware-analysis-framework

The illustration should be self-explanatory. In this manner, any DNS request made by the infected machine will be redirected to the REMnux. If the malware is not using DNS but using hardcoded IP addresses, the requests will go through the default gateway which is pointing to the REMnux. The REMnux by its turn will have iptables configured to redirect all received traffic either on port TCP 80 or 443 to TCP port 8080. On this port – TCP 8080 – Burp Suite is listening as a transparent Proxy. In this way you will have visibility and control into all network communications initiated by the infected machine.

On REMnux the steps to perform this configuration are:

  1. Define the Network adapter settings on VMware Workstation to be in a custom virtual networkg., VMnet5.
  2. Define a static IP
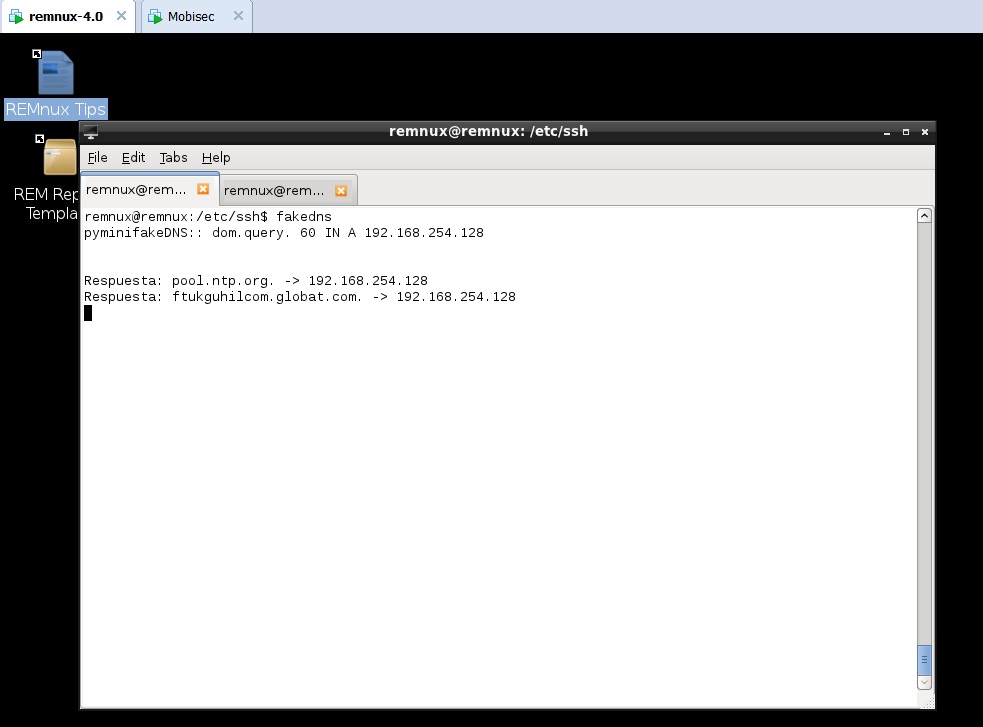
  3. Start FakeDNS to answer any DNS requests.
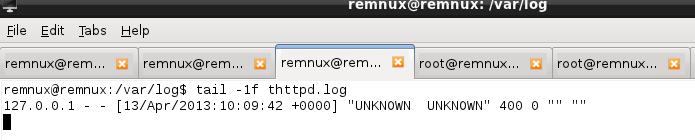
  4. Start HTTP daemon to answer HTTP requests.
  5. Redirect HTTP and HTTPS traffic to port TCP 8080 by configuring redirect rules via iptables.
  6. Intercept HTTP requests using BURP Suite in Invisible mode on port 8080
  7. Optionally you run tcpdump to capture all the networking traffic (allows you to create IDS signatures).

Te necessary commands to perform steps 3 to 6 are:

remnux@remnux:~$ sudo fakedns 192.168.1.23
dom.query. 60 IN A 192.168.1.23

Open another shell:

remnux@remnux:~$ httpd start
Starting web server: thttpd.
remnux@remnux:~$ sudo sysctl -w net.ipv4.ip_forward=1
net.ipv4.ip_forward = 1
remnux@remnux:~$ sudo iptables -t nat -A PREROUTING -i eth0 -p tcp --dport 80 -j REDIRECT --to-port 8080
remnux@remnux:~$ sudo iptables -t nat -A PREROUTING -i eth0 -p tcp --dport 443 -j REDIRECT --to-port 8080
remnux@remnux:~$ sudo iptables -t nat -L
Chain PREROUTING (policy ACCEPT)
target     prot opt source               destination        
REDIRECT   tcp  --  anywhere             anywhere            tcp dpt:https redir ports 
REDIRECT   tcp  --  anywhere             anywhere            tcp dpt:www redir ports 
REDIRECT   tcp  --  anywhere             anywhere            tcp dpt:https redir ports 

remnux@remnux:~$ burpsuite
[1] 8912

malware-analysis-framework-burp

Then, on Windows the initial steps are:

  1. Define the Network adapter settings in the VMware to be in the same custom virtual network as the REMnux.
  2. Configure IP address in the same range as the REMnux
  3. Configure the DNS server to point to the REMnux
  4. Define the default GW as being the REMnux
  5. Test the network settings
  6. Create a VMware snapshot
  7. Move the malware sample to the machine
  8. Start necessary tools (if needed)
  9. Execute the malware sample

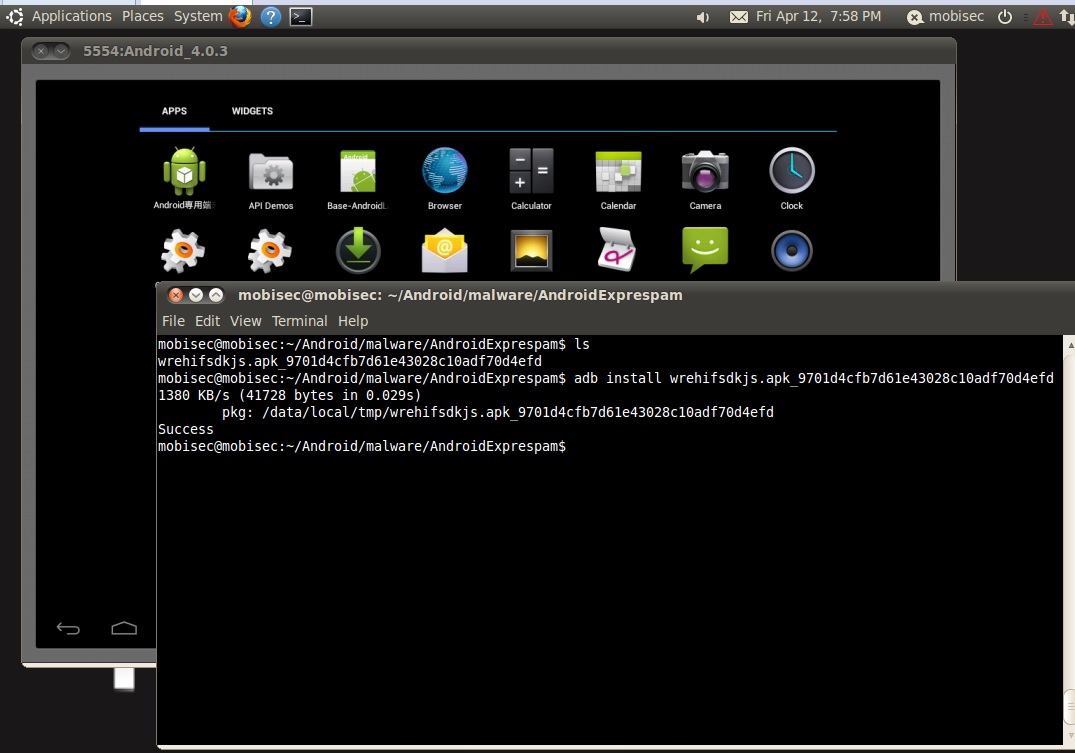
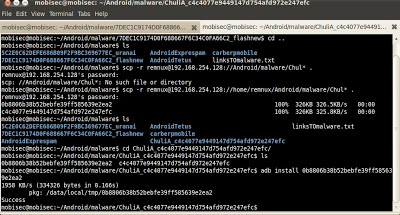
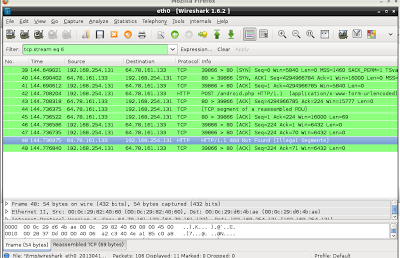
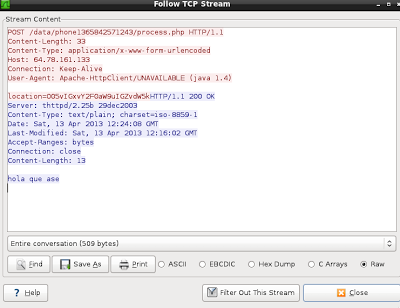
After having the machines ready you can move your malware sample to the disposable Windows machine and execute it. In this case I executed a malware variant of Torrentlocker. The result is shown in the following picture:

malware-analysis-framework-result1

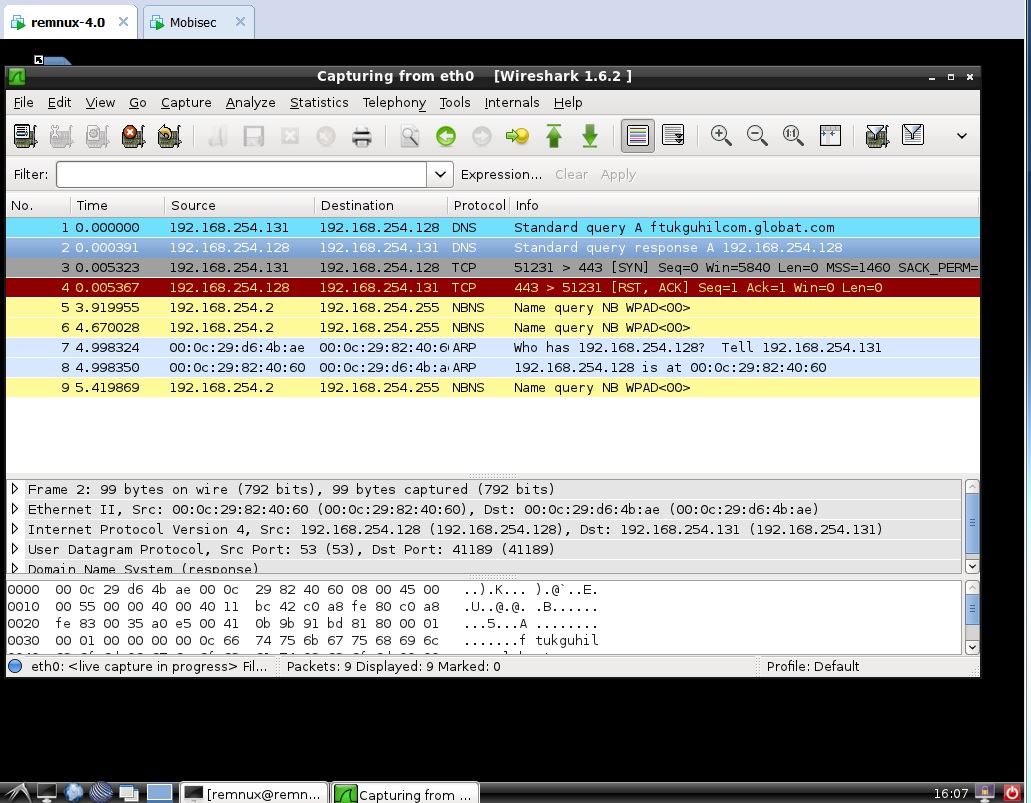
  1. There is a query from the Windows machine to the DNS server asking the A record of the address allwayshappy.ru
  2. FakeDNS answers back with the IP of the REMnux
  3. Windows machines establishes a SSL connection to the IP REMnux on port 443 which is redirected trough iptables to port 8080
  4. The traffic is Intercept by Burp Suite and can be seen and manipulated in clear.
  5. The request can be forwarded to localhost on port 80 to fake an answer.

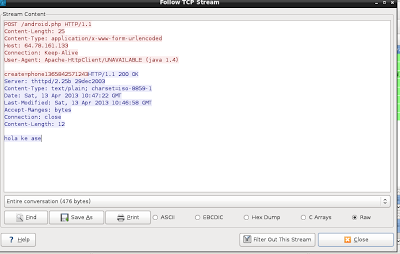
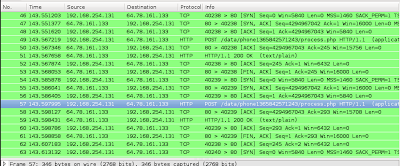
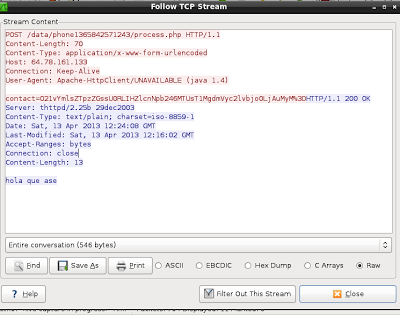
Following the first request, this malware performs a second request, potentially sending some more data. Unfortunately the request is encrypted – that would be a good challenge for static analysis!

malware-analysis-framework-burp2

As you could see in a quick manner you could determine that the malware tries to reach out to a C&C. This type of knowledge can then be used to find other compromised systems and start your incident response actions.

You might see this as a time-intensive process that does not scale – think a company that needs to analyse hundreds of samples per month, week or per day – solution is automation. Several automated malware analysis system have appeared over the last years such as CWSandbox, Norman Sandbox, Anubis, Cuckoo and others. Essentially these systems load the malicious binary into a virtual machine and execute it. During execution all the interactions with I/O, memory, registry and network are tracked and then a report is produced. This greatly reduces the costs of malware analysis. However, is good to understand how to do manual analysis because many times the malware samples only trigger on specific conditions or bypasses the sandboxes. In addition you start to be proficient on different tools and techniques!


References:
SANS FOR610: Reverse-Engineering Malware: Malware Analysis Tools and Techniques

Tagged , , , , , , , ,

Reverse-Engineering and Malware Analysis

malwareLast year I had the chance to go to SANS Orlando 2013 in Orlando, Florida – thank you Wes! – which is one of the yearly’s biggest SANS conferences only outpaced in size by SANS FIRE in Baltimore, Maryland.  I went there to take the 5 days course – FOR 610 Reverse-Engineering Malware: Malware Analysis Tools and Techniques – with Lenny Zeltser. Apart of the course the main choice was due to the instructor. Lenny is a brilliant fellow and top rated SANS instructed. Awesome writer and fantastic lecturer.

I was very enthusiastic about taking out the most of it. One reason was  because I had read the Malware Fighting  Malicious Code book from Ed Skoudis where Lenny wrote chapter 2 and 4.  This book is 10 years and it’s still a classic, a historical object and definitely a must read to someone who is part of the security community. Other reason was that l wanted to get the skills to be capable of securely analyze, debug, and disassemble malicious programs in order to translate this capability into actionable threat intelligence.

On the first day of the training we got introduced to 2 approaches to examine malicious programs. Behavior analysis and static/code analysis. To perform this we started by setting up a controlled and isolated environment. A simple and inexpensive malware analysis lab running on VMware. Using this lab we used a set of free tools that allowed us to determine what the malicious program does and how it interacted with the file system, network, registry and memory. We also got introduced to REMnux . A lightweight Linux distribution for assisting malware analysts with reverse-engineering malicious software. The distribution is based on Ubuntu and is maintained by Lenny Zeltser.  Using a set of Windows tools, the REMnux distro plus a variety techniques we  got a better understanding how we could analyze malware and determine its capabilities.  Then we got deeper in order to make a detailed analysis of the malware by using reverse engineering tools and different methods. By using techniques to find strings in the executable, run a disassembler (IDA Pro),  load the executable into a debugger (OllyDbg) and execute it and look at the API calls being made we got a glimpse in the world of code analysis. After the lab was set and we got an understanding of the processes we will follow the fun started! With several hand-on labs and different specimens we observed what the malware does and we could document the findings and translate them into indicators of compromise and actionable intelligence that can be used to proactively detect and monitor threats.

Day two started with additional malware analysis approaches. We started to get introduced into packed executable’s and what patching means. Also we unpacked malicious executables using simple packing techniques. Here is where we began the journey on x86 Intel assembly. On the second half of day two we covered browser malware and flash based malware and how to use REMnux to use behaviors and code analysis techniques to analyze web malware. It was impressive to see the amount of ingenious techniques enforced by the bad guys to deliver malicious stuff.

Day three is a deep dive into malicious code analysis. Its starts with core reversing engineering concepts and you spend the rest of the day playing with malicious code at the assembly level. It’s the all day looking at a dissasembler and a debugger. Throughout the material and the exercises you get more and more exposed to x86 assembly stuff. We manage to use the debugger to control malicious program execution (step in, over, breakpoints) and monitor or change its state (registry and memory).   On this day we also covered user mode rootkits, key loggers, sniffers, DLL injection and downloader’s – great stuff!

Day four, even after 10 hours sleep I doubt I had enough processing power on my neurons to absorb all Lenny had to say. As complementary strategy I gave a lot of use to my pencil and wrote as much notes as possible in my courseware material. During the first half of the day we were shown the techniques that the malware writes use to protect their programs. Packing was one. But more complex techniques such as anti-disassembly, anti-debugging and anti-VMware and others were demonstrated. It’s an extraordinary arms race between good and evil. A huge amount of hands on exercises were made so we could reinforce all these concepts and techniques. Was also amazing to see Lenny describing how different malware specimens use mazes of code and junk code to frustrates the analyst and mislead him. By enforcing this techniques, in case the analyst does not have enough resources (time/money) he will soon stop doing his analysis and move on to something else – Evil will win – an interesting trade-off. Apart of the techniques we were taught different techniques to bypass those malware defenses. One example was to infect a system with a piece of malware that was packed/obfuscated. When execute, the malware  loaded its unpacked code into memory which allowed us to examine it. By staying resident in memory because in the file system it was encrypted we used techniques do dump it from memory. To do this we used Chimprec to extract the process from memory and then rebuilding its  PE header import table in order to be executed. Other technique was the usage of a debugger to patch an executable to avoid anti-debugging mechanism. Other tools like LordPE and OllyDump are also used. On the second half of the day, shellcode analysis and Web malware anti-deobfuscation techniques were described and practiced.

Finally on day 5 we spent the first half of the day learning the techniques and tools for analyzing malicious Microsoft Office (Word, Excel, PowerPoint) and Adobe PDF documents. The second half of the day is spent on memory analysis forensics with the help of Volatility Framework and associated plug-ins. The course ends with explanation of the different techniques used by root kit infections and its deceptive techniques and how you could use memory and code analysis to determine and un-hide their capabilities.

The course is extremely technical and deep and very hands-on. I was overwhelmed with the amount of information. After day 3 I was feeling like I was drinking from the fire hose. The course is part of the SANS digital forensics and Incident response curriculum. It is very well structured and the sequential steps it follows are very well thought out.

This particular security field is a very interesting one, it will continue to evolve and it is challenging. Also as the security industry continues to progress from a reactive approach to a more proactive one, the malware analyst type of skills will have an increased demand. More and more companies are funding their own threat intelligence operations with this kind of capability in-house.

If you are an incident handler, sysadmin, researcher or simple want to be the next digital Sherlock Holmes you may also want to look into the Malware Analyst’s Cookbook and DVD: Tools and Techniques for Fighting Malicious Code book and the Practical Malware Analysis. Other relevant and free resources are the Dr. FU’s Security blog on Malware analysis tutorials. Thet Binary Auditing site which contains free IDA Pro training material.  Finally, the malware analysis track  in the Open Security Training site is awesome. It contains several training videos and material for free.

Tagged , , , ,

Behavioral Android Malware Analysis with REMnux and Mobisec

[Editor’s Note: In the article below, Angel Alonso-Parrizas who is a SANS GSE certified, illustrates a series of very useful tools and techniques that security and malware analysts can apply to analyze mobile code malware. This way you can get familiar with malware specimens and analyze it on your own. Using free tools suite like Remnux or Mobisec you can put malware under a controlled environment and determine its purpose and functions. ~Luis]

REMnux-logo1
Last week Lenny Zelster released version 4 of  REMnux, a Linux distribution thought to perform malware analysis.
REMnux includes  a set of tools to  facilitate and speed up the analysis and although REMnux is not designed to perform Android malware analysis, it is possible to use some of the tools for this purpose.
On the other hand the guys from  Secure Ideas have deployed a Linux distribution named MobiSec which is designed to evaluate and analyze the security of mobile devices and the applications running on them. Also, it has many tools, emulators, etc.
The idea of this post it to show both distributions and combine the functionalities of them with a simple example for Android. The purpose isn’t to do an exhaustive malware analysis, but  explain how these distributions can be used to perform part of the behavior analysis.
It is possible to download REMnux in OVF/OVA which can be imported in VMWare or VirtualBox. On the other hand MobiSec requires to download the ISO and to install it manually . Once both OS have been installed, and on account that we are dealing with malware, it is key to setup the network isolated, without internet access, hence in ‘Host only’ mode. In order to facilitate the analysis, we have to setup the DNS and Gateway of MobiSec to REMnux’s IP.
Mobisec, beside other tools, it includes several version of Android emulator which facilitates a lot the work when you need to test something in Android in a quick way, because there is not need to setup anything. For this example we will use version 4.0.3
mobisec
Next step is to push the malware into the emulator which is running in MobiSec. In this example we will download the sample from http://contagiominidump.blogspot.com.es to the phisicall machine and afterwars it will be copied to MobiSec through SCP. The malware chosen is l
Android.Exprespam.  The last step is to install the file through  the ‘adb’ commands (adb install).
malwareinstallation

In the meantime, and before execute the malware in the emulator, let’s prepare REMnux. REMnux allows to run services (like a honeypot) to interact with the malware. For example, we can run a DNS server to resolve domain, IRC server, a SMTP server or a HTTP server

First step is to run ‘fakedns’ which will resolve any domain to REMnux IP and at the same time launch Wireshark to have visibility on what’s going on
In this case we can see that the malware is asking for the domain ftukguhilcom.globat.com and REMnux is replying with the IP of itself.
fakedns-remnux
We can observe in Wireshark that the malware is trying to make a HTTPS
connection, which is RST by REMnux as there is no service running on that port.
Wireshark-dnsquery
Next step is to emulate the HTTPS server in order to see the traffic. REMnux includes an HTTP server and stunnel, which permits to combine both tools to provide an HTTPs server. To do that it is necessary to launch the server with ‘httpd start’ and setup stunnel with an autosigned certificated.
wireshark-HTTPS-after-change
If we look to the HTTP logs we can see there is not any HTTP request. This is because it is necessary to accept the autosigned certificate when accessing through HTTPs. This might be because the malware checks the certificate, as an additional control, or the malware is using Android web browse which is not imported in the repository.
HTTP-logs-empty

If it were the second case, it would be possible to import the certificate in Android’s repository and avoid the SSL error. As the purpose of this post isn’t to perform a full malware analysis but   to show the tools in REMnux y MobiSec we are going to continue with the analysis of other malware which performs HTTP requests. For this second case we will use  Chuli.A

The steps are the same as previously: to install the malware and run it.

malware-chuliA

In this case the malware accesses directly and IP, instead of resolving a hostname first. Luckily, REMnux is able to reply to such requests automatically hence looking at Wireshark it is possible to see that the HTTP resource requested is ‘android.php’ which it doesn’t exists in the server.

wireshark-malware-3

In the meantime we can see in the HTTP logs all the requests to android.php. On account that the file doesn’t exist, we are going to create it in order to interact with the malware and see what happens when targeting the resource.

android.php

Now, once the resource exists, it is possible to see the replies from the server with code 200 OK.

android.php-OK

Probable in this POST request the malware has informed the C&C that a new device has been compromised and it sends some information about it. Likely the string  ‘phone1365842571243’ sent in the POST is a unique ID.

Given the fact that the reply is 200 now the malware is able to perform other request as it is possible to see in the logs of the HTTP server. To be precise, the requested resource is  ‘POST /data/phone1365842571243/process.php’. The same way than before, and in order to interact with the malware, we are going to creare such resource.phone1365
It seems it is working as there are several POST request which can be analyzed with Wireshark. This requests contains several information.
phone1365-posts
For example, in one of them the information sent looks like GPS coordinates encoded somehow.
phone1365-GPS
In other one it looks like the contacts are being sent (but in this case the contact list is empty so the information sent is short)
phone1365-contact
We could continue analyzing all the request and check which information is being sent through the different POST requests but this is not the objective of this post.
The important part is to keep in mind that it is possible to use MobiSec and REMnux to interact dynamically with malware creating fake DNS replies, HTTP services, web objects, etc, while advancing in the malware analysis. Also, MobiSec integrates several tools to perform malware reverse but this will be explain in other post.
Tagged , , ,