
 In this article I would like to go over some of the digital forensic artifacts that are likely to be useful on your quest to find answers to investigative questions. Specially, when conducting digital forensics and incident response on security incidents that you know the attacker performed its actions while logged in interactively into a Microsoft Windows systems. Normally, one of the first things I look is the Windows Event logs. When properly configured they are a treasure trove of information, but in this article, I want to focus on artifacts that can be useful even if an attacker attempts to cover his tracks by deleting the Event Logs.
Let’s start with ShellBags!
To improve the customer experience, Microsoft operating systems stores folder settings in the registry. If you open a folder, resize its dimensions, close it and open it again, did you notice that Windows restored the view you had? Yep, that’s ShellBags in action. This information is stored in the user profile hive “NTUSER.dat” within the directory “C:\Users\%Username%\” and in the hive “UsrClass.dat” which is stored at “%LocalAppData%\Microsoft\Windows”. When a profile is loaded into the registry, both hives are mounted into the HKEY_USERS and then then linked to the root key HKEY_CURRENT_USER and HKEY_CURRENT_USER\Software\Classes respectively. If you are curious, you can see where the different files are loaded by looking at the registry key “HKEY_LOCAL_MACHINE\SYSTEM\CurrentControlSet\Control\hivelist”. On Windows XP and 2003 the ShellBags registry keys are stored at HKEY_USERS\{SID}\Software\Microsoft\Windows\Shell\ and HKEY_USERS\{SID}\Software\Microsoft\Windows\ShellNoRoam\. On Windows 7 and beyond the ShellBags registry keys are stored at “HKEY_USERS\{SID}_Classes\Local Settings\Software\Microsoft\Windows\Shell\”.
Why are ShellBags relevant?
Well, this particular artifact allows us to get visibility about the intent or knowledge that a user or an attacker had when accessing or browsing directories and, when. Even if the directory does no longer exists. For example, an attacker that connects to a system using Remote Desktop and accesses a directory where his toolkit is stored. Or an unhappy employee that accesses a network share containing business data or intellectual property weeks before his last day and places this information on a USB drive. ShellBags artifacts can help us understand if such actions were performed. So, when you obtain the NTUSER.dat and UsrClass.dat hives you could parse it and then placed events into a timeline. When corroborated with other artifacts, the incident response team can reconstruct user activities that were performed interactively and understand what happened and when.
Which tools can we use to parse ShellBags?
I like to use RegRipper from Harlan Carvey, ShellBags Explorer from Eric Zimmerman or Sbags from Willi Ballenthin. The below picture shows an example of using Willi’s tool to parse the ShellBags information from the NTUSER.dat and UsrClass.dat hives. As an example, this illustration shows that the attacker accessed several network folders within SYSVOL and also accessed “c:\Windows\Temp” folder.

To give you context, why I’m showing you this particular illustration of accessing the SYSVOL folder, is because they contain Active Directory Group Policy preference files that in some circumstances might contain valid domain credentials that can be easily decrypted. This is a known technique used by attackers to obtain credentials and likely to occur in the beginning of an incident. Searching for passwords in files such as these are simple ways for attackers to get credentials for service or administrative accounts without executing credential harvesting tools.
Next artifact on our list, JumpLists!
Once again, to increase the customer experience and accelerate the workflow, Microsoft introduced on Windows 7 the possibility to allow a user to access a list of recently used applications and files. This is done by enabling the feature to store and display recently opened programs and items in the Start Menu and the taskbar. There are two files that store JumpLists information. One is the {AppId}.automaticDestination-ms and the other is {AppId}.customDestination-ms where {AppId} corresponds to a 16 hex string that uniquely identifies the application and is calculated based on application path CRC64 with a few oddities. These files are stored in the folder “C:\Users\%USERNAME%\AppData\Roaming\Microsoft\Windows\Recent\AutomaticDestinations” and “C:\Users\%USERNAME%\AppData\Roaming\Microsoft\Windows\Recent\CustomDestinations”. The folder AutomaticDestinations contain files {16hexchars}.automaticDestination-ms and these files are generated by common operating system applications and stored in a in Shell Link Binary File Format known as [MS-SHLLINK] that are encapsulated Inside a Compound File Binary File Format known as MS-CFB or OLE. The folder CustomDestinations contain files {16hexchars}.customDestination-ms and these files are generated by applications installed by the user or scripts there were executed and stored in Shell Link Binary File Format known as [MS-SHLLINK].
Why are JumpLists relevant?
Just like like ShellBags, this artifact allows us to get visibility about the intent or knowledge an attacker had when opening a particular file, launching a particular application or browsing a specific directory during the course of an interactive session. For example, consider an attacker that is operating on a compromised system using Remote Desktop and launches a browser, the JumpList associated with it will contains the most visited or the recently closed website. If the attacker is pivoting between system using the Terminal Services client, the JumpList shows the system that was specified as an argument. If an attacker dumped credentials from memory and saved into a text file and opened it with Notepad, the JumpList will show evidence about it. Essentially, the metadata stored on these JumpList files can be parsed and will show you a chronological list of Most Recently Used (MRU) or Most Frequently Used (MFU) files opened by the user/application. Among other things, the information contains the Standard Information timestamps from the list entry and the time stamps from the file at the time of opening. Furthermore, it shows the original file path and sizes. This information, when placed into a timeline and corroborated with another artifact can give us a clear picture of the actions performed.
Which tools can we use to parse JumpLists?
JumpListsView from NIRSOFT, JumpLister from Mark Waon or JumpLists Explorer from Eric Zimmerman. Below an example of using Eric’s tool to parse the JumpLists files. More specifically the JumpList file that is associated with Notepad. As an example, this illustration shows that an attacker opened the file “C:\Windows\Temp\tmp.txt”with Notepad. It shows when the file was created and the MFT entry. Very useful.

Next artifact, LNK files!
Again, consider an attacker operating on a compromised system using a Remote Desktop session where he dumped the credentials to a text file and then double clicked on the file. This action will result in the creation of the corresponding Windows shortcut file (LNK file). LNK files are Windows Shortcuts. Everyone that has used Windows has created a shortcut of your most favorite folder or program. However, the Windows operating system behind the scenes also keeps track of recently opened files by creating LNK files within the directory “C:\Documents and Settings\%USERNAME%\Recent\”. The LNK files, like JumpLists, are stored in Shell Link Binary File Format known as [MS-SHLLINK]. When parsed, the LNK file, contains metadata that, among other things, shows the target file Standard Information timestamps, path, size and MFT entry number. This information is maintained even if the target file does no longer exists on the file system. The MFT entry number can be valuable in case the file was recently deleted and you would like to attempt to recover by carving it from the file system.
Which tools can we use to parse .LNK files?
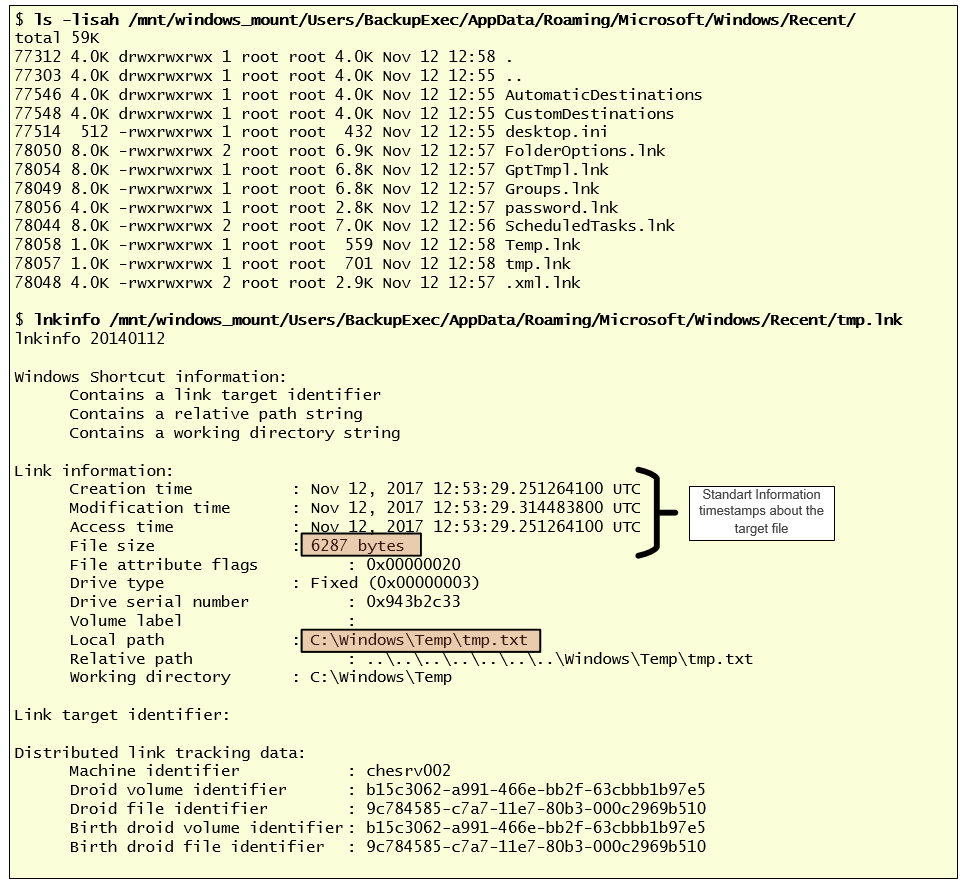
Joachim Metz has an utility that to parse the information from the Windows Shortcut files. The utility is installed by default on SIFT workstation. In the illustration below, while analyzing a disk image, we could see that there are several .LNK files created under a particular profile. Knowing that this profile has been used by an attacker you could parse the files. In this case parsing, when parsing the file “tmp.lnk” file we can see the target file “C:\Windows\Temp\tmp.txt”, its size and when was created.
Next artifact, UserAssist!
The UserAssist registry key keeps track of the applications that were executed by a particular user. The data is encoded using ROT-13 substitution cipher and maintained on the registry key HKEY_USERS\{SID}\Software\Microsoft\Windows\CurrentVersion\Explorer\UserAssist.
Why is UserAssist relevant?
Consider an attacker operating on a compromised system where he launched “cmd.exe” to launch other Windows built-in commands, or opened the Active Directory Domains and Trusts Snap-in “domain.msc” to gather information about a particular domain, or launched a credential dumper from an odd directory. This action will be tracked by the UserAssist registry key. The registry key will show information about which programs have been executed by a specific user and how frequently. Due to the nature of how timestamps are maintained on registry ie., only the last modified timestamp is kept, this artifact will show when was the last time that a particular application was launched.
Which tools can we use to parse the UserAssist registry keys?
Once again RegRipper from Harlan Carvey is a great choice. Another tool is UserAssist from Didier Stevens. Other method that I often use is to use log2timeline using Windows Registry plugin and then grepping for the UserAssist parser. In this example, we can see that an attacker while operating under a compromised account, executed “cmd,exe”, “notepad.exe”and “mmc.exe”. Now combining these artifacts with the Shellbags, JumpLists and .LNK files, I can start to interpret the results.

Next artifact, RDP Bitmap Cache!
With the release of RDP 5.0 on Windows 2000, Microsoft introduced a persistent bitmap caching mechanism that augmented the bitmap RAM cache. With this mechanism, when you do a Remote Desktop connection, the bitmaps can get stored on disk and are available for the RDP client, allowing it to load them from disk instead of waiting on the latency of the network connection. Of course this was developed with low bandwidth network connections in mind. On Windows 7 and beyond the cache folder is located on “%USERPROFILE%\AppData\Local\Microsoft\Terminal Server Client\Cache\ ” and there two types of cache files. One that contains a .bmc extension and a newer format that was introduced on Windows 7 that follows the naming convention of “cache{4-digits}.bin’. Both files have tiles of 64×64 pixels. The .bmc files support different bits per pixel ranging from 8-bits to 32-bits. The .bin files are always 32-bits and have more capacity and a file can store up to 100Mb of data.
Why are RDP Bitmap cache files relevant?
If an attacker is pivoting between systems in a particular environment and is leveraging Remote Desktop then, on the system where the connection is initiated you could find the bitmap cache that was stored during the attacker Remote Desktop session. After reconstructing the bitmaps, that translate what was being visualized by the attacker, it might be possible to reconstruct the bitmap puzzle and observe what was seen by the attacker while performing the Remote Desktop connections to the compromised systems. A great exercise for people who like puzzles!
Which tools can we use to parse RDP Bitmap Cache files?
Unfortunately, there aren’t many tools available. ANSSI-FR released a RDP Bitmap Cache parser that you could use to extract the bitmaps from the cache files. There was a tool called BmcViewer that was available on a now defunct website and is great tool to parse the .bmc files. The tool doesn’t support the .bin files. If you know how to code, an interesting project might be to develop a parser that allows you to puzzle the tiles.
Finally, combining these artifacts with our traditional file system metadata timeline and other artifacts such as ShimCache, would allows us to further uncover more details. Below an illustration of parsing ShimCache from a memory image using Volatility and the ShimCacheMem plugin written by Fred House. We could see that there are some interesting files. For example “m64.exe” and looking at the adjacent entries we can see that it shows the execution of “notepad.exe”, “p64.exe” and “reg.exe”. Searching for those binaries on our file system timeline uncovers that for example m64.exe is Mimikatz.
![]()
That’s it for today! As I wrote in the beginning, the Windows Even Logs are a treasure trove of information when properly configured but If an attacker attempts to cover his tracks by deleting the Event Logs, there are many other artifacts to look for. Combine the artifacts outlined in this article with File system metadata, ShimCache, AMCache, RecentDocs, Browser History, Prefetch, WorldWheelQuery, ComDlg32, RunMRU, and many others and you likely will end up having a good understanding of what happened and when. Happy hunting!
References:
PS: Due to the extensive list of references I decided to attach a text file with links: references. Without them, this article won’t be possible.
Luttgens, J., Pepe, M., Mandia, K. (2014) Incident Response & Computer Forensics, 3rd Edition
Carvey, H. (2011) Windows Registry Forensics: Advanced Digital Forensic Analysis of the Windows Registry, Second Edition
SANS 508 – Advanced Computer Forensics and Incident Response

this article is very helpful.Thansk for share
LikeLike