Following part I where we wrote about tools to parse and read Windows Event Logs we will start analyzing our Super Timeline. First we start by filtering out the Super Timeline in Excel and look at WinEVTX artifacts and their meaning. To be able to find interesting events we need to have a good understanding about the different Event ID’s. This will be the main focus of this article.
In this exercise the system had Remote Desktop Administration service enable and after some event it was generating a huge amount of traffic on TCP port 3389 which might indicate that was compromise somehow. That being written we will start by looking at the Event IDs that indicate that someone logged in into the system. Security Event Logs and Terminal Service Logs can aid our quest. The following files and ID’s would be of interest:
Microsoft-Windows-TerminalServices-LocalSessionManager
Event ID 21 : Shell start notification received
Event ID 23 : Session logoff succeeded
Event ID 24 : Session has been disconnected
Microsoft-Windows-TerminalServices-RemoteConnectionManager
Event ID 1149 : User authentication succeeded
Microsoft-Windows-Security-Auditing Computer
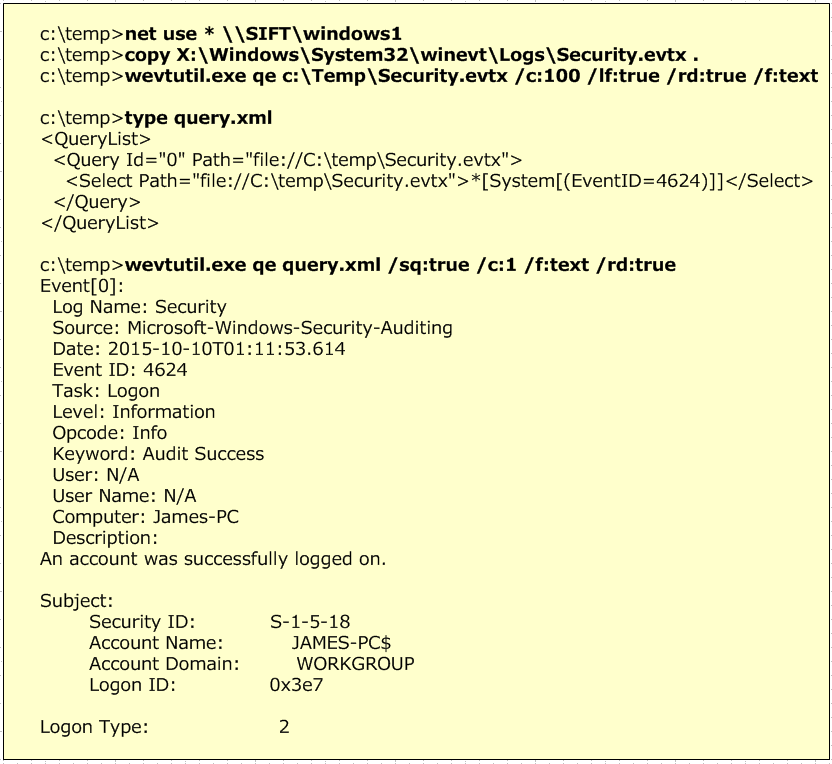
Event ID 4624 : An account was successfully logged on.
Event ID 4625 : An account failed to log on
The image below shows some of this events in our Super Timeline. Clearly, someone logged on into our system!

When looking into the different Event ID’s is important to review its contents. For example, in the ID 4624 there is a huge amount of information about the logon event. Information such as the User Name, Domain, Logon ID and Logon Type, Authentication Package, Source Network Address will give you more context when looking for malicious activities. One important field in the Event ID 4624 is the Logon Type. This is a code that states how the logon was performed. In this case the Logon Type is 10 which means the long was performed via Remote Desktop. The table below lists the different logon types and a brief description. This information is available on Microsoft Technet and MSDN.
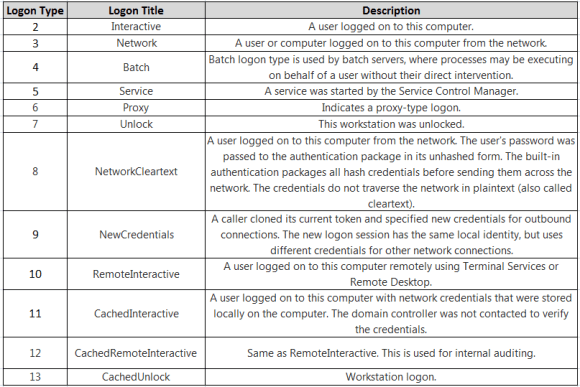
Note: From a Incident Response perspective, in Active Directory environments where the logging is centralized the logon types can be very useful when you are filtering out Event ID’s. In addition if you combine this filtering with the different Authentication Packages and the NTLM or Kerberos Error Codes you start finding interesting things in your domain.
For this exercise we know that we had Audit Process Tracking enable because of the PolAdtEv settings. Most often this audit setting is not enable due to the large amount of logs that it generates. However from a security point of view it can be very useful. One of the Event IDs recorded with Audit Process Tracking is the Event ID 4688 that keeps record of every process that starts in the system. Apart of the path, process that was executed, associated account and others it contains information about Token Elevation Type. This can be useful to determine if the user has been prompted for elevation of privileges using the UAC prompt. The majority of events recorded with this ID are background process as part of normal windows activity. However, a good indication of when someone logged into the system is the well known sequence of processes (smss.exe, csrss.exe, winlogon.exe, logonui.exe). This piece of evidence corroborates the other Event ID’s about someone logging in into the system
Another set of relevant Event ID’s from a security perspective its the Service Operation ones. Actions performed by malicious actors often include interaction with services in order to compromise the system or achieve persistence. For example, the usage of Metasploit PsExec module is a good example of a tool that interacts with services and leaves traces on the Event Logs under Service Control Manager category. To look at service operations events the System Event log is the one we want to look at. Some of the interesting Event ID’s are:
7030 – The service is marked as an interactive service. However, the system is configured to not allow interactive services. This service may not function properly.
7035 – The %1 service was successfully sent a %2 control.
7036 – The %1 service entered the %2 state.
7040 – The start type of the %1 service was changed from %2 to %3.
7023 – The %1 service terminated with the following error: %2
7045 – New Service was installed
The Event 7045 is a new event ID introduced in Windows 7 and 2008 R2. When a new service is installed in the system this event gets recorded. Please note that a malicious actor can also create services by editing the registry directly and this will not create an event 7045.
Of course in large environments you might have a broken application or mis-configured services but normally the services do not fail. If a service fails, then it might be interesting to look at it. This might indicate that an attacker or a piece of malware is targeting the service.
The image below shows some of this events in our Super Timeline moments after someone logged on into our system. A system service changed to interactive and was then “svchosted” by the user Administrator. Following that it crashed and then it entered into stop state.

Before we continue lets review the concept behind “svchosted” services. On Microsoft Operating Systems more and more services are turned off by default in order to reduce the attack surface. However, the Windows services continue to be a preferential choice of malware in order to achieve persistence. Microsoft has the concept of shared services in order to reduce resource consumption. This concept is materialized in the form of a service called svchost.exe. This service provides a hosting framework to launch multiple services using only one process. By using this technique multiple services are combined in service groups as long as they have the same privilege requirements. This what we called “svchosted” services. The list of groups can been seen in the Registry under HKEY_LOCAL_MACHINE\SOFTWARE\Microsoft\Windows NT\CurrentVersion\Svchost.
When services are “svchosted” they are loaded trough a DLL. This can been seen on Windows Taskmanager in the Services tab or using the command line and typing tasklist /svc. When services are installed on Windows they are recorded under the registry HKLM\SYSTEM\CurrentControlSet\Services key. For each service that is listed there are two relevant subkeys from a security perspective. One is the ImagePath and another one is the ServiceDLL. Both keys are often abused by malware to load and achieve persistence. The ImagePath for a service that is “svchosted” is always %SystemRoot%\system32\svchost.exe. If the path or binary is something else than is worth investigate. The ServiceDLL value is under the Parameter Key and it points to the DLL that is going to be loaded by the service. This key needs to point to a benign DLL.
By looking at the different Event Log ID’s across our timeline we could find suspicious activities that are worth to further investigation. In this case we have someone who logged in as Administrator via Remote Desktop and we have a Service that was installed and crashed. Which artifacts should we look next? Based on the time that these events occurred we will look into other artifacts in our Super Timeline around this time frame. A closer look at the service that crashed and other artifacts that have a temporal proximity with our findings will be the topics of the upcoming posts.
That’s it. We reviewed some of the events that were generated by the system in regards to Account Logon events and Service Operations. These were relevant for this exercise. However, other events could be important depending on what you are investigating. Because Windows Operating Systems have an enormous amount of different event logs and looking at them might sound a daunting task we need supporting material. Good references that can help us understanding different Event ID’s and support our investigations while looking at Super Timelines or doing investigations are listed below.
A list of all security audit events for Microsoft operating systems can be retrieved from the following links:
Windows Server 2003
Windows Vista and Server 2008
Windows 7 and Server 2008 R2
The paper “Spotting the Adversary with Windows Event Log Monitoring” published by NSA. Furthermore, the “Threats and Countermeasures Guide: Security Settings in Windows 7 and Windows Server 2008 R2” and the old but still relevant “The Security Monitoring and Attack Detection Planning Guide” paper from Microsoft also provide comprehensive material. Other good resource is the Windows Logon Forensics paper from Sunil Gupta and the Windows Logging Cheat Sheet created by Malware Archaeology.
References:
Russinovich, M. E., Solomon, D. A., & Ionescu, A. (2012). Windows internals: Part 1
Russinovich, M. E., Solomon, D. A., & Ionescu, A. (2012). Windows internals: Part 2
Luttgens, J., Pepe, M., Mandia, K. (2014) Incident Response & Computer Forensics, 3rd Edition