
Before we continue our hands-on memory forensics exercise, will be good to refresh some concepts on how memory management works on Windows 32 bits operating systems running on x86 architecture. Windows operating systems have a complex and sophisticated memory management system. In particular the way the mapping works between physical and virtual addresses is a great piece of engineering. On 32 bits x86 machines, virtual addresses are 32 bits long which means each process has 4GB of virtual addressable space. In a simplified manner the 4GB of addressable space is divided into two 2GB partitions. One for user mode processes – Low 2GB (0x00000000 through 0x7FFFFFFF) -and another for the Kernel mode – High 2GB (0x80000000 through 0xFFFFFFFF). This default configuration could be changed in the Windows boot configuration data store (BCD) to accommodate 3GB for user mode. When a process is created and a region of virtual address space is allocated – trough VirtualAlloc API – the memory manager creates a VAD (Virtual Address Descriptor) for it. The VAD is essentially a data structure that contains the various elements of the process virtual addresses organized in a balanced tree. Elements such as the base address, access protection, the size of the region, name of mapped files and others are defined on each VAD entry. The Microsoft Windows Internals book goes over in great detail about it.
Fortunately, Brendan Dolan-Gavitt, back in 2007 created a series of plugins for The Volatility Framework to query, walk and perform forensic examinations of the VAD tree. His original paper is available here.
That being said the next step in our quest to find the malicious code. We will use these great plugins to look at the memory ranges that are accessible by the suspicious process virtual address space. This will allows us to look for hidden and injected code. Worth to mention that a great book with excellent resources and exercises about this matter is the Malware Analyst Cookbook from Michael Ligh et. al. Another great resource that also goes into great detailed and was published last year is the Art of Memory Forensics also from Michael Ligh and the Volatility team. Both books mention that among other things the VAD might be useful to find malicious code hiding in another process. Essentially, by looking at the memory ranges that have an access protection marked as executable specially with the PAGE_EXECUTE_READWRITE protection. This suggest that a particular memory range might be concealing executable code. This has been demonstrated by Michael Ligh and was translated into a Volatility plugin named Malfind. This plugin, among other things, detects code that might have been injected into a process address space by looking at its access protections. For this particular case Malfind does not produce results for the explorer.exe (PID 1872). Might be due to the fact that permissions can be applied at a further granularity level than the VAD node level.
Our next hope is to start looking at the different VAD attributes and mapped files of the VAD tree for this suspicious process using the Vadinfo plugin. The Vadinfo plugin goes into great detail displaying info about the process memory and the output might be vast. For the sake of brevity only the first entry is displayed in the following picture.

In this case the output of the Vadinfo plugin displays almost two hundred VAD nodes and its details. Because we are looking for specific IOCs that we found we want to further look into these memory regions. This is where the Vaddump plugin comes to great help. Vaddump is able to carve our each memory range specified on the VAD node and dump the data into a file.

Then we can do some command line kung-fu to look into those files. We can determine what kind of files we have in the folder and also look for the indicators we found previously when performing dynamic analysis. In this case we could observe that the string “topic.php” appears in five different occasions using the default strings command. In addition it appears once when running strings with a different encoding criteria – and this exactly matches the found IOC.

On a side note is interesting to see based on the file names the memory ranges that span the virtual address space from 0x00000000 to 0x7FFFFFFF. And you also could see that there is some groups of addresses more contiguous than others. This related on how the process memory layout looks like. The following image illustrates this layout on a x86 32bit Windows machine. This can be further visualized using VMMap tool from Mark Russinovich and available on the Sysinternals Suite.

Back to our analysis, one first step is to look across dumped data from the Vaddump plugin see if there is any interesting executables files. We observed that the previous search found several Windows PE32 files. Running again our loop to look for Windows PE32 files we see that it contains 81 executables. However, we also know the majority of them are DLL’s. Lets scan trough the files to determine which ones are not DLL’s. This gives good results because only two files matched our search.
![]()
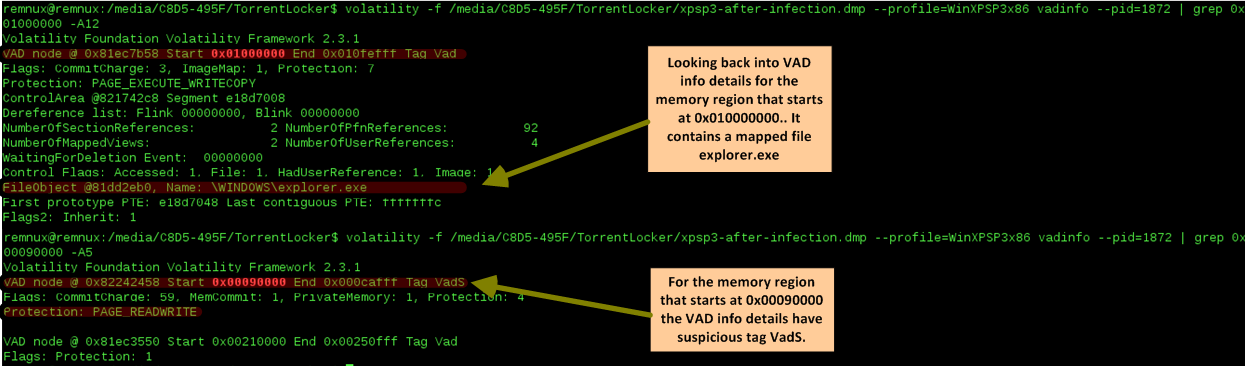
Based on the two previous results we run again the Vadinfo plugin and looked deeper into those specific memory regions. The first memory region which starts at 0x01000000 contains normal attributes and a mapped file that matches the process name. The second memory regions which starts at 0x00090000 is more interesting. Specially the node has the tag VadS. According to Michael Ligh and the Volatility Team this type of memory regions are strong candidates to have injected code.
Next step? run strings into this memory region to see what comes up and don’t forget to run strings with a different encoding criteria.
As you could see below, on the left side, we have a small set of the strings found on the memory region. This information gives great insight into the malware capabilities, gives further hints that can be used to identify the malware on other systems and can further help our analysis. On the right side you have a subset of the strings found using a different encoding criteria. This goes together with previous strings and gives you even further insight into what the malware does, its capabilities and the worst it can do.

Security incident handlers might be satisfied with dynamic analysis performed on the malware because they can extract IOCs that might be used to identify the malware across the defense systems and aid the incident response actions. However, trough this exercise we gained intelligence about what the malware does by performing memory forensics. In addition, as malware evolves and avoids footprints in the hard drive the memory analysis will be needed to further understand the malware capabilities. This allows us to augment prevention controls and improve detection and response actions. Nonetheless, one might want to even go further deep and not only determine what the malware does but also how. That being said the next logical step would be to get the unpacked malware from memory and perform static analysis on the sample. Once again, Volatility Framework offers the capability of extracting PE files from memory. Then they can be loaded into a dissasembler and/or a debugger. To extract these files from memory there are a variety of plugins. We will use the dlldump plugin because it allows you to extract PE files from hidden or injected memory regions.
There are some caveats with the PE extraction plugins and there is a new sport around malware writers on how to manipulate PE files in memory or scramble the different sections so the malware analysts have a tougher time getting them. The Art of Memory Forensics and the The Rootkit Arsenal book goes into great detail into those aspects.

With the malware sample unpacked and extracted from memory we can now go in and perform static analysis … this is left for another post.
That’s it – During the first part we defined the steps needed to acquire the RAM data for a VMware virtual machine before and after infection. Then, we started our quest of malware hunting in memory. We did this by benchmarking both memory captures against each other and by applying the intelligence gained during the dynamic analysis. On the second part we went deeper into the fascinating world of memory forensics. We manage to find the injected malware in memory that was hidden in a VAD entry of the explorer.exe process address space. We got great intel about the malware capabilities by looking at strings on memory regions and finally we extracted the hidden PE file. All this was performed using the incredible Volatility Framework that does a superb job removing all the complex memory details from the investigation.
Malware sample used in this exercise:
remnux@remnux:~/Desktop$ pehash torrentlocker.exe
file:             torrentlocker.exe
md5:              4cbeb9cd18604fd16d1fa4c4350d8ab0
sha1:             eaa4b62ef92e9413477728325be004a5a43d4c83
ssdeep:           6144:NZ3RRJKEj8Emqh9ijN9MMd30zW73KQgpc837NBH:LhRzwEm7jEjz+/g2o7fH
References:
Ligh, M. H., Case, A., Levy, J., & Walters, A. (2014). Art of memory forensics: Detecting malware and threats in Windows, Linux, and Mac memory
Ligh, M. H. (2011). Malware analyst’s cookbook and DVD: Tools and techniques for fighting malicious code.
Russinovich, M. E., Solomon, D. A., & Ionescu, A. (2012). Windows internals: Part 1
Russinovich, M. E., Solomon, D. A., & Ionescu, A. (2012). Windows internals: Part 2
Blunden, B. (2009). The rootkit arsenal: Escape and evasion in the dark corners of the system.
Zeltser, Lenny (2013) SANS FOR610: Reverse-Engineering Malware: Malware Analysis Tools and Techniques


