Tag Archives: honeypot

Honeypot Captures Bad Villain!

On my previous article named Deception Techniques I introduced the concept of Honeypots and illustrated how you could easily run a medium-interaction Honeypot called Kippo. It was highlighted the advantages of running one of these systems. For instance, it could be used to gather intelligence trough the knowledge and information that one could obtain by observing, analyzing and investigating it. To illustrate the intel you can gain, the following facts were captured from a Kippo Honeypot during the first 20 days:

  • 13348 Total break in attempts
  • 667,4 Average break in attempts per day
  • 13290 Unsuccessful break in attempts
  • 2968 Unique account names
  • 8060 Unique passwords
  • 58 Successful break in
  • 71 Unique IPs were used on the 13290 unsuccessful attempts
  • 44 Unique IPs were used on the 58 successful logins
  • 12 Unique IPs logged in and entered commands.
    • Where 8 where from Romania, 2 from Italy, 1 from US and 1 from Germany.

These and other interesting statistics can be visualized using Kippo graph plugin. Or you can query directly on MySQL and produce a tables with the following results, which shows the 12 Bad Villains that successful logged int and entered commands:

IP Country As SSH Client
95.xxx.xxx.xxx Italy AS3269 SSH-2.0-PuTTY_Release_0.62
176.xxx.xxx.xxx Romania AS6910 SSH-2.0-PuTTY_Release_0.62
95.xxx.xxx.xxx Italy AS3269 SSH-2.0-PuTTY_Release_0.62
89.xxx.xxx.xxx Romania AS44203 SSH-2.0-PuTTY_Release_0.62
94.xxx.xxx.xxx Romania AS48161 SSH-2.0-PuTTY_Release_0.62
79.xxx.xxx.xxx Romania AS8708 SSH-2.0-PuTTY_Release_0.62
109.xxx.xxx.xxx Romania AS8953 SSH-2.0-PuTTY_Release_0.62
79.xxx.xxx.xxx Romania AS8708 SSH-2.0-PuTTY_Snapshot_2010_04_07:r8911
188.xxx.xxx.xxx Romania AS8708 SSH-2.0-PuTTY_Release_0.62
38.xxx.xxx.xxx US SSH-2.0-PuTTY_Release_0.60
85.xxx.xxx.xxx Romania AS57568 SSH-2.0-OpenSSH_5.1p1
81.xxx.xxx.xxx Germany AS24961 SSH-2.0-OpenSSH_5.1p1

Other than statistics, Kippo is designed to log the entire shell interaction performed by the attacker plus the archive of any tool they downloaded. From what was observed, after successful login the attacker normally follow the same high level steps:

  • Scanning other systems to identify open SSH ports.
  • Gain access trough SSH brute force.
  • Maintain access by installing rootkits and/or joining the system to IRC Channel.
  • Covering tracks.

Looking deeper into the majority of the attacker sessions, they executed the following actions:

  1. Check the speed of the internet connection by downloading a big file
  2. Check the system Operating System and hardware capabilities
  3. Download necessary tools to :
    1. Perform automated Recon, Scanning and Gain access to other SSH systems via brute force (e.g. gosh) ;
    2. Join the system to an IRC network in order for the system to became part of a larger bot army and wait for attacker commands (e.g. legendbot);
    3. Install IRC proxy/bouncer in order to further hide attacker identity and conceal their IP address when connecting to IRC network and issuing Command & Control commands (e.g. Eggdrop, Emech, Psybnc)
  4. Maintain Access (e.g.Linux user mode rootkits like shv5)
  5. Cover tracks

It is my intention to illustrate these steps and the tools and commands used in further posts. Nevertheless, the following example illustrated the commands issued by one of the attackers in order to cover his tracks:

#unset ; rm -rf /var/run/utmp /var/log/wtmp /var/log/lastlog /var/log/messages /var/log/secure /var/log/xferlog /var/log/maillog ; touch /var/run/utmp /var/log/wtmp /var/log/lastlog /var/log/messages /var/log/secure /var/log/xferlog /var/log/maillog ; unset HISTFILE ; unset HISTSAVE ; unset HISTLOG ; history -n ; unset WATCH ; export HISTFILE=/dev/null ; export HISTFILE=/dev/null

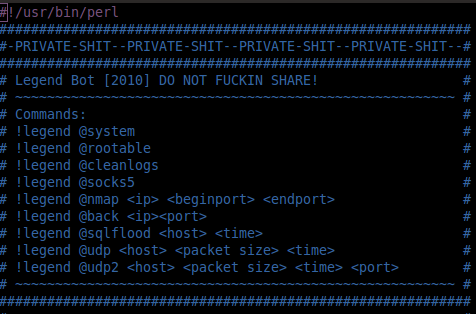
One interesting finding was an attacker that downloaded a bot script written in Perl. The script is called Legend Bot and it consists of 1032 lines of Perl code. It implements a limited set of  features: DDoS attacks (udp floods, sql floods), execution of Linux system, a vulnerability scanner and a Socks proxy. After executed it establishes a connection to a standard IRC network service port, joins the configured attacker’s IRC channel and waits for the attacker’s commands. In this case the IRC channel was hosted at Undernet. For those who don’t know the IRC network Undernet provides a free of charge communication infrastructure which can be misused by attackers to maintain, expand, manage and control their bots army[1].

botmaster

IRC Bot Command and Control

The following picture (nick names removed) illustrates the interaction between a botherder (bad villain)  issuing command and control commands to two compromised systems a.k.a Zombies. This interaction happened on a channel where the chat logs were in  Romanian. First command executed (!legend @system) is used to check the operating system version (uname -a), the system uptime, the name of the process which the bot is running (init[3]) and the user id. Second he checks which  vulnerabilities could be potentially used as local escalation privileges. Third he removes the logs in order to cover is tracks.

After some time finally he launches a UDP Flood DoS attack against a particular system.Interesting that with only 2 systems the attacker can reach easily launch a two digit Megabits DoS attack. This is not shown in the picture but I pasted here the IRC chat logs (IPs removed):

<Botherder> !legend @udp 173.xxx.xxx.xxx 65000 300 22
<Bot1> .:UDP2:. UDP2 Attacking 173.xxx.xxx.xxx:22 with 65000 KB(s) for 300 seconds.
<Bot1> .:UDP2:. UDP2 Sent 1275439 Kb in 300 seconds to 173.xxx.xxx.xxx.
<Bot2> .:UDP2:. UDP2 Sent 10581733 Kb in 300 seconds to 173.xxx.xxx.xxx.

Among others, the value of these compromised systems relies on their capability to be as used as vulnerability scanners, anonymity proxies and/or be part of Denial of Service attacks. To further understand the motives and monetary value behind having compromised systems you can read this article from Krebs on Security, or read the book Inside Spam Cartel by Spammer-X.

Learning the techniques of the attackers can be very useful in order to better understand the motives and methods. Plus will allow you to sharpen your intrusion detection, incident handling and forensic skills.

References:

[1] Analysis of Internet Relay Chat Usage by DDoS Zombies, Stéphane Racine, 2004

Tagged , ,

Deception Techniques

deceptionIn the Tactical Deception Field Manual FM 90-2 of the US Army, the concept of deception is described as those measures designed to mislead enemy forces by manipulation, distortion, or falsification of evidence to induce him to react in a manner prejudicial to his interests. In the cyber world the deception concept and deception techniques have been introduced in the early 1990 with the use of honeypots [1].

Honeypots are decoy systems that attract attackers to attempt to compromise them [2], whose value lies in being probed, attacked or compromised [3]. In addition, honeypots can be used to gain advantage in network security. For instance they provide intelligence based on information and knowledge obtained through observation, investigation, analysis, or understanding [4].

Deception techniques such as honeypots are powerful and flexible techniques offering great insight into malicious activity as well as an excellent opportunity to learn about offensive practices. In this post I will be introducing how to create a honeypot for research purposes to learn about attack methods.

If you want to learn more about computer deception I recommend to read Fred Cohen articles. In regard to honeypots in I definitely recommend the landmark book authored by Lance Spitzner in  2002 and published by Addison-Wesley.  One of the many things Lance introduces on his book is the concept of level of interaction to distinguish the different types of honeypots. Basically, this concept provides a way to measure the level of interaction that the system will provide to the attacker. In this post I will be using a medium interaction honeypot called Kippo.

A important aspect before running a honeypot is to make sure you are aware of the legal implications of running a honeypots. You might need to get legal counsel with privacy expertise before running one. The legal concerns are normally around data collection and privacy, especially for high-interaction honeypots. Also you might need permission from your hosting company if you would for example run a honeypot on a virtual private server (vps). Lance on his book as one full chapter dedicated to the legal aspects. Regarding hosting companies that might allow you to run a honeypot you might want to check  Solar vps, VpsLand or Tagadap.

Let’s illustrate how to setup the Kippo SSH honeypot. Kippo is specialized in logging brute force attacks against SSH. It’s also able to store information about the actions the attacker took when they manage to break in. Kippo is considered a low interaction honeypot.  In addition I will be demonstrating how to use a third party application called Kippo-graph to gather statistics and visualize them.

Based on the tests made the easiest way to setup Kippo is on a Debian linux distro. To install it we need a set of packages which are mentioned in the requirements section of the project page. On my case I had a Debian 6 64 bits system with the core build packages installed and made the following:

Using apt (advanced packaging tool) which is the easier way to retrieve, configure and install Debian packages in automated fashion. I installed subversion to be able to then download Kippo. Plus, installed all the packages mentioned in the requisites. Then verified python version to make sure is the one needed. During the installation of the mysql-server package you should be prompted to enter a password for the mysql.

# apt-get update
# apt-get install subversion python-zope python-crypto python-twisted mysql-server ntp python-mysqldb

# python –V
Python 2.6.6

Check the status of MySQL, then try to login with the password inserted during the installation:
# service mysql status
# mysql -u root -p
Enter password:
Welcome to the MySQL monitor.  Commands end with ; or \g.
Your MySQL connection id is 42
Server version: 5.1.66-0+squeeze1 (Debian)
mysql> quit

Check if we have a timesource configured and NTP is syncing:
#ntpq
ntpq> peers
ntpq> quit

Download Kippo using svn. Create the initial configuration file and then login into MySQL and create the necessary database and tables:
#svn checkout http://kippo.googlecode.com/svn/trunk/ /opt/kippo
#cd /opt/kippo/
#cp kippo.cfg.dist kippo.cfg
mysql -u root –p
mysql> CREATE DATABASE kippo;
mysql> USE kippo;
mysql> SOURCE /opt/kippo/doc/sql/mysql.sql
mysql> show tables;
mysql> quit;

Edit the kippo.cfg file and change the hostname directive, ssh port, and banner file. Also uncomment all the directives shown above regarding the ability of Kippo to log into the MySQL database. Make sure you adapt the fields to your environment and use strong passwords:

#vi kippo.cfg

ssh_port = 48222
hostname = server
banner_file = /etc/issue.net

[database_mysql]
host = localhost
database = kippo
username = root
password = secret

Edit the file /etc/issue.net on the system and insert a banner similar to the following:
This system is for the use of authorized users only. Individuals using this computer system without authority, or in excess of their authority, are subject to having all of their activities on this system monitored and recorded by system personnel. In the course of monitoring individuals improperly using this system, or in the course of system maintenance, the activities of authorized users may also be monitored. Anyone using this system expressly consents to such monitoring and is advised that if such monitoring reveals possible evidence of criminal activity, system personnel may provide the evidence of such monitoring to law enforcement officials.

Verify which username and password is used to deceive the attacker that he got the correct credentials and break in:
# cd /opt/kippo/data
# cat userdb.txt
root:0:123456

Then add a non-privileged user to be used to launch Kippo. Its also needed to change the ownership of the Kippo files and directories to the user just created:
# useradd -m –shell /bin/bash kippo
# cd /opt/
# chown kippo:kippo kippo/ -R
# su kippo
$ cd kippo
$ ./start.sh
Starting kippo in background…Generating RSA keypair…
done.
$exit

By default – as you might noticed in the kippo.cfg – Kippo runs on port 2222. Because we start Kippo as a non-privileged used we cannot change it to port 22. One way to circumvent this is to edit the /etc/ssh/sshd_config file and change the listening port to something unusual which will be used to manage the system. Then create an iptables rule that will redirect your TCP traffic destined to port 22 to the port where Kippo is running.
#cat /etc/ssh/sshd_config | grep Port
40822
#service ssh restart

#iptables -t nat -A PREROUTING -i eth0 -p tcp –dport 22 -j REDIRECT –to-port 48022

Depending on your setup you might need or not additional firewall rules. In my case I had the system directly exposed to the Internet therefore I needed to create additional firewall rules. For the iptables on Debian you might want to check this wiki page.

Create a file with the enforcement rules. I will not be including the redirect rule because will allow me to have control when to start and stop redirecting traffic.
vi /etc/iptables.rules
# Sample firewall configuration
*filter
:INPUT ACCEPT [0:0]
:FORWARD ACCEPT [0:0]
:OUTPUT ACCEPT [0:0]
:RH-Firewall-1-INPUT – [0:0]
-A INPUT -j RH-Firewall-1-INPUT
-A FORWARD -j RH-Firewall-1-INPUT
-A RH-Firewall-1-INPUT -i lo -j ACCEPT
-A RH-Firewall-1-INPUT -p icmp –icmp-type any -j ACCEPT
-A RH-Firewall-1-INPUT -m state –state ESTABLISHED,RELATED -j ACCEPT
-A RH-Firewall-1-INPUT -m state –state NEW -m tcp -p tcp –dport 22 -j ACCEPT
-A RH-Firewall-1-INPUT -m state –state NEW -m tcp -p tcp –dport 2222 -j ACCEPT
-A RH-Firewall-1-INPUT -m state –state NEW -m tcp -p tcp –dport 48022 -j ACCEPT
-A RH-Firewall-1-INPUT -m state –state NEW -m tcp -p tcp –dport 48080 -j ACCEPT
-A RH-Firewall-1-INPUT -j REJECT –reject-with icmp-host-prohibited
COMMIT

I will be allowing ICMP traffic plus TCP port 22 and 2222 for Kippo and 48022 to access the system. Then the 48080 will be for the kippo-graphs.

Note that you might want to add the –source x.x.x.x directive to the rules that allow access to the real ssh and http deamon allowing only your IP address to connect to it.

Then we apply the iptables rules redirecting the contents of the file to the iptables-restore command. Then we need a small script for each time we restart the machine to have the iptables rules loaded as documented on the Debian wiki.

#iptables-restore < /etc/iptables.rules

#vi /etc/network/if-pre-up.d/iptables
#!/bin/bash
/sbin/iptables-restore < /etc/iptables.up.rules

Change the file mode bits
#chmod +x /etc/network/if-pre-up.d/iptables

Subsequently we can install kippo-graphs. To do that we need a set of additional packages:
#apt-get install apache2 libapache2-mod-php5 php5-cli php5-common php5-cgi php5-mysql php5-gd

After that we download kippo-graph into the the webserver root folder, untar it, change the permissions of the generated-graphs folder and change the values in config.php.
#cd /var/www

# wget http://bruteforce.gr/wp-content/uploads/kippo-graph-0.7.2.tar –user-agent=””
# md5sum kippo-graph-0.7.2.tar
#tar xvf kippo-graph-0.7.2.tar
# cd kippo-graph
# chmod 777 generated-graphs

# vi config.php
define(‘DB_HOST’, ‘localhost’);
define(‘DB_USER’, ‘kippo’);
define(‘DB_PASS’, ‘secret’);
define(‘DB_NAME’, ‘kippo’);

Edit the ports configuration settings, under apache folder, to change the port into something hard to guess like 48080. And change the VirtualHosts directive to the port chosen.

 vi /etc/apache2/ports.conf
NameVirtualHost *:48080
Listen 48080

#vi /etc/apache2/sites-enabled/000-default
<VirtualHost *:48080>

#service apache2 restart

Then you can point the browser to your system IP and load the kippo-graphs url. After you confirmed its working you should stop apache. In my case I just start apache to visualize the statistics.

With this you should have a Kippo environment running plus the third party graphs. One important aspect is that, every time you reboot the system you need to: Access the system using the port specified on the sshd config file ;  Apply the iptables redirection traffic ; Stop the apache service and start Kippo. This can be done automatically but I prefer to have control on those aspects because then I now when I start and stop the Kippo service.

#ssh  vps.site.com  -l root -p 48022
#iptables -t nat -A PREROUTING -i eth0 -p tcp –dport 22 -j REDIRECT –to-port 2222

#service apache2 stop
Stopping web server: apache2 … waiting .
#su kippo
$ cd /opt/kippo/
$ ./start.sh
Starting kippo in background…
Loading dblog engine: mysql
$ exit

Based on my experience It shouldn’t take more than 48 hours to have someone breaking in the system. You can than watch and learn. In addition after a couple of hours you should start seeing brute force attempts.

If you want to read more about other honeypots, ENISA (European Network and Information Security Agency) just recently released a study about honeypots called “Proactive Detection of Security Incidents II: Honeypot”. It’s the result of a comprehensive and in-depth investigation about current honeypot technologies. With a focus on open-source solution, a total of 30 different standalone honeypots were tested and evaluated. It’s definitely a must read.

In a future post I will write about the findings of running this deception systems to lure attackers.

References:
[1] The use of Deception Tecniques : Honeypots and decoys, Fred Cohen
[2] The Art of Computer Virus Research and Defense, Peter Szor, Symantec Press
[3] Honeypots. Tracking Hackers, Lance Spitzner, Addison-Wesley
[4] Designing Deception Operations for Computer Network Defense. Jim Yuill, Fred Feer, Dorothy Denning, Fall

Tagged , , , , ,

Countermeasures against Botnets – Legal aspects

The NATO Cooperative Cyber Defense Centre of Excellence based in Tallinn, Estonia just released a study about the legal implications of passive and active countermeasures against botnets. This investigation is made in collaboration with European Network and Information Security Agency (ENISA). It covers the legal aspects of fighting against botnets taking into account the German and Estonian law.  The study was created by two legal experts, one attorney, two scientists and a post-graduate civil service trainee. It’s very well written and it uses an interdisciplinary language which makes it accessible to people who aren’t specialist in information technology or legal.

It covers a variety of interesting topics such as assuming a system is compromised by a botnet. One of the steps, as part of the incident handling process, is that you might capture and inspect the traffic in order to detect and analyze the botnet traffic. However, from a legal perspective the study presents a variety of legal concerns regarding this. Some of them are personal data protection, unauthorized surveillance and confidentiality of communications. It means such monitoring might be perceived as breach of criminal law.  Even if some of the laws were not written in light of cyber space it still can apply.

Another topic with very unique characteristics and legal concerns is running a honeypot to collect, store and process data to learn about botnets. What are the legal concerns about sharing the data gained from running the honeypot? Or how it can be challenging for a private researcher to prove that the data he is collecting is for scientific interests.  These and other legal concerns are discussed in the study.

How about the takeover of botnets? Which assumes you successful infiltrated the CnC server. If the Botnet is taken over with the intent to eliminate and prevent crime and not prepare one, it still has implications under criminal law. Given the uncertainty of jurisdictional traits on how to handle such situations there is the risk of someone making him susceptible to prosecution. Other topics include: Takedown of Command and Control Servers, Automated Immunization or Disinfection, Botnet Mitigation Techniques under Exceptional Circumstances, Duty to Act against Botnet Attacks and Liability of Owners of Infected Hosts.

Apart of that, through out the study there are excellent reference’s that provide supporting and corroborating evidence of their assertions. Definitely a must read for security professionals involved in incident handling and others.

Tagged , ,