
 After attending the workshop on “Vulnerability Discovery and Triage Automation” given by the well-known security researcher Richard Johnson, I rolled up my sleeves and started practicing. Essentially, looking at the different tools and techniques that were shared and reading more about the different topics, specially related on how to perform fuzzing. Not being a coder or not having a software engineering background, some of the topics are harder to grasp, but never late to learn new things.
In this article I want to share a step-by-step guide on how to run American Fuzzy Lop (AFL) to fuzz an open source target. AFL was written by the renowned and respected Polish security researcher Michal Zalewski aka lcamtuf. AFL is a powerful, versatile and open source fuzzer written in C and assembly. A brilliant piece of software engineering that reduces significantly the entry-level and amount of knowledge needed for someone that doesn’t have a software engineering background to perform scalable and intelligent fuzzing against a variety of targets. Fuzzing is the process by which you feed random inputs to a target and observe its execution with the goal to find a condition that will lead to a bug. To perform fuzzing, AFL uses compile-time instrumentation and genetic algorithms combined with more traditional fuzzing techniques that allow it to fuzz targets without any knowledge whatsoever about what the target expects. This makes it an ideal tool to fuzz a broad number of targets. It is especially suited to fuzz targets that take as input a particular file format. It can detect changes to the program control flow and constantly adapt, calibrate and find new test cases that find a new path and grow the code coverage thus increasing the likelihood of finding a condition that trigger a bug. Code coverage is an important metric in fuzzing and dynamic analysis because allows you to get visibility into the amount of code that was executed, you want to reach code paths that are deep, hard to reach and perhaps less tested. Luckily, AFL algorithm does a good job at it. Bottom line, as written by Michal, “The fuzzer is thoroughly tested to deliver out-of-the-box performance far superior to blind fuzzing or coverage-only tools.”
So, anyone can start using AFL against open source code in 5 steps:
- Download, compile and install AFL.
- Download, instrument and install target.
- Get data that will be used to feed AFL, reduce it in quantity and increase the quality (code coverage).
- Create ramdisk and store AFL fuzzing session input and output directories in there.
- Start fuzzing and let AFL perform its magic.
At the time of this writing, the latest version of AFL is 2.52b and can be downloaded from Michal website and easily installed. The below guide was executed on a system running Ubuntu 16.04.

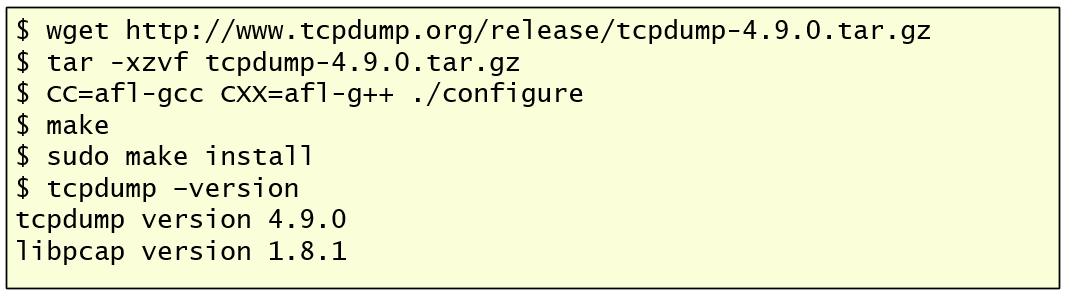
Then, you need a target. I decided to use tcpump as a target of my fuzzing session. Mainly because it is easy to find packet captures to be used as input for fuzzing and is easy to run AFL against it. But better is that by looking at tcpdump release notes I could see that version 4.9.0, released on January 18, 2017, is likely an interesting target to practice because many bugs have been found in this version. So, I downloaded tcpdump source code, extracted its contents, defined the environment variables for the C compiler command to use afl-gcc, which is a replacement for GCC that performs the instrumentation of the target and, finally, compiled it and installed it.
Ok, now that I have the target instrumented with AFL and ready to be fuzzed, I need to prepare my corpus of input files that are going to be mangled, changed and what not by AFL. After collecting around 8 gigabytes of packet captures from different sources containing different protocols – In case you don’t have a easy way to collect packet captures you could download a variety of them from WireShark sample captures website.– , I used editcap to reduce the size of each capture file. Essentially, for each one of the packet captures I had, I exported it in chunks of 4 packets each. This allowed me to create a corpus of packet capture files with reduced size which is a key factor for AFL and its fuzzing process. Size does matter, Michal in the README file writes that files under 1024 bytes are ideal, not mandatory tough.

Following that, I could analyze each one of the pcaps with afl-cmin. The afl-cmin tool is part of AFL toolkit and allows to analyze a large amount of corpus data and identify the different files that exercise the most different code paths. For example, I started a minimization corpus session against 1.5M files and afl-cmin concluded that only 273 files are needed in order to exercise the same quantity of code coverage.

After having the corpus minimized, I prepared the input and output directories to run the fuzzing session onto a Ramdisk.

Then I copied the reduced corpus to the Ramdisk and could start the fuzzing. In my case I have a 64-bits system with 4 CPU cores and because AFL uses 1 CPU core per session, I can parallelize AFL jobs across the cores I have. First starting the master instance. I use screen manager to start the session in a new terminal, then invoke afl-fuzz with “-i” suffix to indicate the input directory where the corpus is, then the “-o” suffix to specify the directories where AFL will save its work, next the “-M” flag is used to specify this is the master node followed by a unique name. Finally, the command line that I want to run which is separated by the “–” suffix. In this case I use tcpdump with verbose and headers output. The last parameter is “@@” which is used by AFL to replace the input file with the test case.

When you start AFL for the first time, you might want to start it without screen, to make sure it executes properly because AFL might printout instructions about tuning that needs to be performed on the operating system such as checking core_pattern and the CPU scaling governor. After having the master node running, I start the slave nodes.

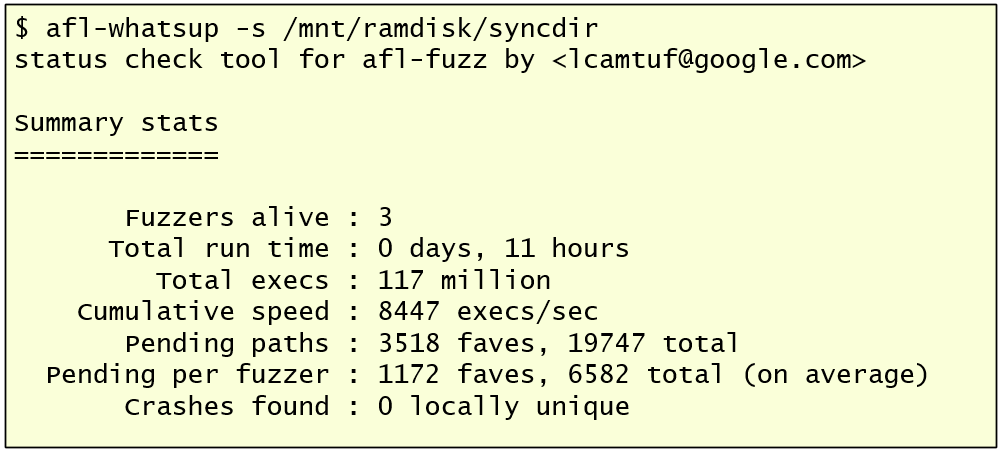
AFL will start reading the different test cases from the input directory, and fuzz them using the different deterministic and non-deterministic stages, find new test cases and queue them for future stage rounds. To check the status of the fuzzing session across the different, I could use afl-whatsup.
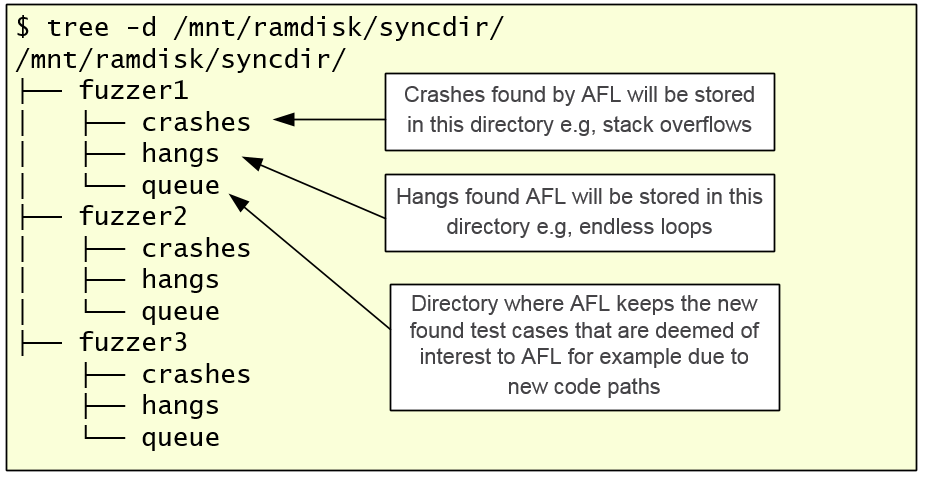
For each one of the fuzzer nodes you start within your fuzzing session, AFL will create a very simple directory structure. Inside, for each fuzzer node, you can see the crashes, hangs and a queue directory. The name is explicit for its intent.
So, after you started the AFL fuzzing session, when should you stop? In the AFL documentation, Michal writes that you should consider three things. One is that the master node should at least show “1” in the cycles done metric in the status screen. The master node plays an important role in the fuzzing session and is the one that performs the deterministic stages, This means the fuzzer has completed the different deterministic stages across all the discovered favored paths. Second case is that the “pending” metric on the status screen shows “0”, Finally the third case is when no new paths have been discovered for quite some time e.g., a week, indicating that likely there isn’t much to find.
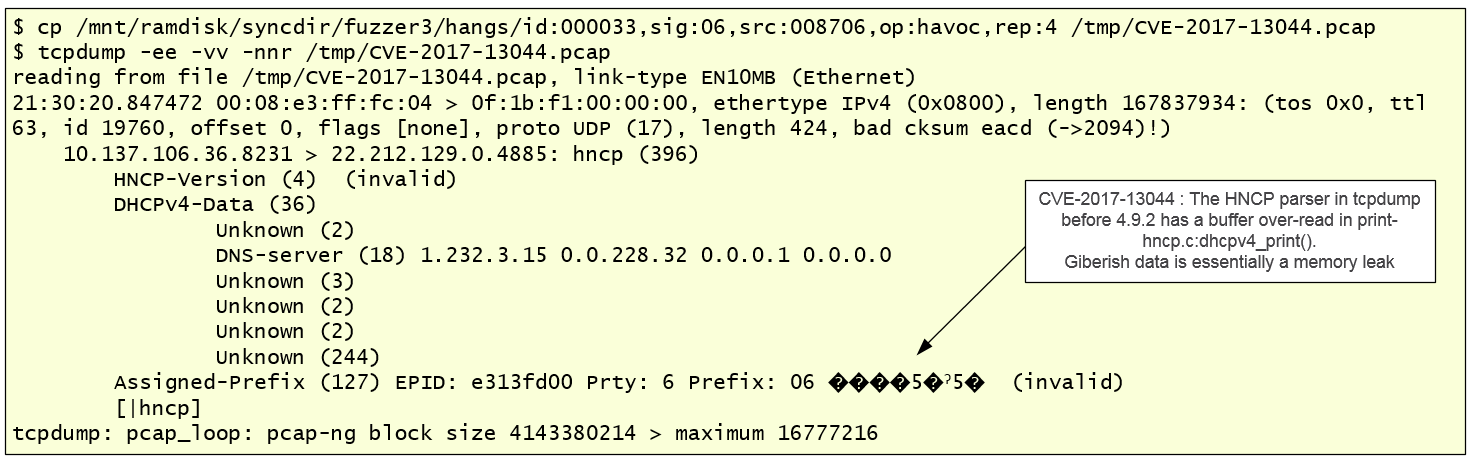
Ok, the fuzzers are running … now we wait and if you get lucky you might start seeing an increase in the number of “Crashes found”. After couple hours of fuzzing I started to see the number of hangs slowly increasing. After analyzing some of the hangs, I came across:
- CVE-2017-13044: The HNCP parser in tcpdump before 4.9.2 has a buffer over-read in print-hncp.c:dhcpv4_print(). This bug was initially discovered by Bhargava Shastry and fixed by the tcpdump maintainers. Taking a quick look seems the bug would allow an attacker to leak data from the stack frame.
- CVE-2017-12989: The RESP parser in tcpdump before 4.9.2 could enter an infinite loop due to a bug in print-resp.c:resp_get_length(). This bug was initially discovered by Otto Airamo & Antti Levomäki and fixed by the tcpdump maintainers. Taking a quick look seems the bug causes an infinite loop.
That’s it for today. In this article I presented a small step-by step guide on how to start using AFL to fuzz an open source target. In the next article (as soon as the time permits) let’s see how you could use other compilers to improve AFL speed and use other tools to catch a bigger variety of memory corruption bugs.
Stay tuned and have fun!
References:
AFL Documentation that comes in the AFL tarball
https://fuzzing-project.org/tutorial3.html
Click to access eu-16-Jurczyk-Effective-File-Format-Fuzzing-Thoughts-Techniques-And-Results.pdf
https://blog.gdssecurity.com/labs/2015/9/21/fuzzing-the-mbed-tls-library.html
Click to access 09-fuzzing.pdf
