Author Archives: Luis Rocha

CVE-2013-3893 – ISC Threat Level: Yellow

[Due to the fact that this new threat is getting pretty good attention across the security vendors and researchers I thought would be good to write a short summary about it.]

Microsoft released security advisory # 2887505 on the 17th September announcing vulnerability (CVE-2013-3893) impacting Internet Explorer versions 6 through 11. Microsoft, Fireeye, TrendMicro and SANS are aware of targeted attacks that attempt to exploit this vulnerability. Furthermore, the Internet Storm Center (SANS) increased their Infocon threat level to yellow due to increased evidence of exploits in the wild.  FireEye has discovered a campaign leveraging this vulnerability labeled Operation Deputy Dog part 1 and part 2. Websense reports that up to 70% of PCs are vulnerable. More in-depth technical details about how this Use After Free vulnerability in IE’s HTML rendering engine (mshtml.dll) is being exploited can be found on Microsoft Security Research and Defense blog.

IE users are advised to apply the Microsoft Fix it solution, “CVE-2013-3893 MSHTML Shim Workaround“, that prevents exploitation of this issue and deploy the Enhanced Mitigation Experience Toolkit (EMET) to protect against exploitation until a permanent fix is released. In addition there are set of workarounds that Microsoft encourages IE users to deploy. For the perimeter, Checkpoint, Juniper, Mcafee, SourceFire, Tipping point and the all the other major vendors have signature for it.

Since this attack could pose a serious security threat to your intellectual property, the Operation Deputy Dog camping done by Fireeye contains some indicators that could be searched across your logs (Unique HTTP Agent ID, Filenames, IP Addresses, Domain names) and/or used on your security infrastructure.

If you are concerned about the risk associated with this vulnerability please exercise caution when visiting websites or opening email addresses from suspicious senders.

Tagged ,

CVE August Awareness Bulletin

The CVE August Awareness Bulletin is a personal initiative and experience that aims to provide further intelligence and analysis concerning the last vulnerabilities published by the National Institute of Standards and Technology (NIST) National Vulnerability Database (NVD) and the vendors coverage for this vulnerabilities.

Common Vulnerabilities and Exposures (CVE) is a public list of common names made available by MITRE Corporation for vulnerabilities and exposures that are publicly known.

This is the most popular list of vulnerabilities used as a reference across the security industry. It should not be considered as absolute but due to nature of its mission and current sponsors – Department of Homeland Security (DHS) National Cybersecurity and Communications Integration Center (NCCIC) – it carries a great amount of adoption across the industry.

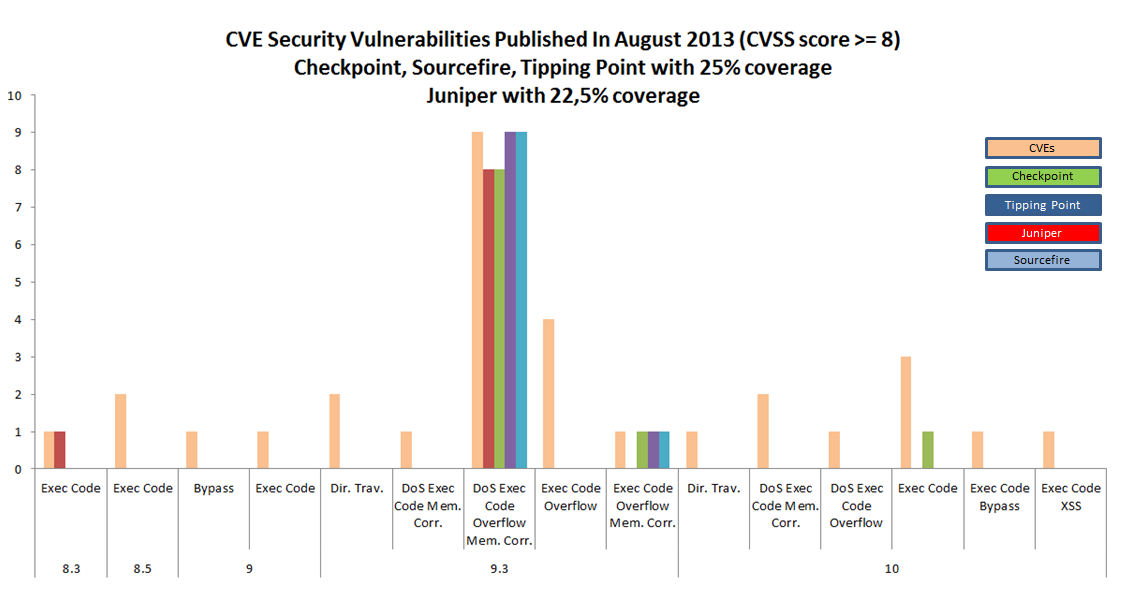
Based on this public information I decided to take a look what has been publicized during the month of August. As of today, there were 300 vulnerabilities discovered In the current month where 40 security vulnerabilities were published with a Common Vulnerability Scoring System (CVSS) score of 8 or higher – CVSS provides a standardized method for rating vulnerabilities using a scoring system based on their different properties -. From these security vulnerabilities, I compared the last signature updates available from Juniper, Checkpoint, Tipping point and SourceFire for their NSM and IPS-1, SMS and DigitalCenter products respectively.  The result is that at the moment Checkpoint, Tipping point and Sourcefire have 25% coverage and Juniper 22,5%,

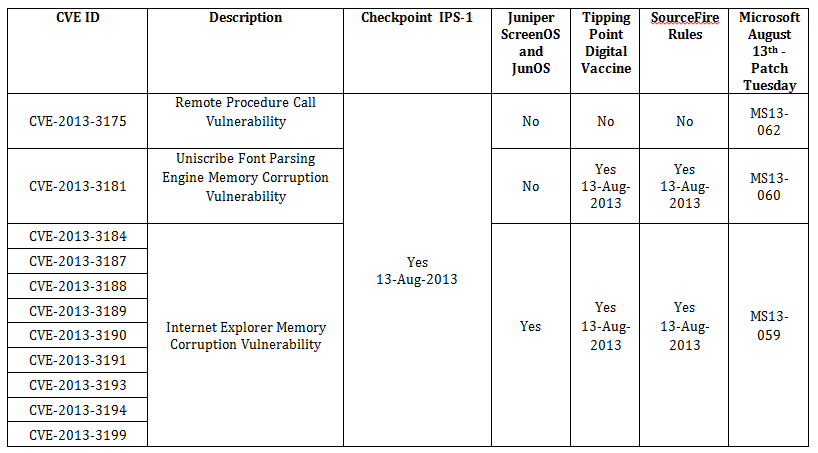
Eleven of forty published security vulnerabilities are related to Microsoft products. From these eleven, nine of them affect Internet Explorer.  Checkpoint, TippingPoint, SourceFire covers ten of the eleven vulnerabilities. Juniper only covers the ones related to Internet Explorer and not protecting against the CVE-2013-3175 and CVE-2013-3181.

The following graph illustrates the mapping between the CVEs published in August with a CVSS equal or higher than 8 by type and the vendor coverage:

CVE-August

The following table shows the August published CVEs related to Microsoft products that have been covered in the latest Checkpoint,  Juniper, Tipping Point and SourceFire  signature updates. It also includes the related Microsoft security bulletin:

CVE-table-August

Interesting that it looks like that Microsoft patch Tuesday is somehow coordinated with the security vendors signature updates. The ones analyzed have provided signatures on the same date (13 of August). The mentioned signatures and patches should be applied  as soon as possible but you should also fully evaluate them (when possible) before applying it production systems.

For further reference I include here where you can check the signatures on Juniper NSM and Checkpoint SmartCenter Server.

For Juniper NSM you can check the signatures under Configure – Object Manager – Attack Objects – IDP Objects:

NSM-Signatures

For Checkpoint IPS-1 you can check the signatures under IPS – Protections – By Type – Signatures:

Checkpoint-Signatures

For TippingPoint, on the SMS, go to Profiles. Then, from the navigation pane on the left, click the + sign next to the IPS Profiles to expand the category. Then select the search type (global or standard). The Profiles – Search screen displays and is divided in four areas. In the Filter Criteria are you can click the arrow next to it and specify the CVE id.

For SourceFire you can locate rules based on CVE numbers from within your intrusion policy by searching all rules using a certain search filter. Go to Policies – Intrusion – Intrusion Policy. Choose “Edit” next to your policy. Click on Rules. In the search filter, type “reference:” followed by the CVE that you wish to look for.

In addition, after deploying signature updates to the sensors you should check which signatures have been enabled by default.  Plus you should be checking and evaluating what is the impact on your environment for the CVEs that don’t have coverage.

Bottom line, the vendors that were analyzed have pretty quick and decent coverage for the signatures that are related to the big software vendors e.g., Microsoft. However, in August we saw 40 vulnerabilities with a CVSS higher than 8 but only 25% of them have coverage. This means 75% of the published vulnerabilities don’t have coverage. Interesting to note that these vulnerabilities are related to software that don’t have significant penetration in the market. Noteworthy, is that 5 vulnerabilities are related to Mozilla Firefox (CVE-2013-1701, CVE-2013-1702,CVE-2013-1704, CVE-2013-1705 and CVE-2013-1710) and they are not covered. Even if the vendors would have 100% coverage for all vulnerabilities they would not apply to all environments. So it’s key that you know your infrastructure, your assets and mainly where are and what are your business crown jewels. Then you should know how to protect your intellectual property and what will be the impact if your intellectual property gets disclosed, altered or destroyed.

Tagged , ,

Browser Exploit Against SSL/TLS

On my last post I wrote about how cipher suite decision works on SSL with a practical example. Today, I would like to write about what is the impact of choosing and prioritizing the appropriate cipher suites on your SSL environment.

Back in May 2011, Juliano Rizzo and Thai Duong released a paper named Here Come The XOR Ninjas [1]. This paper was a contribution to the security community on illustrating a concrete proof of concept against implementations of SSL 3.0 and TLS 1.0 using cipher block chaining (CBC) encryption scheme in a browser environment [3]. The attack also become known as The BEAST (Browser Exploit Against SSL/TLS) [2]. It has been widely publicized after it’s released since the vulnerability was known in the research community but before the paper, attacks against CBC were believed to be theoretical. As a reference, the use of predictable initialization vectors (IV) for CBC mode in a chosen-plaintext attack against SSL 3.0 and TLS 1.0 are described by Bodo Moeller here and by Gregory Bard here.  In a SSL connection if the data is encrypted using CBC with chained IVs, it allows a man-in-the-middle to obtain plain text HTTP headers using blockwise-adaptive chosen-plaintext attack [4][5]. In short it will allow decrypting HTTPS requests and steal information such as session cookies to be used to impersonate the user. The attack has been demonstrated by the researchers on the Ekoparty security conference using Java, a network sniffer and a popular browser [8].

Are you vulnerable to such attack? To quickly verify your web server SSL settings I would recommend looking at SSL Labs from Qualys and running the SSL Server test. If, for example,  you use a SSL load balancer or application firewall from F5 take a look here on how to reduce the exposure to this attack. All major vendors have information about how to configure and remediate this vulnerability. On 09 July 2011 the US National Vulnerability Database published CVE-2011-3389 to address this vulnerability with a CVSS score of 4.3.

On the other hand, in order to remediate this vulnerability the focus should be on configuring the web servers to prioritize a different cipher suite, or upgrade to TLS 1.1/1.2 [8]. Also consider that this attack has a low CVSS score and it’s not easy to pull. Therefore, unless you are exposed to someone who would have the means, motive and opportunity it might be worth to spend time on fixing other things.

If you want to read more about it, I would recommend taking a look at Thai Duong blog article he released one week after the security conference. The summary from Thierry Zoller and the below references.

[1] http://www.infoworld.com/sites/infoworld.com/files/pdfe/BEAST_Duong_Rizzo.pdf
[2] http://vnhacker.blogspot.co.uk/2011/09/beast.html
[3] http://www.imperialviolet.org/2011/09/23/chromeandbeast.html
[4] http://web.nvd.nist.gov/view/vuln/detail?vulnId=CVE-2011-3389
[5] http://www.schneier.com/blog/archives/2011/09/man-in-the-midd_4.html
[6] http://www.openssl.org/~bodo/tls-cbc.txt
[7] http://eprint.iacr.org/2006/136.pdf
[8] http://www.ietf.org/proceedings/85/slides/slides-85-saag-1.pdf

Tagged , , , , , ,

SSL Handshake Protocol

Some years ago during the recruitment phase for a position in professional services. At the end of the technical interview, the practice manager asked if I could provide him by email a little research about the SSL handshake (specific to Web applications) and let him know about the decision on cipher suites, which side (client or server) makes the decision. Basically he wanted to know who makes the decision about which cipher suite to use and details behind it.

I must say I really liked the challenge because it allowed me to do research and build documentation about security matters. So I made a small investigation using one or two good books and produced a three pages document with the technical details.

This is what this blog entry is about. I would like to share with not the three pages document but a short technical summary about the answer I provided on the SSL handshake protocol and the CipherSuite parameter decision. Plus a practical illustration on the usage of the SSL handshake protocol and the cipher suite decision process using openssl and tshark tools.

In short, the most difficult part of SSL stack is the handshake protocol. During the phase 1 of the handshake protocol, where it’s established the security capabilities, the exchange is initiated by the client who sends a client_hello message with a set of parameters. One of those parameters is the CipherSuite which is a list that contains the combinations of cryptographic algorithms supported by the client, in decreasing order of preference. Each element of the list (each cipher suite) defines both a key exchange algorithm and a CipherSpec.

After sending the client_hello message, the client waits for the server_hello message, which containts the same parameters as the client_hello message. Again, here one of the parameters is the CipherSuite, which in the server_hello message contains the single cipher suite selected by the server from those proposed by the client. With this two messages the phase 1 is established and the SSL establishments continues with the phase 2 which is the Server Authentication and Key Exchange. Then the phase 3 for Client Authentication and Key Exchange. Finally the phase 4 to complete the handshake and begin to exchange application layer data.

In short and to make a direct answer to his question: the cipher suits are proposed by the client and decided by the server.

Now, the interesting part is below where a practical exercise was made to illustrate this.

Running on a Linux system I established a HTTPS connection with the host www google.com using openssl command and in parallel executed tshark to capture the packets. Some of the verbose output has been omitted to show what is truly pertinent to the SSL Handshake protocol.

In the output of the openssl command we can see the server X.509 public certificate and its parameters and that the SSL handshake protocol was accomplished using RC4-SHA as cipher and TLSv1 as protocol.

lrocha@host:~$ openssl s_client -connect www.google.com:443
 CONNECTED(00000003)
 depth=1 /C=ZA/O=Thawte Consulting (Pty) Ltd./CN=Thawte SGC CA
 verify error:num=20:unable to get local issuer certificate
 verify return:0
 ---
 Certificate chain
 0 s:/C=US/ST=California/L=Mountain View/O=Google Inc/CN=www.google.com
 i:/C=ZA/O=Thawte Consulting (Pty) Ltd./CN=Thawte SGC CA
 1 s:/C=ZA/O=Thawte Consulting (Pty) Ltd./CN=Thawte SGC CA
 i:/C=US/O=VeriSign, Inc./OU=Class 3 Public Primary Certification Authority
 ---
 Server certificate
 -----BEGIN CERTIFICATE-----
 MIIDITCCAoqgAwIBAgIQT52W2WawmStUwpV8tBV9TTANBgkqhkiG9w0BAQUFADBM
 MQswCQYDVQQGEwJaQTElMCMGA1UEChMcVGhhd3RlIENvbnN1bHRpbmcgKFB0eSkg
 THRkLjEWMBQGA1UEAxMNVGhhd3RlIFNHQyBDQTAeFw0xMTEwMjYwMDAwMDBaFw0x
 MzA5MzAyMzU5NTlaMGgxCzAJBgNVBAYTAlVTMRMwEQYDVQQIEwpDYWxpZm9ybmlh
 MRYwFAYDVQQHFA1Nb3VudGFpbiBWaWV3MRMwEQYDVQQKFApHb29nbGUgSW5jMRcw
 FQYDVQQDFA53d3cuZ29vZ2xlLmNvbTCBnzANBgkqhkiG9w0BAQEFAAOBjQAwgYkC
 gYEA3rcmQ6aZhc04pxUJuc8PycNVjIjujI0oJyRLKl6g2Bb6YRhLz21ggNM1QDJy
 wI8S2OVOj7my9tkVXlqGMaO6hqpryNlxjMzNJxMenUJdOPanrO/6YvMYgdQkRn8B
 d3zGKokUmbuYOR2oGfs5AER9G5RqeC1prcB6LPrQ2iASmNMCAwEAAaOB5zCB5DAM
 BgNVHRMBAf8EAjAAMDYGA1UdHwQvMC0wK6ApoCeGJWh0dHA6Ly9jcmwudGhhd3Rl
 LmNvbS9UaGF3dGVTR0NDQS5jcmwwKAYDVR0lBCEwHwYIKwYBBQUHAwEGCCsGAQUF
 BwMCBglghkgBhvhCBAEwcgYIKwYBBQUHAQEEZjBkMCIGCCsGAQUFBzABhhZodHRw
 Oi8vb2NzcC50aGF3dGUuY29tMD4GCCsGAQUFBzAChjJodHRwOi8vd3d3LnRoYXd0
 ZS5jb20vcmVwb3NpdG9yeS9UaGF3dGVfU0dDX0NBLmNydDANBgkqhkiG9w0BAQUF
 AAOBgQAhrNWuyjSJWsKrUtKyNGadeqvu5nzVfsJcKLt0AMkQH0IT/GmKHiSgAgDp
 ulvKGQSy068Bsn5fFNum21K5mvMSf3yinDtvmX3qUA12IxL/92ZzKbeVCq3Yi7Le
 IOkKcGQRCMha8X2e7GmlpdWC1ycenlbN0nbVeSv3JUMcafC4+Q==
 -----END CERTIFICATE-----
 subject=/C=US/ST=California/L=Mountain View/O=Google Inc/CN=www.google.com
 issuer=/C=ZA/O=Thawte Consulting (Pty) Ltd./CN=Thawte SGC CA
 ---
 No client certificate CA names sent
 ---
 SSL handshake has read 1772 bytes and written 307 bytes
 ---
 New, TLSv1/SSLv3, Cipher is RC4-SHA
 Server public key is 1024 bit
 Secure Renegotiation IS supported
 Compression: NONE
 Expansion: NONE
 SSL-Session:
 Protocol : TLSv1
 Cipher : RC4-SHA
 Session-ID: 8FEF40B71445984250A6658D3664CB8D391EEA43EB40CD535249FAB6EFC79F11
 Session-ID-ctx:
 Master-Key:
 8CFE3997E583BC3D9FDBCC81F3FA136DCC1872818FF9BECA6B10C64EA03D6D52C163DA470779E7D5AB23A89967A05E39
 Key-Arg : None
 Start Time: 1335093485
 Timeout : 300 (sec)
 Verify return code: 20 (unable to get local issuer certificate)

With tshark we can see that during the client_hello message the client proposes
26 cipher specs in order of preference which by its turn it’s followed by the server_hello
message which decides to use the Cipher Suite: TLS_RSA_WITH_RC4_128_SHA
(0x0005).

lrocha@host:~$ tshark -i eth0 -Vx -s0 port 443 

Secure Socket Layer 
 SSLv2 Record Layer: Client Hello
 [Version: SSL 2.0 (0x0002)] 
 Length: 119 
 Handshake Message Type: Client Hello (1) 
 Version: TLS 1.0 (0x0301) 
 Cipher Spec Length: 78 
 Session ID Length: 0 
 Challenge Length: 32 
 Cipher Specs (26 specs) Cipher Specs (26 specs)
 Cipher Spec: TLS_DHE_RSA_WITH_AES_256_CBC_SHA (0x000039) 
 Cipher Spec: TLS_DHE_DSS_WITH_AES_256_CBC_SHA (0x000038) 
 Cipher Spec: TLS_RSA_WITH_AES_256_CBC_SHA (0x000035) 
 Cipher Spec: TLS_DHE_RSA_WITH_3DES_EDE_CBC_SHA (0x000016) 
 Cipher Spec: TLS_DHE_DSS_WITH_3DES_EDE_CBC_SHA (0x000013) 
 Cipher Spec: TLS_RSA_WITH_3DES_EDE_CBC_SHA (0x00000a) 
 Cipher Spec: SSL2_DES_192_EDE3_CBC_WITH_MD5 (0x0700c0) 
 Cipher Spec: TLS_DHE_RSA_WITH_AES_128_CBC_SHA (0x000033) 
 Cipher Spec: TLS_DHE_DSS_WITH_AES_128_CBC_SHA (0x000032) 
 Cipher Spec: TLS_RSA_WITH_AES_128_CBC_SHA (0x00002f) 
 Cipher Spec: SSL2_RC2_CBC_128_CBC_WITH_MD5 (0x030080) 
 Cipher Spec: TLS_RSA_WITH_RC4_128_SHA (0x000005)
 Cipher Spec: TLS_RSA_WITH_RC4_128_MD5 (0x000004) 
 Cipher Spec: SSL2_RC4_128_WITH_MD5 (0x010080) 
 Cipher Spec: TLS_DHE_RSA_WITH_DES_CBC_SHA (0x000015) 
 Cipher Spec: TLS_DHE_DSS_WITH_DES_CBC_SHA (0x000012) 
 Cipher Spec: TLS_RSA_WITH_DES_CBC_SHA (0x000009) 
 Cipher Spec: SSL2_DES_64_CBC_WITH_MD5 (0x060040) 
 Cipher Spec: TLS_DHE_RSA_EXPORT_WITH_DES40_CBC_SHA (0x000014) 
 Cipher Spec: TLS_DHE_DSS_EXPORT_WITH_DES40_CBC_SHA (0x000011) 
 Cipher Spec: TLS_RSA_EXPORT_WITH_DES40_CBC_SHA (0x000008) 
 Cipher Spec: TLS_RSA_EXPORT_WITH_RC2_CBC_40_MD5 (0x000006) 
 Cipher Spec: SSL2_RC2_CBC_128_CBC_WITH_MD5 (0x040080) 
 Cipher Spec: TLS_RSA_EXPORT_WITH_RC4_40_MD5 (0x000003) 
 Cipher Spec: SSL2_RC4_128_EXPORT40_WITH_MD5 (0x020080) 
 Cipher Spec: Unknown (0x0000ff) 
 Challenge 

Secure Socket Layer 
 TLSv1 Record Layer: Handshake Protocol: Server Hello
 Content Type: Handshake (22) 
 Version: TLS 1.0 (0x0301)
 Length: 81 
 Handshake Protocol: Server Hello 
 Handshake Type: Server Hello (2) 
 Length: 77 
 Version: TLS 1.0 (0x0301) 
 Random 
 gmt_unix_time: Aug 22, 2009 07:18:05.000000000 EDT 
 random_bytes: 4abfee70b2a89e684e917c40c47054bf074028babe764af3... 
 Session ID Length: 32 
 Session ID: 8fef40b71445984250a6658d3664cb8d391eea43eb40cd53... 
 Cipher Suite: TLS_RSA_WITH_RC4_128_SHA (0x0005)
 Compression Method: null (0) 
 Extensions Length: 5 
 Extension: renegotiation_info 
 Type: renegotiation_info (0xff01) 
 Length: 1 
 Data (1 byte)

Bottom line, I didn’t got the job but it was fun!

Tagged

The Evil Bit

IPv4headerIt was 10 years ago that the Internet Engineering Task Force (IETF) released the Request For Comments (RFC) 3514 “The Security Flag in the IPv4 Header” authored by Steve Bellovin.

This RFC brought to the Internet community what  could have been the security silver bullet. What do you mean? Well, due to the fact that security devices like firewalls, intrusion detection systems, proxies and others have a hard time trying to determine if a packet has malicious intent or is rather normal. Steve Bellovin came up with the idea of creating the Evil bit, taking advantage of the unused high-order bit of the IP Flags field.

Very simple mechanism! Consider this: benign packets should have the Evil Bit set to 0 and those that have malicious intent will have the Evil Bit set to 1.

How does it work? When using offensive tools or crafting packets with malicious intent. The software or the attacker must set the Evil bit. For example fragments that are dangerous must have the Evil bit set. When executing a port scanning if the intent is malicious the Evil bit should be set. When sending an exploit via Metasploit the Evil bit should be set and the list goes on. On the other hand if the packets don’t have malicious intent the bit should not be set.

How should the security systems process such packets?

When processing packets, devices such as firewall should check the Evil Bit. If it is set they must drop all packets. If the Evil bit if off the packets must not be dropped.

Wonderful idea, but for those who don’t know the RFC was released on the April Fools’ Day. The Evil bit RFC was published on 1st April of 2003. Like many others, this has been another humorous RFC. Humorous Request for Comments have been around for quite some time and is a good read if you have time and want to laugh.
Apart of the Evil bit one that is really hilarious is the RFC 5841 which proposes a TCP option to denote packet mood. For example happy packets which are happy because they received their ACK return packet within less than 10ms. Or the Sad Packets which are sad because they faced retransmission rates greater than 20% of all packets sent in a session. If you want to read more the Wikipedia as its complete list here or the book “The Complete April Fools’ Day RFC“.

Humor apart and for the sake of curiosity you could try to determine if any system process or reply to such packets. I used Scapy which is a powerful packet crafting and manipulation tool. It is written in python and let’s see how could we generate a TCP Syn packet with the Evil Bit set.

Before creating the packet lets just refresh our knowledge about the IP Flags field. In the IP header there 3 bits used for flags and according to the RFC 791:

Bit 0: reserved, must be zero
Bit 1: (DF) 0 = May Fragment, 1 = Don’t Fragment.
Bit 2: (MF) 0 = Last Fragment, 1 = More Fragments.

The normal combinations used with Fragmentation flags are shown in the following table:

MF Bit Frag Offset Meaning
Not Set Zero Not Fragmented
Set Zero First Fragment
Set Non Zero Middle Fragment
Not Set Non Zero Last Fragment

In our case we want to generate a packet that has the highest order bit of the FlaView Postgs field set i.e. Evil Bit.

Which according to the RFC is reserved and must be set zero. However, we will use Scapy to craft a packet that has the Evil bit set with a fragment offset of zero and send it trough the wire and capture it using tcpdump.

#cat myevilpacket.py
#!/usr/bin/python
from scapy.all import *

ip=IP(src="192.168.1.121", dst="192.168.1.2", flags=4, frag=0)
tcpsyn=TCP(sport=1500, dport=80, flags="S", seq=4096)
send(ip/tcpsyn)

# python myevilpacket.py

I will leave the Scapy explanation for another post but would like to briefly mention the usage of flags=4. As you could see in the IPv4 header image the IP Flags field uses 3 bits.  These 3 bits are the highest bits in the 6th byte of the IP Header.  To set the Evil bit we need to set the value to 100 in binary or 4 in hex/integer.

The following picture illustrates the packet that was captured using tcpdump when the myevilpacket.py script was invoked  You could see the Evil bit on.

Evilbit

Tagged , ,

SANS Comes to Zürich Starting January 23

Starting the 23rd of January 2013, I will be mentoring  SANS Security 504: Hacker Techniques, Exploits & Incident Handling in Zürich. The training material is awesome and I am looking forward to start. Below is a short description about this mentoring session.sans-mentor

If your organization has an Internet connection or one or two disgruntled employees (and whose doesn’t!), your computer systems will get attacked. From the five, ten, or even one hundred daily probes against your Internet infrastructure to the malicious insider slowly creeping through your most vital information assets, attackers are targeting your systems with increasing viciousness and stealth.
This course addresses the latest cutting-edge insidious attack vectors and the “oldie-but-goodie” attacks that are still so prevalent, and everything in between. Instead of merely teaching a few hack attack tricks, this course includes a time tested, step-by-step process for responding to computer incidents; a detailed description of how attackers undermine systems so you can prepare, detect, and respond to them; and a hands-on workshop for discovering holes before the bad guys do.

Students on the SANS mentor program study SANS Hacker Techniques, Exploits & Incident Handling course books at their own pace. Each week, students meet with SANS Local Mentor, who will lead class discussions, provide hands-on demonstrations, point out the most salient features, and answer questions. The Mentor’s goal is to help students grasp the more difficult material, master the exercises, and prepare them for GCIH certification.

This challenging course is particularly well suited to individuals who lead or are a part of an incident handling team. Furthermore, general security practitioners, system administrators, and security architects will benefit by understanding how to design, build, and operate their systems to prevent, detect, and respond to attacks.

Tagged , ,

Step-by-Step Bot Infection process exploiting bad password.

There are two main motives involving the usage of botnets causing them to emerge and evolve. On one hand, there is the motivation to pursuit political ends using bots for example to initiate DDoS attacks. This is known as hackitivism. On the other hand, there is an economical incentive to use and exploit bots for spam, phishing, DoS extortion and other attacks. These two avenues make a strong incentive for the bad guys. Traditionally the attacker’s motivation was self-fulfillment, fun and proof of skills. However, the motivation is leading into business models that involve building, exploiting and maintaining botnets. In addition to the motivation, the methods used are also progressing. The distributions of the tools that allow infection, propagation, management and exploitation of the bots have been industrialized on IRC networks. The bot infection process has become more automated [1][2].

So, if the attackers have the motivation. Which methods are they using? How do attackers infect new bots/Zombies? Which tools are they leveraging?

One of the methods used in the bot infection process is exploiting bad passwords. During the course action of using a medium interaction honeypot, it has been observed daily brute force attempts against SSH.

The following diagram illustrates the step-by-step infection process of new bots exploiting bad ssh passwords. This process is explained in the enumerated list below.

Bot Infection Process

Bot Infection Process

  1. The attacker attempts to infect the victim machines with bots trough SSH brute force. It starts by scanning entire class A (126 nets with 126 16,277,214 possible hosts) or B (16,384 nets with 65,534 possible hosts) networks. The tool used uses TCP Syn scanning techniques in a parallel execution to achieve higher scanning speeds. The parallel scan technique is similar to the one described by Niels Provos and Peter Honeyman on their document ScanSSH – Scanning Internet for SSH Servers published in October 2001[3]. The TCP Syn scan technique is also known as “half-open” scanning because it doesn’t establish the TCP 3-way handshake [4].The most observed and downloaded tool on the honeypot used to accomplish this is called ss and is a variant of Fast Syn Scan produced by Dr.Bios [5]. Is a fast scanner and is able to scan an entire class B network in less than 30s. This means is able to send more than 2166 TCP Syn packets per second on a Intel Core Duo @ 2.20Ghz with 4Gb running Debian 5 32bit.
    To further illustrate the speed, with this tool one can scan the entire IP ranges assigned to a small country, like Portugal, in 43,5m [6]. The tool is written in C, uses libnet and libcap. The binary is a statically linked, stripped in ELF format with 552k . It needs UID 0 to be executed. The tool detects if a system has the TCP port 22 (SSH) open by processing the TCP Syn Ack packets from the scanned systems.
  2. In the next stage, the attacker launches a tool called ssh-scan. The tool is supplemented with different dictionary password files. One of the captured files contains 6 dictionaries files with a total of 232k entries. This tool is a statically linked, stripped ELF binary with 823k. When executed starts by reading the contents of a text file (mfu.txt). This text file contains the IP addresses that were identified by the ss scanner as having TCP port 22 open. Then it reads the contents of a dictionary password file (pass_file) containing combinations of username and passwords (the different dictionaries are directed to the tool using simple bash scripts which copies and renames the files). If any of the brute force login attempts is successful the IP address, username and password is written on text file (vuln.txt).
  3. With the obtained credentials, the attacker logins into the system. He typically starts by running linux commands to check who are the users connected, what the operating system is and what the hardware capabilities of the machine are. Then he downloads the necessary tools to continue his operation. In case the credentials obtained are not UID 0, the attacker typically downloads an exploit that will allow him to escalation his privileges. The majority of the tools downloaded have a .jpg extension. They are generally hosted on suspicious TLD domains like .tk or .su. The .su stands for the Soviet Union Top Level Domain, Roman Hüssy describes that cyber criminals are moving to .su from .ru TLD domains [7]. The common downloaded tools are tar archive files with extension renamed. Among others, the archives contained the tools ss and ssh-scan plus variants of bash scripts that automate the scanning and brute force process. Different ASCII art which allude to the authors is also present. Other downloaded archives may contain Perl bots.
  4. This step is where the Perl bot is executed and it attempts to connect to an IRC server using a randomly generated nickname normally starting by some common identifier. Once the bot is connected to the IRC server, it joins the attacker’s channel and waits for instructions.
  5. The infected system, now in control of the attacker, will continue to potentially compromise more SSH systems using the same technique described in step 1 in an automated fashion.
  6. After successful identified additional systems having port TCP 22 open it executes the same steps as described in point 2. This step is typically automated.
  7. This step was observed by some attacker sessions where the attacker downloaded an IRC proxy such as Energy Mech or EggDrop in order to connect to an IRC Network. This will allow him to conceal his identify and add additional layers of anonymity.
  8. With this IRC proxy, the attacker can then connect to channel where the Zombies are waiting for instructions. The settings of the IRC proxy are using properties such as the system and nick name which are also hardcode on the Perl bot script. With this the Zombies will only accept instructions for a bot-herder that meets this properties.
  9. This step was created to illustrate that the attackers will start the process all over again in their attempt to pursue more compromised systems and recruit more bots.
  10. Finally, the last step is where the attacker leverages the power of having these Zombie systems waiting for his instructions. A variety of activities can be executed and leveraged using a bot or botnets. Denial-of-service attacks, spamming, anonymization proxy, keylogging, identity theft, click fraud, etc [8][9]. During the observed time on the IRC channels the Denial-of-service attacks were the most popular.

References and further reading:

[1] Evan Cooke,Farnam Jahanian,Danny McPherson , The Zombie Roundup: Understanding, Detecting, and Disrupting Botnets
[2] Zhen Li, Qi Liao, Aaron Striegel , Botnet Economics : Uncertainty Matters
[3] Niels Provos, Peter Honeyman, ScanSSH – Scanning the Internet for SSH Servers
[4] http://nmap.org/nmap_doc.html#sy
[5] http://www.securiteam.com/tools/5EP0B0ADFO.html
[6] http://www.nirsoft.net/countryip/pt.csv
[7] http://www.abuse.ch/?p=3581
[8] http://krebsonsecurity.com/2012/10/the-scrap-value-of-a-hacked-pc-revisited/
[9] http://honeynet.org/node/52

Tagged , , ,