
 Starting with Windows Vista, Microsoft used a secure development lifecycle from start to finish. By introducing this software development practices, Microsoft built better software using secure design, threat modeling, secure coding, security testing, and best practices surrounding privacy. One of many features introduced was the BitLocker drive encryption. This allows to encrypt the full content of the volumes and is designed to work with Trusted Platform Module (TPM) security device. By encrypting the drive contents you add an additional layer of protection that helps defend against evil maid attacks, offline attacks and disclosure of data when a laptop is lost or stolen. Windows 7 brought more enhancements to this technology that will drive its adoption because is more user friendly, supports BitLocker To Go (protects removable media) and reduces the administration overhead e.g. does not require an admin to layout the hard drive partition in a special form (now you know why during Windows 7 you might see a partition of 100MB NTFS Volume – This volume allows the BIOS locate and run the Bootmgr). BitLocker can work with or without a TPM. A TPM is a tamper resistant security chip on the system board that will hold the keys for encryption and check the integrity of the boot sequence and allows the most secure BitLocker implementation. BitLocker needs a TPM chip version 1.2 or higher enabled on the BIOS. Without a TPM the Bitlocker can store its keys on a USB drive that will be used during boot sequence. BitLocker encrypts the contents of the hard drive using AES128-CBC (by default) or AES256-CBC algorithm, with a Microsoft-specific extension called a diffuser. To run BitLocker you need Windows 7 Enterprise or Ultimate edition. When configuring Bitlocker you have a number of options:
- TPM Only: No authentication required for the boot sequence but protects against offline attacks and is the most transparent method to the user.
- TPM with PIN : Adds “What you know” factor to the boot process and the user is prompted for a PIN.
- TPM with USB : Adds “What you have” factor to the boot process and the user needs to insert the USB pen that contains the key.
- TPM with USB and PIN : Most secure mode using 2 factor authentication boot process but the most costly in terms of support e.g. user loses its USB or forgets its PIN.
- Without TPM : It does not provide the preboot protection and uses a USB pen to store the key.
How to enable BitLocker with TPM in 10 Steps?
- Determine if your computer has support for TPM 1.2.
- Enable TPM in the BIOS settings.
- On Windows launch the TPM management console (tpm.msc).
- Initialize it and create a owner password.
- Save and print the password.
- Define Group Policy settings to ensure a TPM is used with BitLocker and define the authentication method.
- Turn on BitLocker on the desired hard drive.
- Define the authentication method.
- Save and print the recovery key.
- Encrypt the drive.
Let’s review each one of these steps into more detail.
Step 1 : To determine if your computer has TPM support you can check your computer model documentation or check the BIOS directly. In my case I had a second hand Dell Latitude E6400 Laptop with TPM capabilities.
Step 2: I went to the BIOS and enabled the TPM Security option.

Step 3 : I booted Windows and called the TPM management console by executing tpm.msc.

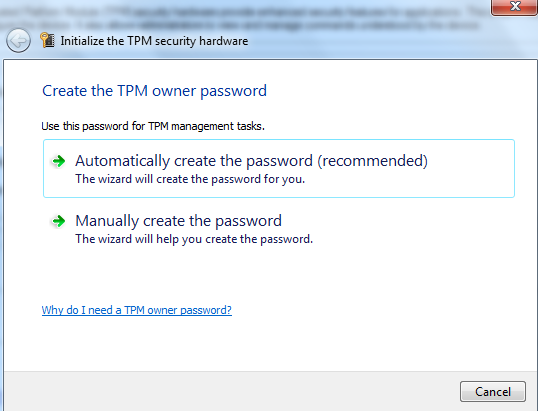
Step 4 : In the TPM management console, click on the Initialize. This will start the process where you need to manually create a password or generate one. In this case I selected to automatically create the TPM password.
Step 5 : Save the password file in a USB drive (file.tpm) and print the password for recovery purposes. Please keep this file in a secure location away from your computer’s
local hard drive.

Step 6 : On windows run gpedit.msc and go to the Group Policy Editor. Provide administrator credentials if you have UAC configured. Navigate to Computer Configuration – Administrative Templates – Windows Components – BitLocker Drive Encryption, Operating System Drives: Require Additional Authentication at Startup. Here Enable this setting and under options, verify that the option Allow BitLocker Without a Compatible TPM is unchecked. I left the remaining settings by default but it is here that you can configure 2 factor for the boot process.

Step 7 : Select the drive you want to encrypt, right click and select Turn On BitLocker.

Step 8 : The options that you defined in the group policy will show here in order to define the authentication method, in this case I selected TPM with PIN.

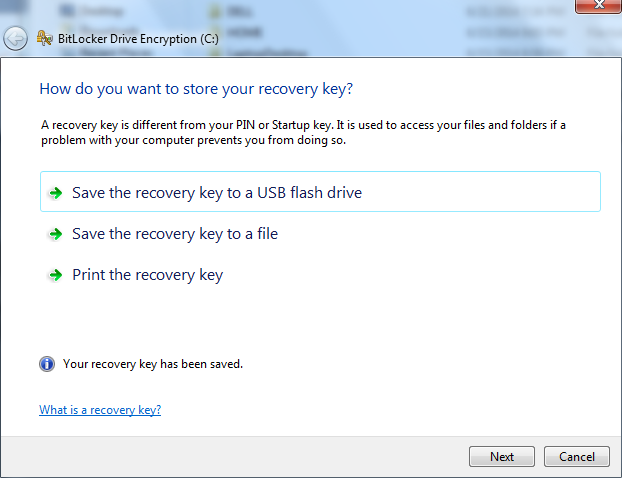
Step 9 : Save the recovery key to a USB pen and and print it for recovery purposes. The recovery key is used to recover the data on a BitLocker protected drive.
Step 10 : Finally, encrypt the drive and select the “Run Bitlocker system check” in order to ensure the recovery key can be used.

When you reboot your computer you will be prompted with a Windows BitLocker Drive Encryption PIN entry where you need to supply the PIN in order to start the operating system.
I terms of management the BitLocker settings can be configured/checked using the manage-bde.exe command. For systems where the Windows is part of a domain the key for each machine can be backed up as part of an escrow service. This way business owners like legal teams or others can gain access to the machine in case the user loses the USB key or PIN or there is the need to due to an insider threat. Another method is to use the data recovery agent (DRA) that creates a certificate that can be used to unlock the encrypted volumes. Further there are several group policies settings that can be configured.
The recovery process is also easy in case you have the USB drive/printed the recovery keys. Note that during the boot process if the system detect any changes like a different hard drive or change/upgrade the bios you might be asked to provide the recovery keys due to an alteration of the boot process. Other than the full volume encryption the BitLocker To Go is also great method to encrypt removable hard disks and thumb drives.
As you can see is extremely easy to add additional layer of protection to your system. If you have a Windows 7 Enterprise or Ultimate license then this is a great feature to protect the family photos and wife cooking trade secrets from falling into the wrong hands.
References:
Windows Internals, Sixth Edition, Part 2 By: Mark E. Russinovich, David A. Solomon, and Alex Ionescu

Excellent post. Am I right in thinking that the most recommended approach is to Bitlock encrypt all drives a ( windows 10) business laptop?
LikeLike
thank you for your post!
one thing I would like to add here: in the group policies, add “allow extended PIN (or similar, I used it in German). this allows you to chose your own password and you are not limited to a 0-9 digit PIN!
regards
Christoph
LikeLike
Thanks for an enlightening article. Much appreciated.
LikeLike
Thanks for the article. If you are wondering if / when the PIN should be used, refer to this Microsoft article:
https://technet.microsoft.com/itpro/windows/keep-secure/bitlocker-countermeasures
LikeLike