
[This is my first post on a series of articles that I would like to cover different tools and techniques to perform file system forensics of a Windows system. First article is about acquiring a disk image in Expert Witness Format and then mounting it using the SIFT workstation. LR]
Let’s look at an hands-on scenario to create a forensic image from a compromised system. To acquire the disk we will boot the system from a CD/USB using Helix and then run ewfacquire. Ewfacquire is a tool that allows us to acquire media and stored it in Expert Witness Format. Essentially, it can acquire media in an equivalent format that commercial tools like EnCase and FTK imager do. EWF format is very popular due to the market penetration of Guidance Software and their Encase Suite. The EWF format also know as Encase evidence files (E01) are a representation of the acquired physical or logical drive. Plus they support metadata, the evidence hash value, compression and file splitting. These features are very convenient.
Ewfacquire is simple and flexible tool that is part of the LibEWF package that contains many other great forensic tools written by Joachim Metz. It is launched using the command line and is preinstalled in Linux distributions like Helix and SIFT Workstation. In this case we will run use Helix. Helix product went commercial but you can still download the free 2009R3 version.
Frist step is boot the compromised system with a CD/USB using Helix. Then we will plug the pristine media where we will store the evidence and mount it. Following that we launch ewfaquire. On a previous post I wrote about the first two steps.
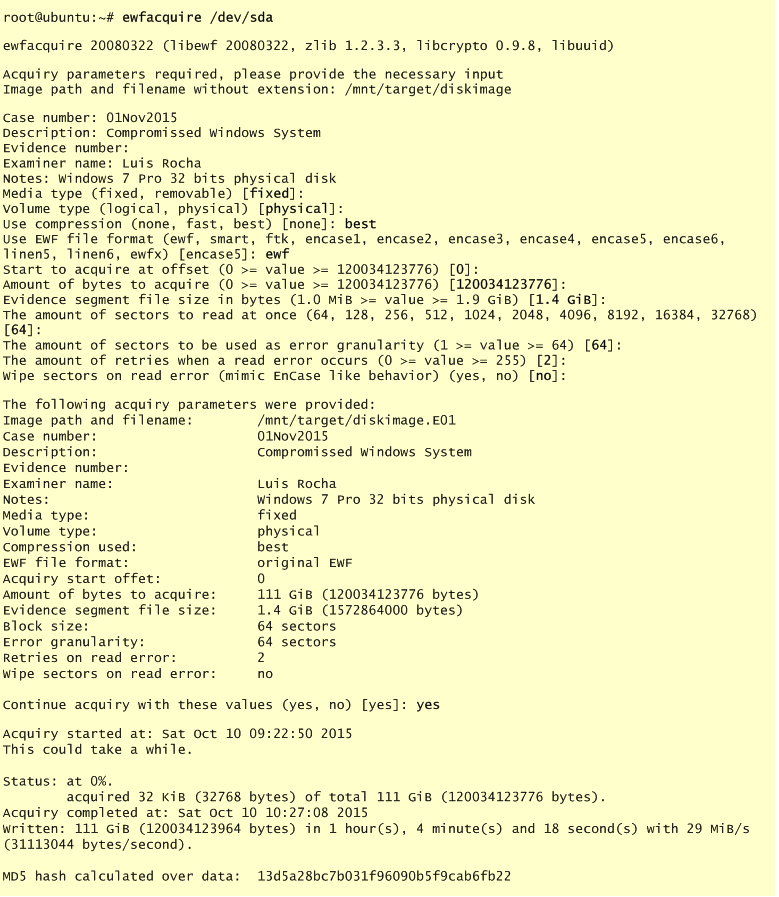
In this exercise we will concentrate on ewfaquire. We can see the source and destination devices by running fdisk -lu. Then we know which drive will be the source and the destination. In this case the source drive is /dev/sda. We then start the acquiring process by launching the ewfacquire tool with source drive as option and a set of questions will be raised. Below picture ilustrate this steps. The values are self explanatory. In this case we are aquiring a physical disk using the best compression method in EWF format. After entering the default values which are good enough for the majority of the case were are asked to review the settings and then proceed. The process will take some time depending on factors like disk size and compression method. When finish the evidence hash value is presented. All this information is stored in the metadata and can be reviewed afterwards with ewfinfo.
After the acquire process is finish we will have a bunch of .E## files in our target media. Next step is to move them to our SIFT workstation and process the image.
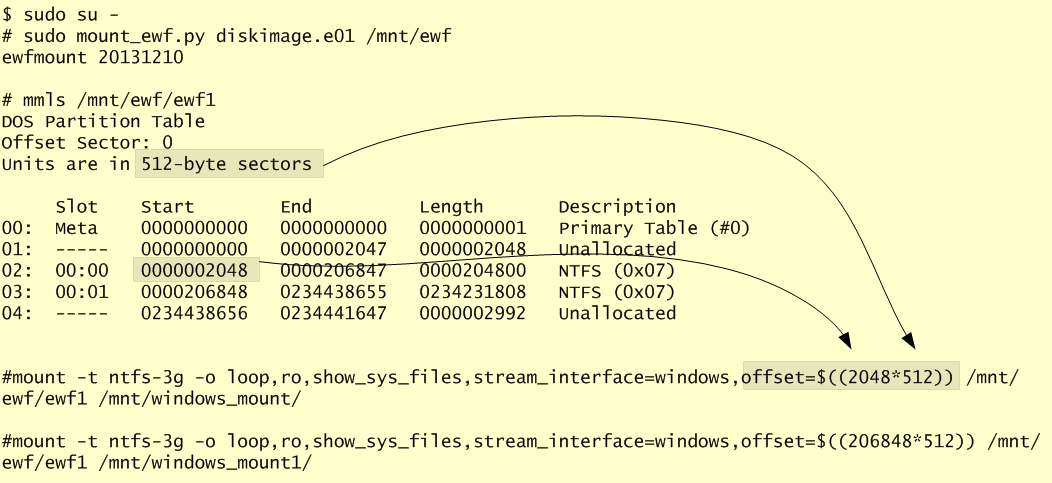
This will take three steps. First we mount the EWF files using mount_ewf.py, then we get the partition layout using mmls and finally we run the mount command. Mount_ewf.py is a script written in Python by David Loveall and available in SIFT workstation that allows us to read the evidence in EWF format and prepare it in a way that can be mounted. Then we use mmls from thesleuthkit written by Brian Carrier to display the partition layout of the physical disk we acquire. With mmls we find the starting sector for each one of the NTFS partitions and we use that value in the mount command. Finally, we use the mount command for each partition we want to mount.
In the mount command we have different flags. The loop suffix allows us to mount disk images. The ro is to ensure we mount the evidence in read only. The show_sys_files is important if we want to see the NTFS metadata. Then the stream_interface=windows is used in order to be able to read data streams such ADS. Finally, the offset is calculated by multiplying the starting sector with the amount of units we have per sector (a.ka. bytes per cluster). The following image illustrate these steps.
After mounting the different partitions into /mnt/windows folder we can see their contents. Because we mount it with the show_sys_files option. we can see the different NTFS metadata files that start with $.

That’s it! The techniques and tools are not new. However, the tools are open source and the techniques are relevant and used in today’s digital forensic analysis. Next step, produce a forensic timeline!
