Tag Archives: getting started

Security Hands-On-Training – Part 2

This article follows the first part of the security hands-on-training series. The focus will be on adding system components to the environment that was built on part one.

After you have setup the host environment with your virtualization software, additional components need to be installed. It is important to install and test one component at a time to minimize complexity and to keep good notes. Document each step and relevant configurations like passwords and IP addresses.

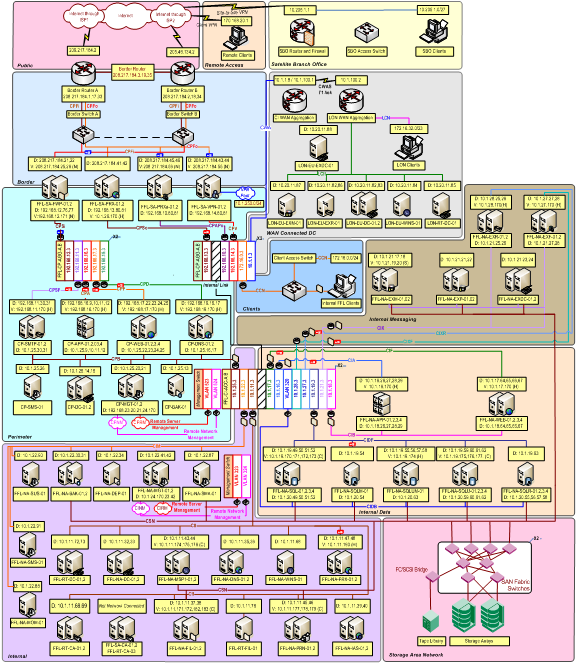
The environment needs Microsoft Windows systems. When building a Windows environment start with a Domain Controller and a Member server (TechNet, 2009). A more complex configuration is described in the Windows Server System Reference Architecture (WSSRA) documentation (Microsoft, 2005). It uses a modular approach that allows users to focus on the scenarios or services that are more relevant for their needs. With overview documents, reference blueprints, architecture blueprints, service blueprints and exhaustive implementation guides that will help the users design and implement IT services based on the use of Windows Server Systems products within the context of a real-world enterprise scenario using a fictitious organization, named Contoso (Microsoft, 2005). This documentation was written in 2005 and considers Windows Server 2003 to build foundational infrastructure services. Even though, the WSSRA is a complex set of guidance spanning more than 3,500 pages and contains more information than what is needed, it is a great guide and helps to build a Windows environment. Over time, the services covered by WSSRA are being updated and replaced with the Infrastructure Planning and Design (IPD) Series which will cover Windows Server 2008 (Microsoft, 2012). Below is the logical diagram that illustrates the infrastructure that is build throughout those guides.

hotsecurity-fig4a

In the small environment that we are building in order to perform hands-on security, two Windows machines were used. After having the first Windows machine deployed with a baseline configuration and device drivers installed from VMware Tools, the reader should sysprep it. Next, shutdown the system, compress it, and save it to a separate folder. This folder will be the repository of ready to deploy gold images. Please consider that the sysprep method is to avoid SID duplications when cloning windows machines. Mark Russinovich explains it perfectly: “The Microsoft-supported way to create a Windows installation that’s ready for deployment to a group of computers is to install Windows on a reference computer and prepare the system for cloning by running the Sysprep tool. This is called generalizing the image, because when you boot an image created using this process, Sysprep specializes the installation by generating a new machine SID, triggering plug-and-play hardware detection, resetting the product activation clock, and setting other configuration data like the new computer name” (Russinovich, 2009). In addition, after finishing the operating system and driver installation, create a snapshot to save the state of the virtual machine which will allow you to return to any point previously saved. This allows the reset of the virtual machines to a known-good previous state without the need to rebuild the systems from scratch.

The scenario that is described trough these article series uses two Windows 2008 Standard edition servers. One will have the role of Domain controller and Primary DNS server. The other will run a web server, a database server and a development framework. To get the Windows 2008 operating system media the reader can download an evaluation copy from Microsoft’s download center portal or from MSDN if it has a MSDN subscription.

The high level steps needed to create the first Windows Server 2008 are described below:

  • Install and configure Windows Server 2008.
  • Install VMware Tools.
  • Execute Sysprep.
  • Shutdown and compress to a golden image.
  • Start the new system and activate it (or use a trial).
  • Assign the VM network adapter to a custom specific network e.g. VMnet3
  • Assign a static IP address, DNS and default gateway in the desired range.
  • Ping the default gateway.
  • Run dcpromo to install Active Directory Domain Services.
  • Choose to install DNS Server and Create a new Domain in a new Forest e.g. ville.com.
  • Create a VM snapshot.

Web Stack

The next step is to build the second windows machine. This machine will be the web stack with a web server, database and a development framework. Using Windows, IIS, SQL Server and ASP.NET is one option. Another popular choice is Linux, Apache, MySQL and PHP. The first option was chosen. After some research the book “Build Your Own ASP.NET 4 Web Site Using C# & VB” was used because it gives a step-by-step approach to build a web stack using ASP.NET framework (Posey, Barnett & Darie, 2011).

The first steps are to install the required software i.e., Visual Web Developer 2010 Express Edition, .NET Framework 4 and the .NET Framework Software Development Kit (SDK), Microsoft SQL Server 2008 R2 Express Edition and SQL Server Management Studio Express  (Posey, Barnett & Darie, 2011).

Then with the web stack ready, the reader can start by creating the first Hello ASP.NET page and getting an understanding how it works in the background. While following the book and advancing trough the chapters to build the web application you will start to get familiar with topics like view state, global configuration, server and client side data validation, visual design and code-behind files, debugging and error handling and interacting with a relational database via ADO.NET (Posey, Barnett & Darie, 2011).

Below are the high level steps needed to do install the Windows Server 2008 and Web Stack:

  • Deploy Windows Server 2008 from previous golden image.
  • Start the new system, define the hostname, admin password and activate it (or use a trial).
  • Assign the VM network adapter to a custom specific network e.g. Vmnet3.
  • Assign a static IP address, DNS and default gateway in the desired range.
  • Ping the default gateway.
  • Join the system to the Domain.
  • Create a VM snapshot.

Next the high level steps to create the web stack by following the Build Your Own ASP.NET 4 Web Site Using C# & VB book  (Posey, Barnett & Darie, 2011).

  • Install IIS 7.x with ASP.NET application development support.
  • Install Visual Studio 2010 Web Express Edition.
  • Install .NET 3.5 SP1.
  • Install KB942288.
  • Install SQL Server 2008 Express R2.
  • Build the ASP.NET application.

Artillery – Tools of the Trade

After having the initial infrastructure in place the reader will need to build an arsenal of tools that will get him well equipped to practice, learn and perform offensive techniques. One of the best suites available is the Kali Linux. This distribution brings the instruments needed in order to execute the steps an intruder will eventually perform during an attack. Depending on the reader’s choice, Kali Linux is available in ISO or VMware image format.  Similarly arsenals are available like the Samurai Web Testing Framework created by Kevin Johnson of Secure Ideas and Justin Searle of UtilSec which focus on web application penetration testing (Johnson). Other alternatives exist such as Pentoo, Matrix, NodeZero, or Katana which consists of a multi-boot DVD that gathers a number of different tools and distributions in a single location (Engebretson, 2013). Moreover, the reader can choose a preferred operating system and start collecting and installing the tools needed depending on the task or technique. In our environment ,Backtrack R5, which is a precursor of Kali, will be used (Security).

Even though the BackTrack distribution is well known in the security community, many of the tools have malicious capabilities, can cause damage and take systems offline. Make sure to keep those tools in a controlled environment and behind a firewall to minimize the possibility of misuse. You never know if the tools have a hidden feature that targets the user system. In some cases, after trying the tools and techniques, the target operating system needs to be rebuilt. This is another area where VMware shines. Rather than physically reinstalling the operating system or application, its original configuration can be easily restored using snapshots.

In this case the BackTrack was installed from the ISO image and positioned into the bridge network as illustrated in part one. The default gateway on the system points to the virtual firewall’s IP address. The installation of BackTrack or Kali is easy and simple and allows the reader to have a ready system with all the tools needed.

Part 3 will describing how the ASP.NET web site code was modified in order to make the application less secure. This will allow us to understand the security techniques employed by the application in order to make it defenseless and practice our security tools and techniques!

References:

TechNet, M. (2009, 06). Step 1: Setting up the infrastructure. Retrieved from http://technet.microsoft.com/en-us/library/dd883274(v=ws.10).aspx
Microsoft. (2005, 12 04). Windows server system reference architecture (wssra). Retrieved from http://www.microsoft.com/en-gb/download/confirmation.aspx?id=15777
Microsoft. (2012, 03 1). Infrastructure planning and design guide series. Retrieved from http://technet.microsoft.com/en-gb/solutionaccelerators/ee382254.aspx
Microsoft. (2013, 11 16). Memory limits for windows releases. Retrieved from http://msdn.microsoft.com/en-us/library/windows/desktop/aa366778(v=vs.85).aspx
Russinovich, M. (2009, 11 3). [Web log message]. Retrieved from http://blogs.technet.com/b/markrussinovich/archive/2009/11/03/3291024.aspx
Posey, T., Barnett, W., & Darie, C. (2011). Build your own asp.net 4 web site using c# & VB, 4th edition. SitePoint
Security, O. (n.d.). Kali Linux. . Retrieved , from http://www.offensive-security.com/community-projects/kali-linux/
Engebretson, P. (2013). the basics of hacking and penetration testing, 2nd edition. Syngress.

Tagged , , , , , ,

Security Hands-on-Training – Part 1

The information security industry will continue to grow in size, density and specialization (Tipton, 2010). The demand for qualified security professionals who possess relevant knowledge and required skills is growing and will increase substantially (Miller, 2012) (Suby, 2013).  The information security discipline is complex and requires continuous investment in training (Suby, 2013). Recently, various articles posted in the media illustrate demand for security professionals (Ballenstedt, 2012). The Cyber workforce has also increased by 600 percent over the last few years. As an example, a search for the phrase “IT Security” on jobserve.com for IT & Telecommunications industry returned over 5000 jobs in UK. As far as the biggest Swiss job portal jobs.ch is concerned, running the same query resulted in over 300 job postings.

That being said, the following question is being raised: How can one help and facilitate the growth of these information security skills? One key method is via training and education. Even though there are plenty of systematic, formalized security training programs, the hands-on training method provides opportunities to practice skills under the most realistic conditions possible (Sisson, 2001). One option is to  build an environment that is designed to mimic real life situations by creating a simple virtual IT infrastructure lab that will allow simulating complex implementations . This creates an environment that will have the flexibility to accommodate changes by adding and removing components at will. This environment will represent real-world security issues with their respective flaws in an interactive, hands-on experience which comes with greater advantage over traditional learning methods because security issues often require substantial hands-on training in order to be understood and mastered (Erickson, 2008). In addition there is the advantage of being in a controlled environment in which unforeseen events are nonexistent or at least minimized (Gregg, 2008). By creating this environment we foster the knowledge and promote learning. Topics such as incident handling, intrusion analysis, system administration, network security, forensics or penetration testing can be practiced, explored and explained.

In order to maintain focused, we need to define a clear scope while creating such an environment. Each one of the aforementioned security domains would take several book volumes to be adequately covered. The environment is flexible enough to allow simulating any of those domains. In this article series we will focus only on familiarizing users with offensive and hacker techniques, attack methods and exploits – all of which the reader can learn, practice at his or her own pace. We won’t focus on the countermeasures or defensive techniques which can be an opportunity for the reader to conduct further research. For example, an incident handling question could be: how could you better prepare and be able to identify such attack methods? Or how could you contain, eradicate and recover from such attacks? This article series aims to provide an introduction and encourage further research using the same or similar environments.

It is important to realize that some of the techniques that will be demonstrated could be used to commit nefarious acts, and this series of articles only provides them so the reader understands how attack methods work. It is also important to understand that as a security professional, readers should only use these methods in an ethical, professional and legal manner (Skoudis & Liston, 2005) (John & Ken, 2004).

The methodology presented creates an environment that will mimic a small business network which will be modified in order to make its defenses weaker or stronger depending on the offensive tools and techniques the reader wants to practice.  In addition, a combined arms approach is used to raise awareness of how combining different tools and techniques can lead to more powerful attacks. Throughout the series of articles the reader is encouraged to practice other scenarios and further explore the techniques and move into more advanced topics.

Get the Environment Ready

Whether the reader is running Linux, Windows or OS X, a virtual environment can be easily build. There are a variety of virtualization systems and hypervisors available. The VMware Workstation was chosen due to personal preference, wide range of operating systems supported, and affordable price. Other open source and commercial solutions are available and the “thehomeserverblog.com” maintained by Don Fountain contains great articles about them.

Use at least two monitors. The system should be equipped with sufficient RAM and fast I/O like SSD drives or USB 3.0 ports. In most cases an average desktop or laptop can run 2 to 3 machines but a more powerful system with 32GB RAM and enough storage can easily perform with 18 VMs. The first system to be deployed should be a 64 bit host operating system e.g., Windows 7 Professional in order to accommodate enough RAM (Microsoft, 2013). Next the hypervisor software is installed. In this case will be VMware workstation 8. The second component that should be built is a virtual firewall that will be the gateway to the isolated and controlled environment. This is important because the reader does not want to practice tools, exploits and other nefarious software in its home or production network (John & Ken, 2004).

The firewall should have several interfaces mapping to different VMnets which will result in having different networking segments protected by firewall rules and routing. The reader can start with a single-arm DMZ. For a more realistic setup, a DMZ screened subnet approach with a dedicated segment for a management network is preferred. Moving beyond this by adding additional tiers of security is always possible at cost of proportional increase of environment complexity and resources. One of the interfaces of the firewall should be the management interface where the management traffic will reside and where the management systems are.  Another interface of the firewall is considered the external. This interface, in the VMware terminology, is configured as Bridge mode. It will connect the environment to the real-world (host network) where the reader might have his wife’s and kid’s laptop plus the wireless and router devices to be able to connect to the Internet.

The environment used here contains a distributed Checkpoint firewall but any other firewall would work. The reader should choose one that he feels comfortable with or one that he would like to learn about.  The distributed Checkpoint installation is made up of two machines: a firewall module and a management station based on SPLAT version R70. Both machines are managed using a Windows server called GUI, that contains the Smart Console client software.

hotsecurity-fig1

To optimize the install, the DHCP server will be disabled and each VMnet will be mapped to an appropriate network range.

In this environment three (3) DMZ networks were created in the firewall. Each DMZ is assigned an RFC1918 IP network range and will be mapped to a different VMware network. Below figure depicts the network diagram and the high level steps to create the environment are described on the end of this article.

hotsecurity-fig2

In terms of firewall rules the environment contains a very simple approach where HTTP traffic is allowed from anywhere to the Web server. This is a typical scenario in a small business network. Then the internal DNS server is allowed to make UDP connections towards a public DNS server. Another rule allows NTP synchronization between the various machines and a public NTP server. Management traffic that allows communicating with the firewall is defined by default as part of the implicit rules. The initial firewall rule base is shown in the figure below.

hotsecurity-fig3

Below are the high level steps that describe how to create the environment:

  1. Install the host operating system e.g. Windows 7 PRO 64bits.
  2. Install VMware Workstation 8.
  3. Configure VMnets using Virtual Network Editor.
  4. Install and configure the Checkpoint Management Station R70 in VMnet4.
  5. Install Windows OS and Checkpoint Smart Tools in VMnet4.
  6. Install Checkpoint Firewall R70.
  7. Configure the Firewall with 4 interfaces.
  8. Configure routing and define the firewall rules.
  9. Test the connectivity among the different subnets.

Part 2 will follow with windows systems and infrastructure.


References:

Suby, M. (2013). The 2013 (isc)2 global information security workforce study. Retrieved from https://www.isc2cares.org/uploadedFiles/wwwisc2caresorg/Content/2013-ISC2-Global-Information-Security-Workforce-Study.pdf
Skoudis, E., & Liston, T. (2005). Counter hack reloaded: A step-by-step guide to computer attacks and effective defenses, second edition. Prentice Hall..
Gregg, M. (2008). Build your own security lab: A field guide for network testing. John Wiley & Sons.
John, A., & Ken, B. (2004). Creating a secure computer virus laboratory. Manuscript submitted for publication EICAR 2004 Conference, Department of Computer Science, University of Calgary.
Erickson, J. (2008). Hacking: The art of exploitation, 2nd edition. No Starch Press.
Tipton, W. Hord, “Preface” Preface (2010). Official (isc)2 guide to the issap cbk. Auerbach Publications.
Miller, J. (2012, 10 31). Napolitano wants nsa-like hiring authority for dhs cyber workforce. Retrieved from http://www.federalnewsradio.com/473/3101703/Napolitano-wants-NSA-like-hiring-authority-for-DHS-cyber-workforce
Ballenstedt, B. (2012, 08 12). Dhs seeks cyber fellows. Retrieved from http://www.nextgov.com/cio-briefing/wired-workplace/2012/11/dhs-seeks-cyber-fellows/59197/?oref=ng-voicestop

Tagged , , , , , ,