Mass mailing or targeted campaigns that use common files to host or exploit code have been and are a very popular vector of attack. In other words, a malicious PDF or MS Office document received via e-mail or opened trough a browser plug-in. In regards to malicious PDF files the security industry saw a significant increase of vulnerabilities after the second half of 2008 which might be related to Adobe Systems release of the specifications, format structure and functionality of PDF files.
Most enterprise networks perimeters are protected and contain several security filters and mechanism that block threats. However, a malicious PDF or MS Office document might be very successful passing trough Firewalls, Intrusion Prevention Systems, Anti-spam, Anti-virus and other security controls. By reaching the victim mailbox, this attack vector will leverage social engineering techniques to lure the user to click/open the document. Then, for example, If the user opens a PDF malicious file, it typically executes JavaScript that exploits a vulnerability when Adobe Reader parses the crafted file. This might cause the application to corrupt memory on the stack or heap causing it to run arbitrary code known as shellcode. This shellcode normally downloads and executes a malicious file from the Internet. The Internet Storm Center Handler Bojan Zdrnja wrote a good summary about one of these shellcodes. In some circumstances the vulnerability could be exploited without opening the file and just by having a malicious file on the hard drive as described by Didier Stevens.
From a 100 feet view a PDF file is composed by a header , body, reference table and trailer. One key component is the body which might contains all kinds of content type objects that make parsing attractive for vulnerability researchers and exploit developers. The language is very rich and complex which means the same information can be encoded and obfuscated in many ways. For example, within objects there are streams that can be used to store data of any type of size. These streams are compressed and the PDF standard supports several algorithms including ASCIIHexDecode, ASCI85Decode, LZWDecode, FlateDecode, RunLengthDecode, CCITTFaxDecode, DCTCDecode called Filters. PDF files can contain multimedia content and support JavaScript and ActionScript trough Flash objects. Usage of JavaScript is a popular vector of attack because it can be hidden in the streams using different techniques making detection harder. In case the PDF file contains JavaScript, the malicious code is used to trigger a vulnerability and to execute shellcode. All this features and capabilities are translated in a huge attack surface!
From a security incident response perspective the knowledge about how to do a detailed analysis of such malicious files can be quite useful. When analyzing this kind of files an incident handler can determine the worst it can do, its capabilities and key characteristics. Furthermore, it can help to be better prepared and identify future security incidents and how to contain, eradicate and recover from those threats.
So, which steps could an incident handler or malware analyst perform to analyze such files?
In case of a malicious PDF files there are 5 steps. By using REMnux distro the steps are described by Lenny Zeltser as being:
- Find and Extract Javascript
- Deobfuscate Javascript
- Extract the shellcode
- Create a shellcode executable
- Analyze shellcode and determine what is does.
A summary of tools and techniques using REMnux to analyze malicious documents are described in the cheat sheet compiled by Lenny, Didier and others. In order to practice these skills and to illustrate an introduction to the tools and techniques, below is the analysis of a malicious PDF using these steps.
The other day I received one of those emails that was part of a mass mailing campaign. The email contained an attachment with a malicious PDF file that took advantage of Adobe Reader Javascript engine to exploit CVE-2013-2729. This vulnerability found by Felipe Manzano exploits an integer overflow in several versions of the Adobe Reader when parsing BMP files compressed with RLE8 encoded in PDF forms. The file on Virus Total was only detected by 6 of the 55 AV engines. Let’s go through each one of the mentioned steps to find information on the malicious PDF key characteristics and its capabilities.
1st Step – Find and extract JavaScript
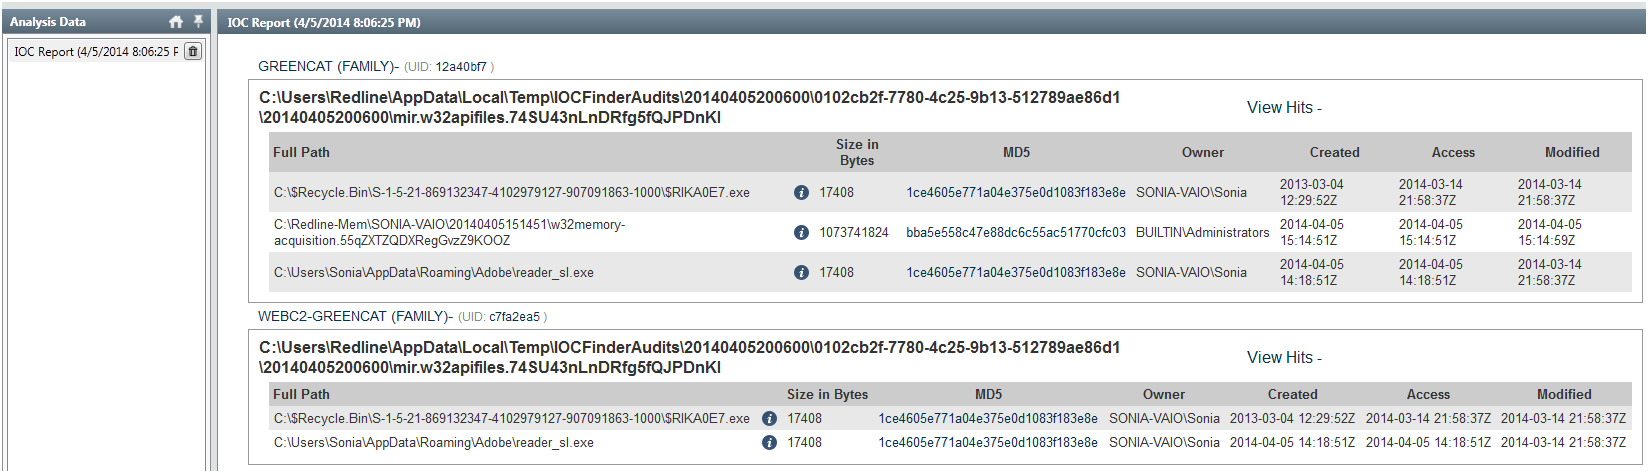
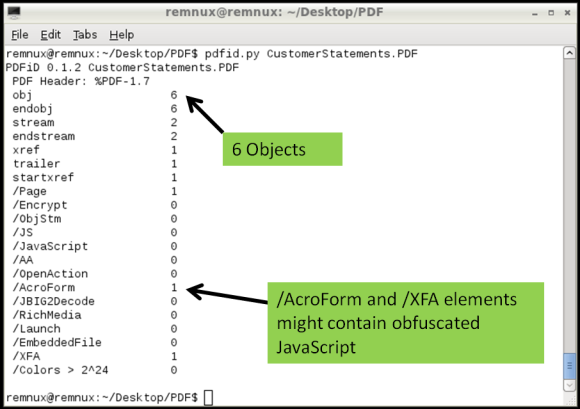
One technique is using Didier Stevens suite of tools to analyze the content of the PDF and look for suspicious elements. One of those tools is Pdfid which can show several keywords used in PDF files that could be used to exploit vulnerabilities. The previously mentioned cheat sheet contain some of these keywords. In this case the first observations shows the PDF file contains 6 objects and 2 streams. No JavaScript mentioned but it contains /AcroForm and /XFA elements. This means the PDF file contains XFA forms which might indicate it is malicious.
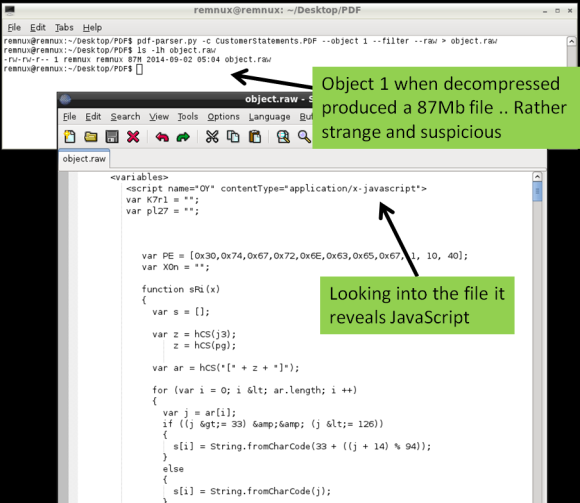
Then looking deeper we can use pdf-parser.py to display the contents of the 6 objects. The output was reduced for the sake of brevity but in this case the Object 2 is the /XFA element that is referencing to Object 1 which contains a stream compressed and rather suspicious.

Following this indicator pdf-parser.py allows us to show the contents of an object and pass the stream trough one of the supporter filters (FlateDecode, ASCIIHexDecode, ASCII85Decode, LZWDecode and RunLengthDecode only) trough the –filter switch. The –raw switch allows to show the output in a easier way to read. The output of the command is redirected to a file. Looking at the contents of this file we get the decompressed stream. When inspecting this file you will see several lines of JavaScript that weren’t on the original PDF file. If this document is opened by a victim the /XFA keyword will execute this malicious code.
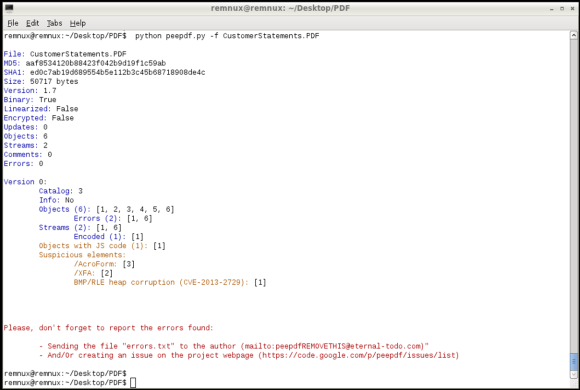
Another fast method to find if the PDF file contains JavaScript and other malicious elements is to use the peepdf.py tool written by Jose Miguel Esparza. Peepdf is a tool to analyze PDF files, helping to show objects/streams, encode/decode streams, modify all of them, obtain different versions, show and modify metadata, execution of Javascript and shellcodes. When running the malicious PDF file against the last version of the tool it can show very useful information about the PDF structure, its contents and even detect which vulnerability it triggers in case it has a signature for it.
2nd Step – Deobfuscate Javascript
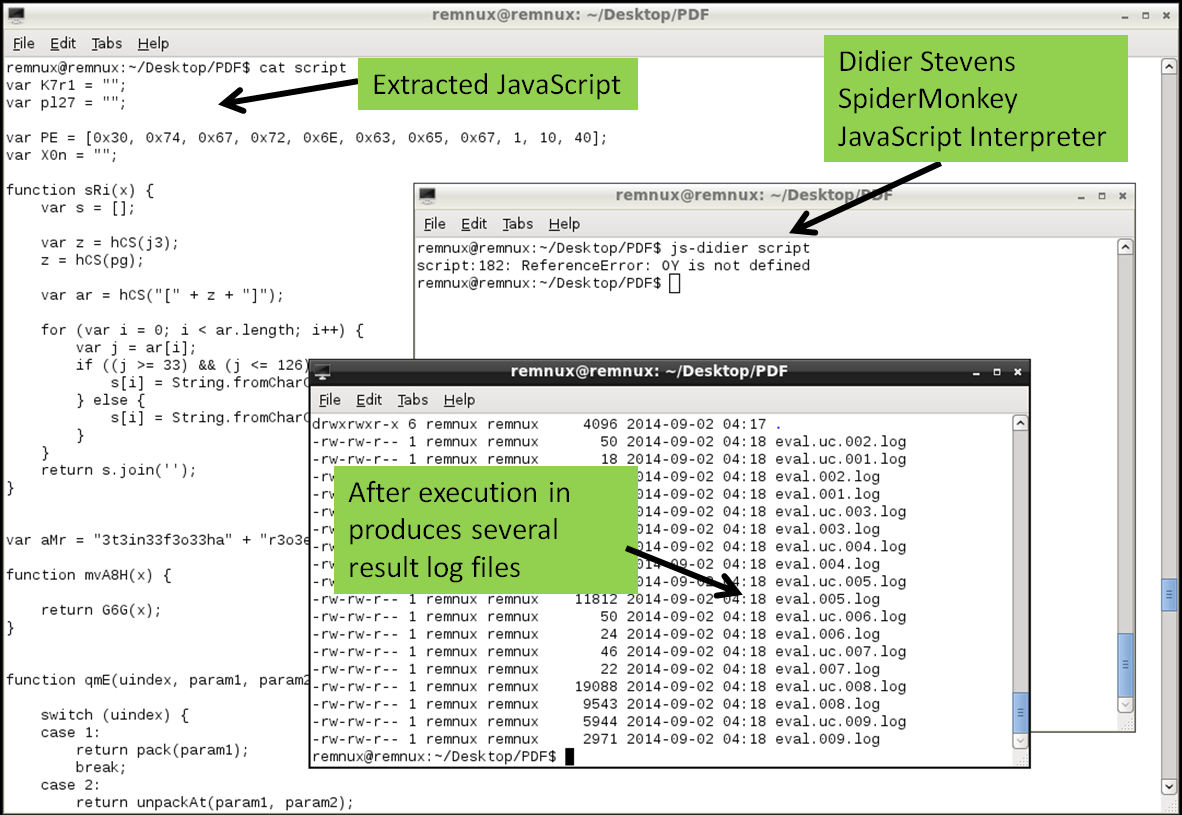
The second step is to deobfuscate the JavaScript. JavaScript can contain several layers of obfuscation. in this case there was quite some manual cleanup in the extracted code just to get the code isolated. The object.raw contained 4 JavaScript elements between <script xxxx contentType=”application/x-javascript”> tags and 1 image in base64 format in <image> tag. This JavaScript code between tags needs to be extracted and place into a separated file. The same can be done for the chunk of base64 data, when decoded will produce a 67Mb BMP file. The JavaScript in this case was rather cryptic but there are tools and techniques that help do the job in order to interpret and execute the code. In this case I used another tool called js-didier.pl which is a Didier version of the JavaScript interpreter SpiderMonkey. It is essentially a JavaScript interpreter without the browser plugins that you can run from the command line. This allows to run and analyze malicious JavaScript in a safe and controlled manner. The js-didier tool, just like SpiderMonkey, will execute the code and prints the result into files named eval.00x.log. I got some errors on one of the variables due to the manual cleanup but was enough to produce several eval log files with interesting results.

3rd Step – Extract the shellcode
The third step is to extract the shellcode from the deobfuscated JavaScript. In this case the eval.005.log file contained the deobfuscated JavaScript. The file among other things contains 2 variables encoded as Unicode strings. This is one trick used to hide or obfuscate shellcode. Typically you find shellcode in JavaScript encoded in this way.
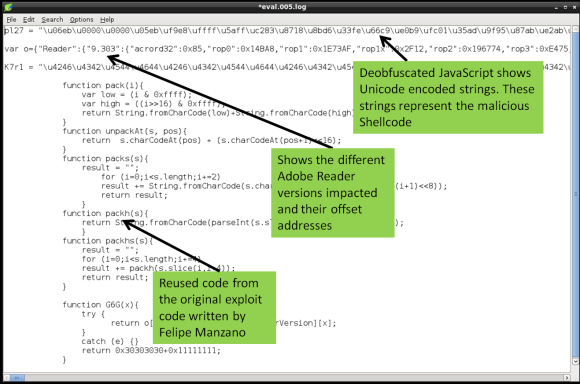
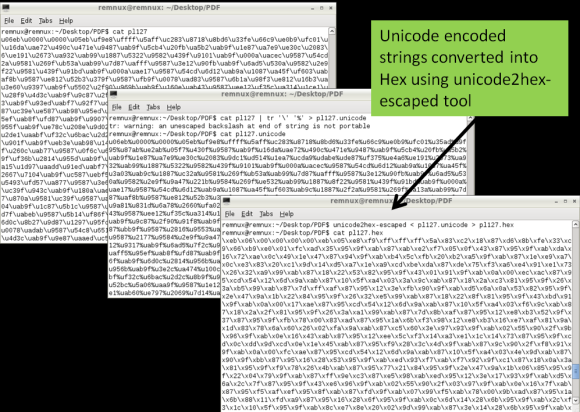
These Unicode encoded strings need to be converted into binary. To perform this isolate the Unicode encoded strings into a separated file and convert it the Unicode (\u) to hex (\x) notation. To do this you need using a series of Perl regular expressions using a Remnux script called unicode2hex-escaped. The resulting file will contain the shellcode in a hex format (“\xeb\x06\x00\x00..”) that will be used in the next step to convert it into a binary
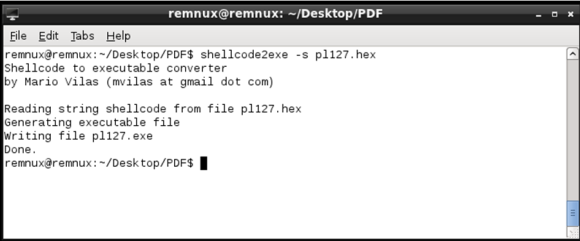
4th Step – Create a shellcode executable
Next with the shellcode encoded in hexadecimal format we can produce a Windows binary that runs the shellcode. This is achieved using a script called shellcode2exe.py written by Mario Vilas and later tweaked by Anand Sastry. As Lenny states ” The shellcode2exe.py script accepts shellcode encoded as a string or as raw binary data, and produces an executable that can run that shellcode. You load the resulting executable file into a debugger to examine its. This approach is useful for analyzing shellcode that’s difficult to understand without stepping through it with a debugger.”
5th Step – Analyze shellcode and determine what is does.
Final step is to determine what the shellcode does. To analyze the shellcode you could use a dissasembler or a debugger. In this case the a static analysis of the shellcode using the strings command shows several API calls used by the shellcode. Further also shows a URL pointing to an executable that will be downloaded if this shellcode gets executed
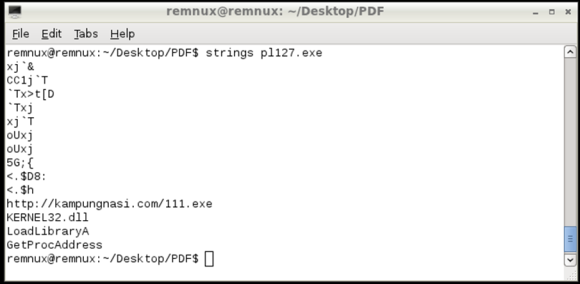
We now have a strong IOC that can be used to take additional steps in order to hunt for evil and defend the networks. This URL can be used as evidence and to identify if machines have been compromised and attempted to download the malicious executable. At the time of this analysis the file was no longer there but its known to be a variant of the Game Over Zeus malware.
The steps followed are manual but with practice they are repeatable. They just represent a short introduction to the multifaceted world of analyzing malicious documents. Many other techniques and tools exist and much deeper analysis can be done. The focus was to demonstrate the 5 Steps that can be used as a framework to discover indicators of compromise that will reveal machines that have been compromised by the same bad guys. However using these 5 steps many other questions could be answered. Using the mentioned and other tools and techniques within the 5 steps we can have a better practical understanding on how malicious documents work and which methods are used by Evil. Two great resource for this type of analysis is the Malware Analyst’s Cookbook : Tools and Techniques for Fighting Malicious Code book from Michael Ligh and the SANS FOR610: Reverse-Engineering Malware: Malware Analysis Tools and Technique authored by Lenny Zeltser.
Download link for the malicious PDF file: https://0x0.st/sZyY.zip . MD5: 4f275c936b0772c969b2daf4688b7fc9
Password: infected


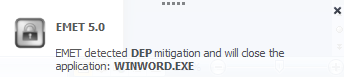 This is a free product from Microsoft for the endpoint and will prevent the execution of the attacks described previously and many others. Exploit mitigation technologies do not guarantee that vulnerabilities cannot be exploited. However, they raise the bar and increase the costs for the attacker to make exploitation successful by making it harder to be executed. On a windows 7 SP1 with EMET 5, when opening the documents and running the malicious VBA macros, EMET would prevent its execution.