[The PlugX malware family has always intrigued me. I was curious to look at one variant. Going over the Internet and the research articles and blogs about it I came across the research made by Fabien Perigaud. From here I got an old PlugX builder. Then I set a lab that allowed me to get insight about how an attacker would operate a PlugX campaign. In this post, l will cover a brief overview about the PlugX builder, analyze and debug the malware installation and do a quick look at the C2 traffic. ~LR]
PlugX is commonly used by different threat groups on targeted attacks. PlugX is also refered as KORPLUG, SOGU, DestroyRAT and is a modular backdoor that is designed to rely on the execution of signed and legitimated executables to load malicious code. PlugX, normally has three main components, a DLL, an encrypted binary file and a legitimate and signed executable that is used to load the malware using a technique known as DLL search order hijacking. But let’s start with a quick overview about the builder.
The patched builder, MD5 6aad032a084de893b0e8184c17f0376a, is an English version, from Q3 2013, of the featured-rich and modular command & control interface for PlugX that allows an operator to:
- Build payloads, set campaigns and define the preferred method for the compromised hosts to check-in and communicate with the controller.
- Proxy connections and build a tiered C2 communication model.
- Define persistence mechanisms and its attributes.
- Set the process(s) to be injected with the payload.
- Define a schedule for the C2 call backs.
- Enable keylogging and screen capture.
- Manage compromises systems per campaign.
Then for each compromised system, the operator has extensive capabilities to interact with the systems over the controller that includes the following modules:
- Disk module allows the operator to write, read, upload, download and execute files.
- Networking browser module allows the operator to browse network connections and connect to another system via SMB.
- Process module to enumerate, kill and list loaded modules per process.
- Services module allows the operator to enumerate, start, stop and changing booting properties
- Registry module allows the operator to browse the registry and create, delete or modify keys.
- Netstat module allows the operator to enumerate TCP and UDP network connections and the associated processes
- Capture module allows the operator to perform screen captures
- Control plugin allows the operator to view or remote control the compromised system in a similar way like VNC.
- Shell module allows the operator to get a command line shell on the compromised system.
- PortMap module allows the operator to establish port forwarding rules.
- SQL module allows the operator to connect to SQL servers and execute SQL statements.
- Option module allows the operator to shut down, reboot, lock, log-off or send message boxes.
- Keylogger module captures keystrokes per process including window titles.
The picture below shows the Plug-X C2 interface.

So, with this we used the builder functionality to define the different settings specifying C2 comms password, campaign, mutex, IP addresses, installation properties, injected binaries, schedule for call-back, etc. Then we build our payload. The PlugX binary produced by this version of the builder (LZ 2013-8-18) is a self-extracting RAR archive that contains three files. This is sometimes referred in the literature as the PlugX trinity payload. Executing the self-extracting RAR archive will drop the three files to the directory chosen during the process. In this case “%AUTO%/RasTls”. The files are: A legitimate signed executable from Kaspersky AV solution named “avp.exe”, MD5 e26d04cecd6c7c71cfbb3f335875bc31, which is susceptible to DLL search order hijacking . The file “avp.exe” when executed will load the second file: “ushata.dll”, MD5 728fe666b673c781f5a018490a7a412a, which in this case is a DLL crafted by the PlugX builder which on is turn will load the third file. The third file: “ushata.DLL.818”, MD5 “21078990300b4cdb6149dbd95dff146f” contains obfuscated and packed shellcode.

So, let’s look at the mechanics of what happens when the self-extracting archive is executed. The three files are extracted to a temporary directory and “avp.exe” is executed. The “avp.exe” when executed will load “ushata.dll” from the running directory due to the DLL search order hijacking using Kernel32.LoadLibrary API.

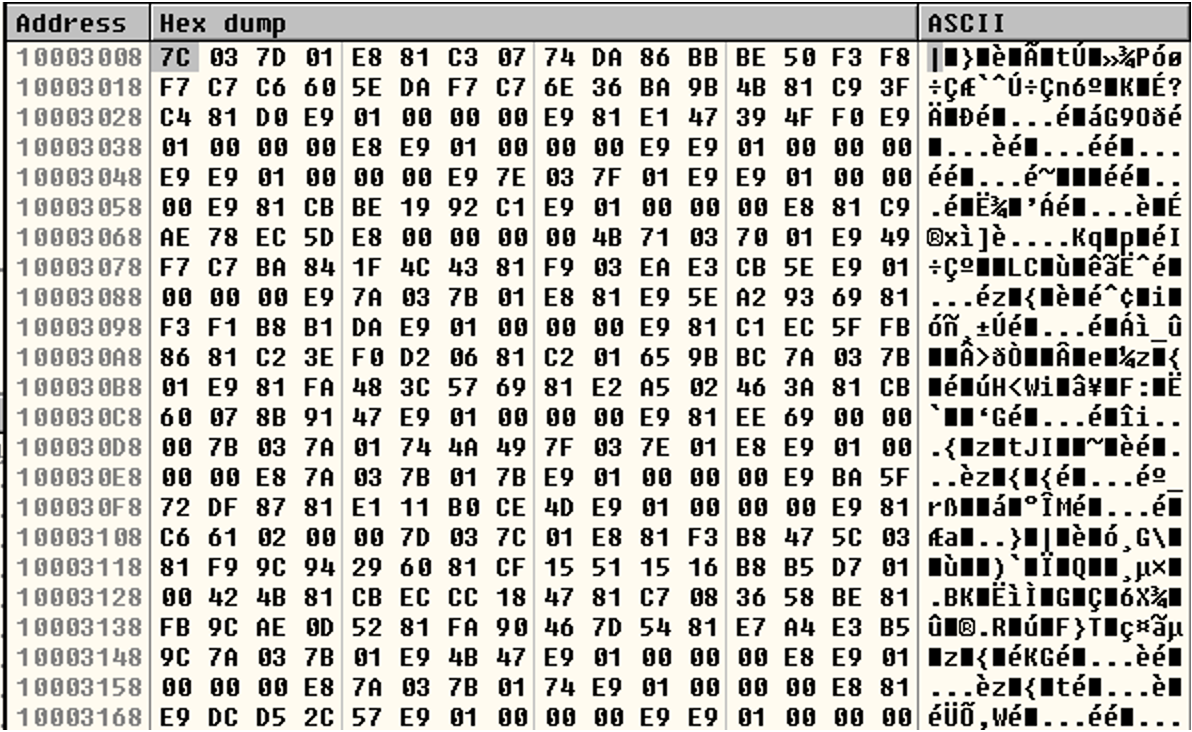
Then “ushata.dll” DLL entry point is executed. The DLL entry point contains code that verifies if the system date is equal or higher than 20130808. If yes it will get a handle to “ushata.DLL.818”, reads its contents into memory and changes the memory address segment permissions to RWX using Kernel32.VirtualProtect API. Finally, returns to the first instruction of the loaded file (shellcode). The file “ushata.DLL.818” contains obfuscated shellcode. The picture below shows the beginning of the obfuscated shellcode.
The shellcode unpacks itself using a custom algorithm. This shellcode contains position independent code. Figure below shows the unpacked shellcode.
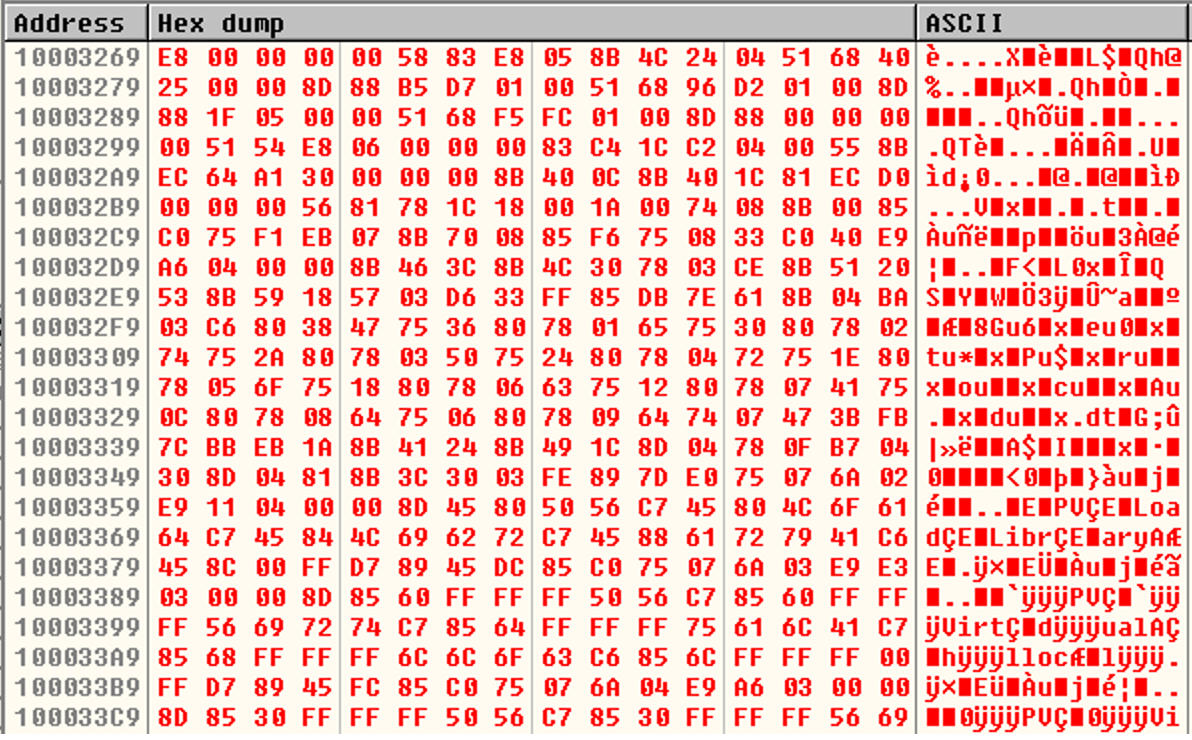
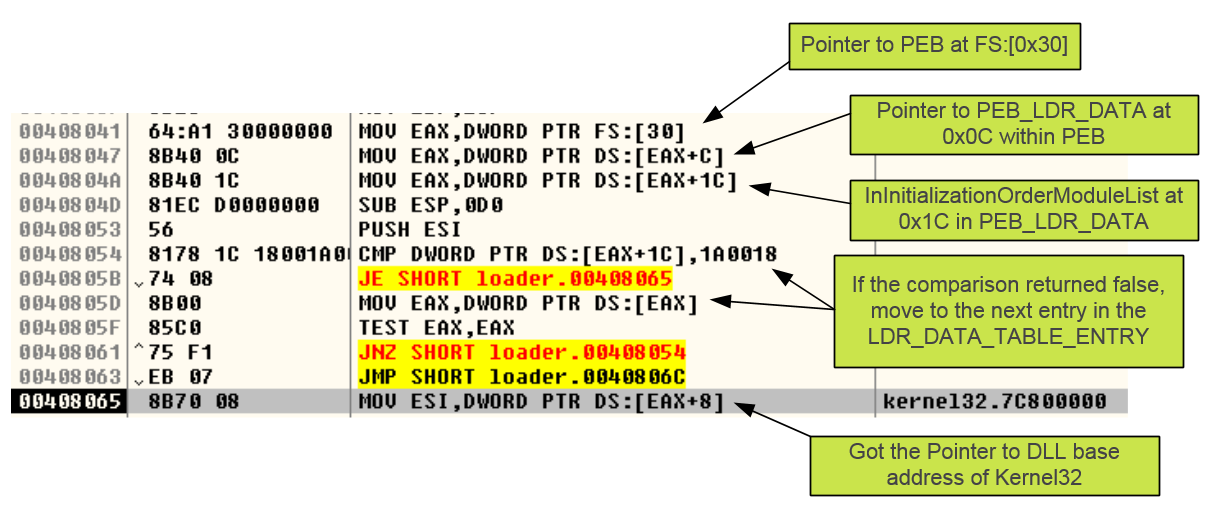
The shellcode starts by locating the kernel32.dll address by accessing the Thread Information Block (TIB) that contains a pointer to the Process Environment Block (PEB) structure. Figure below shows a snippet of the shellcode that contains the different sequence of assembly instructions for the code to find the Kernel32.dll.
It then reads kernel32.dll export table to locate the desired Windows API’s by comparing them with stacked strings. Then, the shellcode decompresses a DLL (offset 0x784) MD5 333e2767c8e575fbbb1c47147b9f9643, into memory using the LZNT1 algorithm by leveraging ntdll.dll.RtlDecompressBuffer API. The DLL contains the PE header replaced with the “XV” value. Restoring the PE header signature allows us to recover the malicious DLL.

Next, the payload will start performing different actions to achieve persistence. On Windows 7 and beyond, PlugX creates a folder “%ProgramData%\RasTl” where “RasTl” matches the installation settings defined in the builder. Then, it changes the folder attributes to “SYSTEM|HIDDEN” using the SetFileAttributesW API. Next, copies its three components into the folder and sets all files with the “SYSTEM|HIDDEN” attribute.
![]()
The payload also modifies the timestamps of the created directory and files with the timestamps obtained from ntdll.dll using the SetFileTime API.

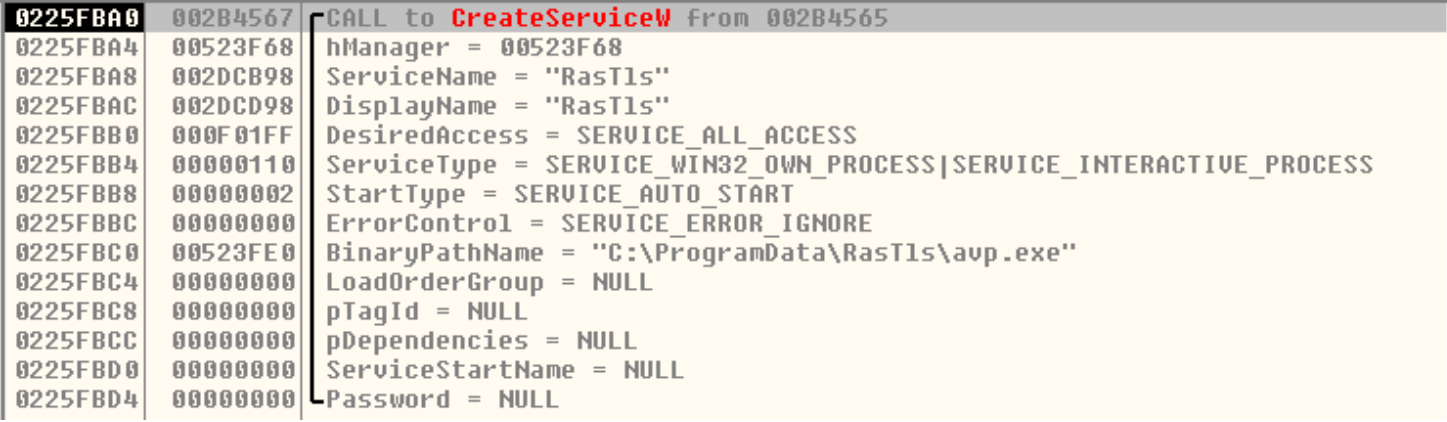
Then it creates the service “RasTl” where the ImagePath points to “%ProgramData%\RasTl\avp.exe”
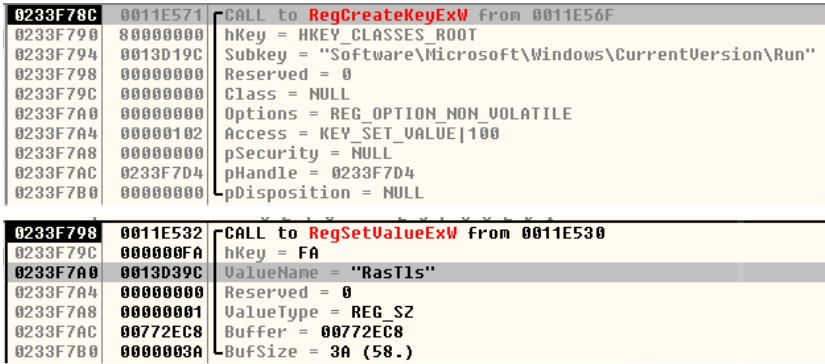
If the malware fails to start the just installed service, it will delete it and then it will create a persistence mechanism in the registry by setting the registry value “C:\ProgramData\RasTls\avp.exe” to the key “HKLM\SOFTWARE\Classes\SOFTWARE\Microsoft\Windows\CurrentVersion\Run\RasTls” using the RegSetValueExW API.
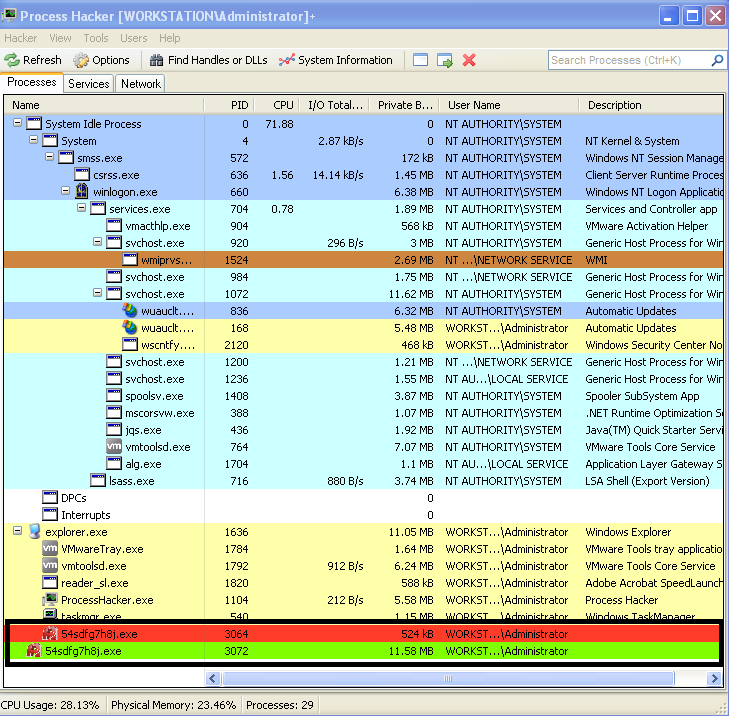
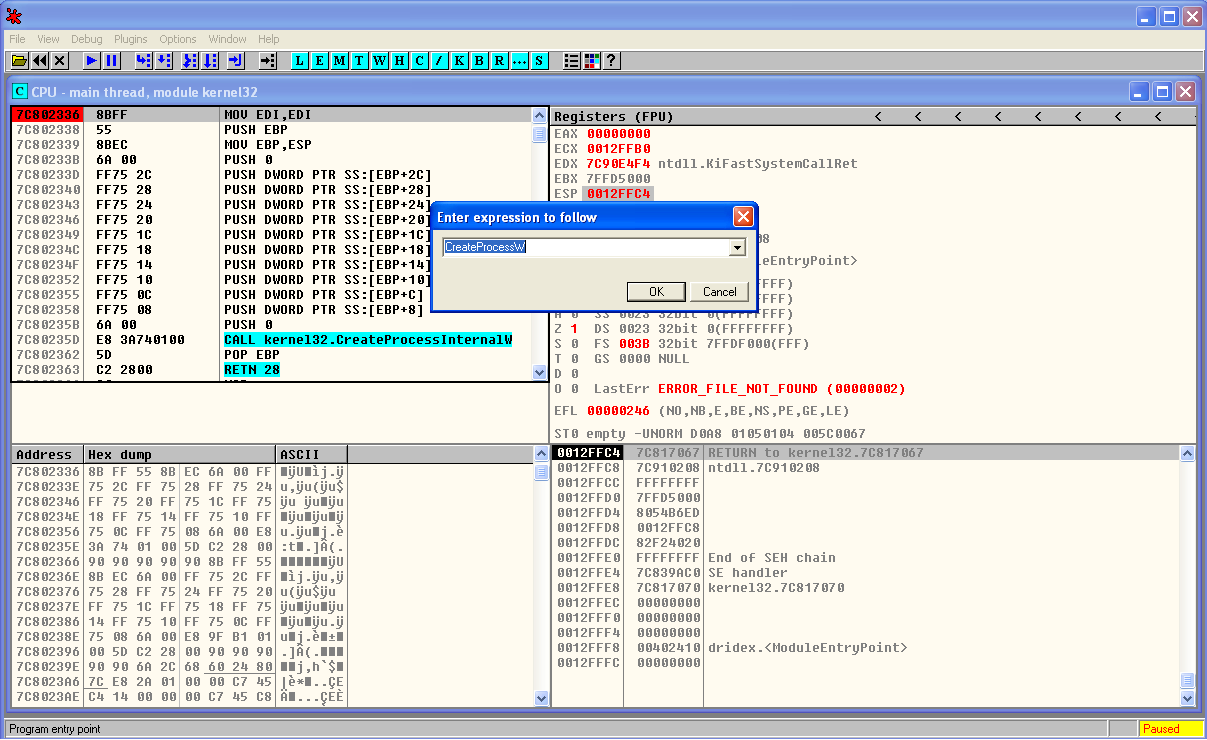
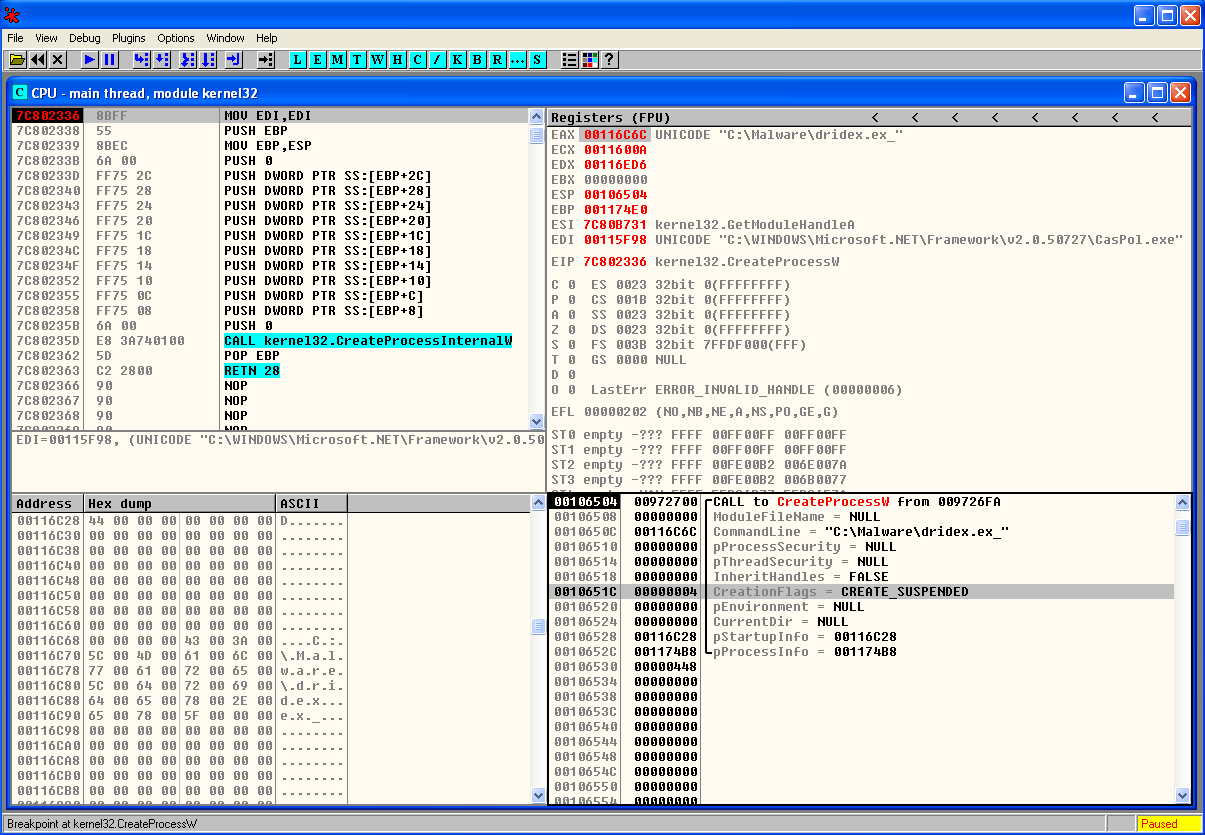
If the builder options had the Keylogger functionality enabled, then it may create a file with a random name such as “%ProgramData%\RasTl\rjowfhxnzmdknsixtx” that stores the key strokes. If the payload has been built with Screen capture functionality, it may create the folder “%ProgramData%\RasTl \RasTl\Screen” to store JPG images in the format <datetime>.jpg that are taken at the frequency specified during the build process. The payload may also create the file “%ProgramData%\DEBUG.LOG” that contains debugging information about its execution (also interesting that during execution the malware outputs debug messages about what is happening using the OutputDebugString API. This messages could be viewed with DebugView from SysInternals). The malicious code completes its mission by starting a new instance of “svchost.exe” and then injects the malicious code into svchost.exe process address space using process hollowing technique. The pictures below shows the first step of the process hollowing technique where the payload creates a new “svchost.exe” instance in SUSPENDED state.

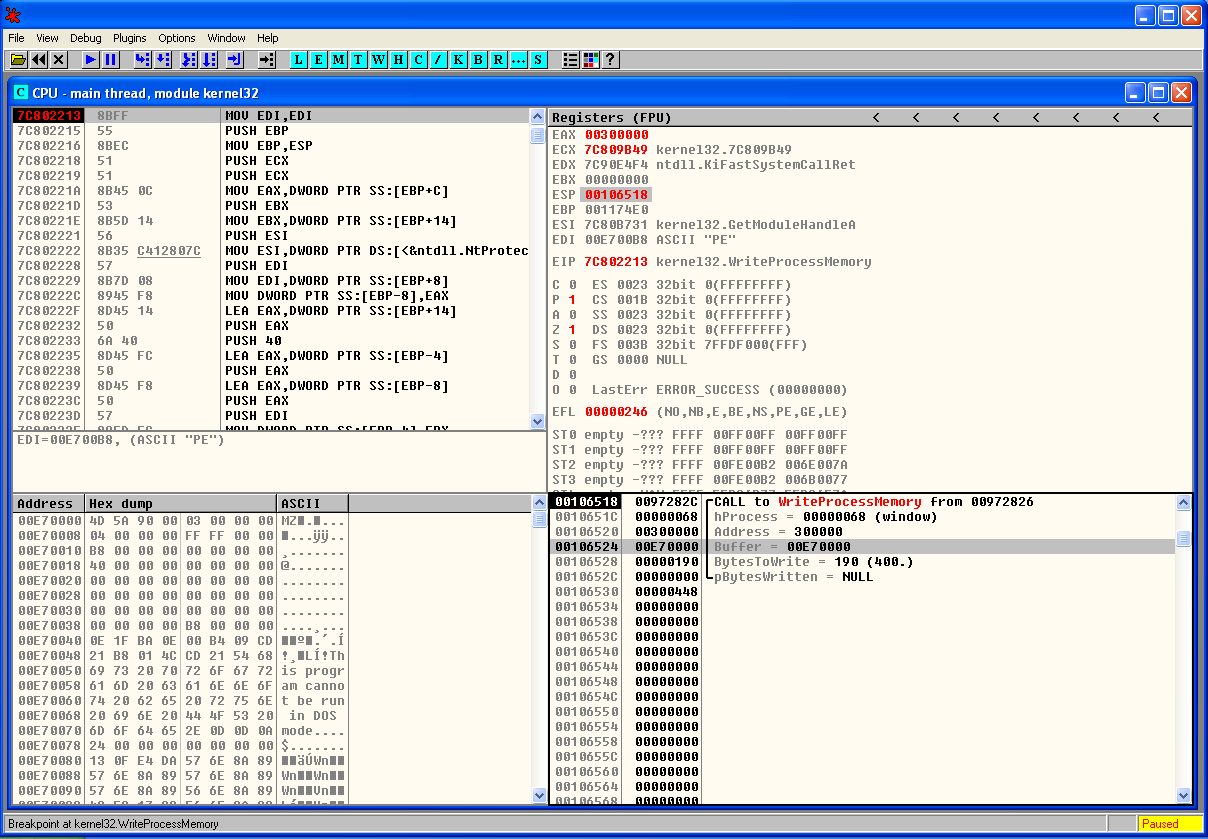
and then uses WriteProcessMemory API to inject the malicious payload

Then the main thread, which is still in suspended state, is changed in order to point to the entry point of the new image base using the SetThreadContext API. Finally, the ResumeThread API is invoked and the malicious code starts executing. The malware also has the capabilities to bypass User Account Control (UAC) if needed. From this moment onward, the control is passed over “svchost.exe” and Plug-X starts doing its thing. In this case we have the builder so we know the settings which were defined during building process. However, we would like to understand how could we extract the configuration settings. During Black Hat 2014, Takahiro Haruyama and Hiroshi Suzuki gave a presentation titled “I know You Want Me – Unplugging PlugX” where the authors go to great length analyzing a variety of PlugX samples, its evolution and categorizing them into threat groups. But better is that the Takahiro released a set of PlugX parsers for the different types of PlugX samples i.e, Type I, Type II and Type III. How can we use this parser? The one we are dealing in this article is considered a PlugX type II. To dump the configuration, we need to use Immunity Debugger and use the Python API. We need to place the “plugx_dumper.py” file into the “PyCommands” folder inside Immunity Debugger installation path. Then attached the debugger to the infected process e.g, “svchost.exe” and run the plugin. The plugin will dump the configuration settings and will also extract the decompressed DLL
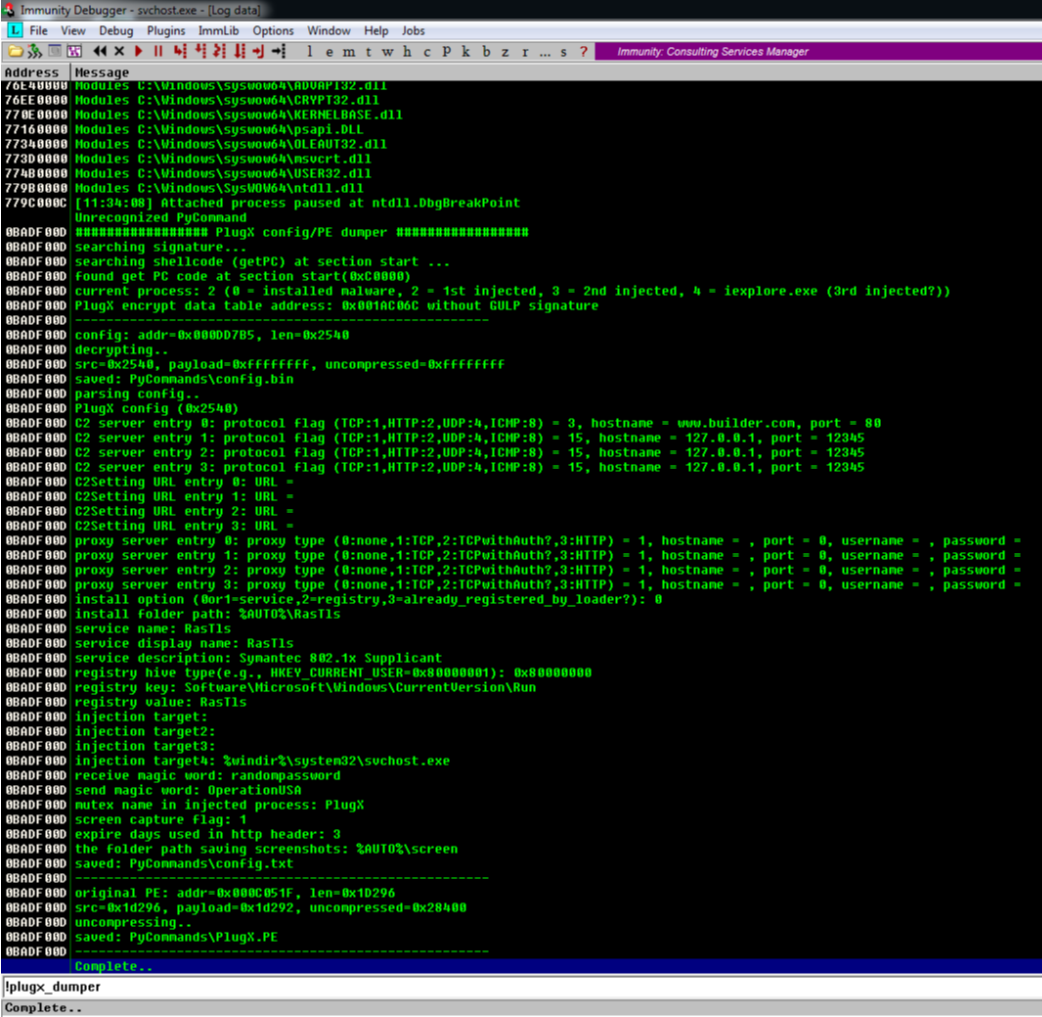
We can see that this parser is able to find the injected shellcode, decode its configuration and all the settings an attacker would set on the builder and also dump the injected DLL which contains the core functionality of the malware.
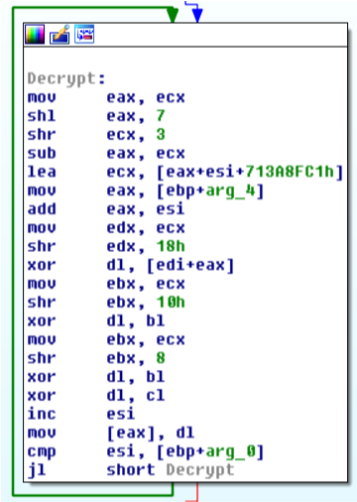
In terms of networking, as observed in the PlugX controller, the malware can be configured to speak with a controller using several network protocols. In this case we configured it to speak using HTTP on port 80. The network traffic contains a 16-byte header followed by a payload. The header is encoded with a custom routine and the payload is encoded and compressed with LZNT1. Far from a comprehensive analysis we launched a Shell prompt from the controller, typed command “ipconfig” and observed the network traffic. In parallel, we attached a debugger to “svchost.exe” and set breakpoints: on Ws2_32.dll!WSASend and Ws2_32.dll!WSARecv to capture the packets ; on ntdll.dll!RtlCompressBuffer and ntdll.dll!RtlDecompressBuffer to view the data before and after compression. ; On custom encoding routine to view the data before and after. The figure below shows a disassemble listing of the custom encoding routine.
So, from a debugger view, with the right breakpoints we could start to observe what is happening. In the picture below, on the left-hand side it shows the packet before encoding and compression. It contains a 16-byte header, where the first 4-bytes are the key for the custom encoding routine. The next 4-bytes are the flags which contain the commands/plugins being used. Then the next 4-bytes is the size. After the header there is the payload which in this case contains is output of the ipconfig.exe command. On the right-hand side, we have the packet after encoding and compressing. It contains the 16-byte header encoded following by the payload encoded and compressed.

Then, the malware uses WSASend API to send the traffic.

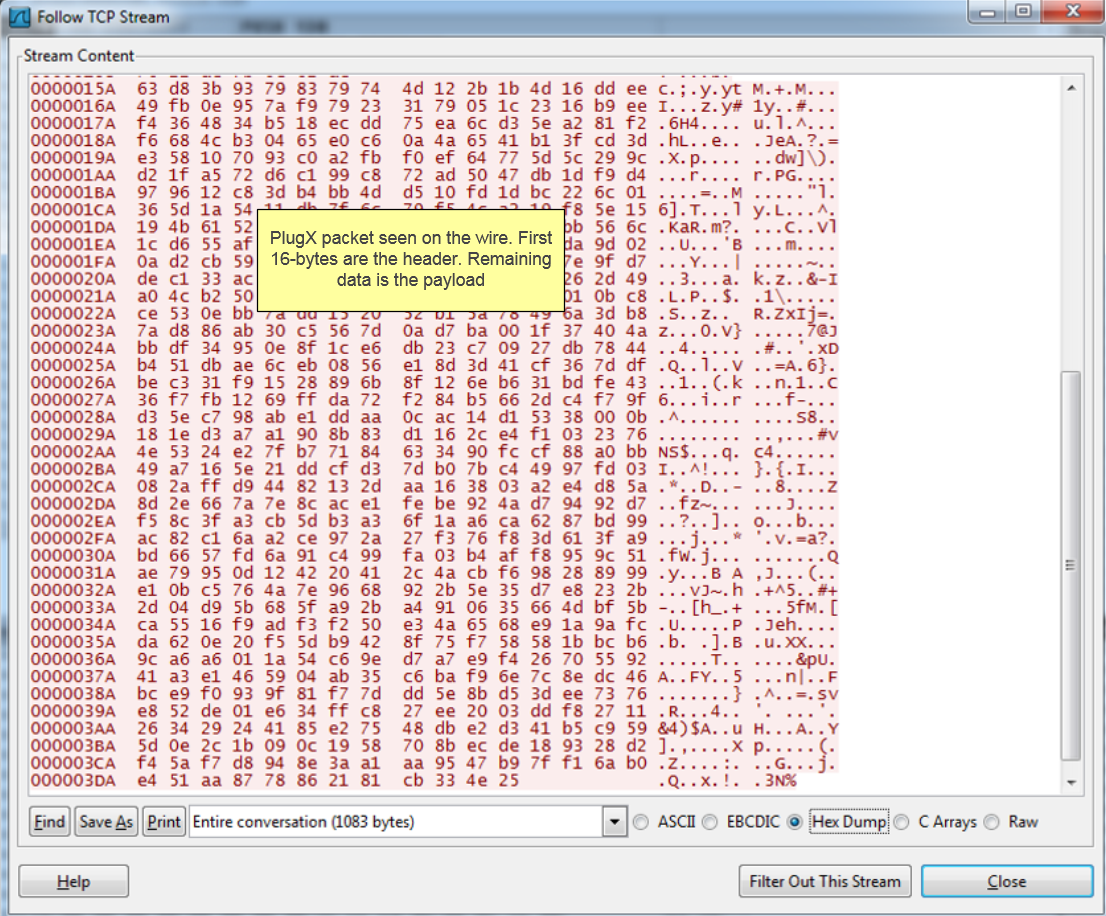
Capturing the traffic, we can observe the same data.
On the controller side, when the packet arrives, the header will be decoded and then the payload will be decoded and decompressed. Finally, the output is showed to the operator.

Now that we started to understand how C2 traffic is handled, we can capture it and decode it. Kyle Creyts has created a PlugX decoder that supports PCAP’s. The decoder supports decryption of PlugX Type I.But Fabien Perigaud reversed the Type II algorithm and implemented it in python. If we combine Kyle’s work with the work from Takahiro Haruyama and Fabien Perigaud we could create a PCAP parser to extract PlugX Type II and Type III. Below illustrates a proof-of-concept for this exercise against 1 packet. We captured the traffic and then used a small python script to decrypt a packet. No dependencies on Windows because it uses the herrcore’s standalone LZNT1 implementation that is based on the one from the ChopShop protocol analysis and decoder framework by MITRE.

That’s it for today! We build a lab with a PlugX controller, got a view on its capabilities. Then we looked at the malware installation and debugged it in order to find and interpret some of its mechanics such as DLL search order hijacking, obfuscated shellcode, persistence mechanism and process hollowing. Then, we used a readily available parser to dump its configuration from memory. Finally, we briefly looked the way the malware communicates with the C2 and created a small script to decode the traffic. Now, with such environment ready, in a controlled and isolated lab, we can further simulate different tools and techniques and observe how an attacker would operate compromised systems. Then we can learn, practice at our own pace and look behind the scenes to better understand attack methods and ideally find and implement countermeasures.
References:
Analysis of a PlugX malware variant used for targeted attacks by CRCL.lu
Operation Cloud Hopper by PWC
PlugX Payload Extraction by Kevin O’Reilly
Other than the authors and articles cited troughout the article, a fantastic compilation about PlugX articles and papers since 2011 is available here.
Credits: Thanks to Michael Bailey who showed me new techniques on how to deal with shellcode which I will likely cover on a post soon.